
Japanese Milk Buns with Fillings
Japanese Milk Buns are like clouds you can eat — only fluffier, sweeter, and possibly stuffed with red bean, custard, or chocolate. Soft, pillowy, and always hiding a sweet surprise inside just like the ones from Hokkaido bakeries. Once you try them with filling, plain bread will feel like a betrayal.

If you’re obsessed with soft, cloud-like breads—think Beef Floss Rolls, Roti Sisir Pandan, or Korean Sausage Bread—you’re in for a treat with these Japanese Milk Buns. They’re a softer, fluffier cousin of classic Japanese milk bread, made even more irresistible thanks to a secret ingredient: mashed potatoes! No tangzhong needed, but you still get that same melt-in-your-mouth texture.
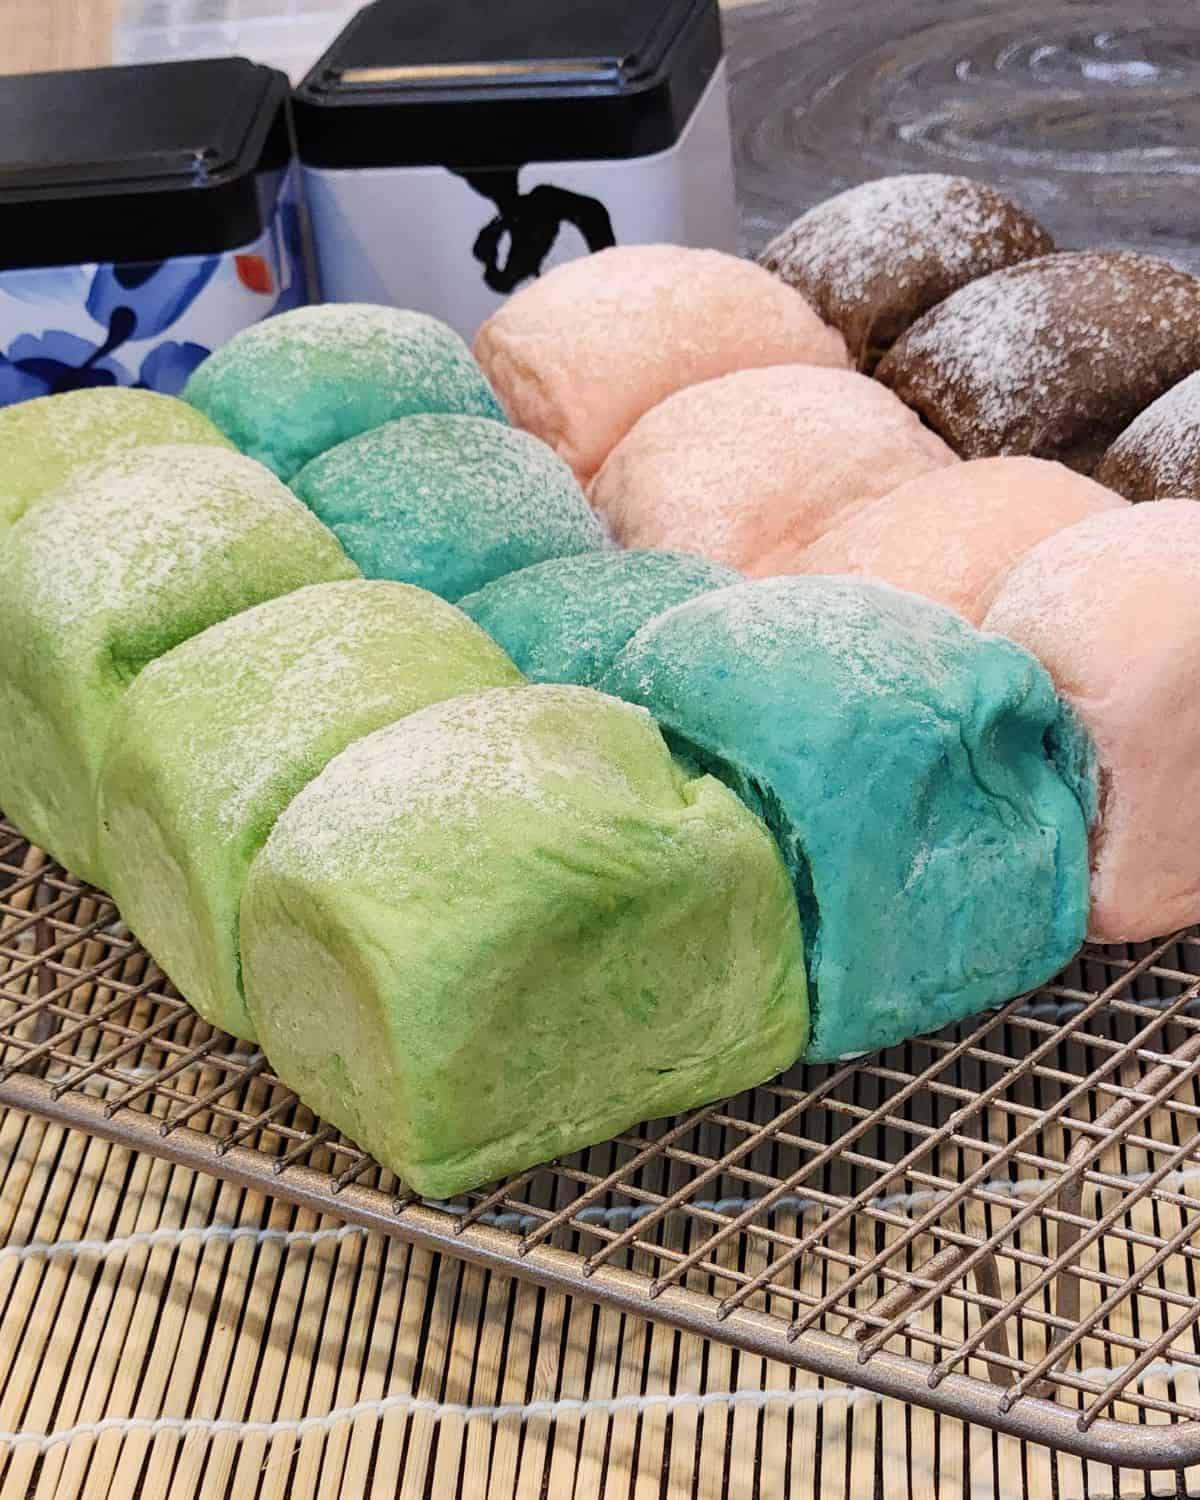
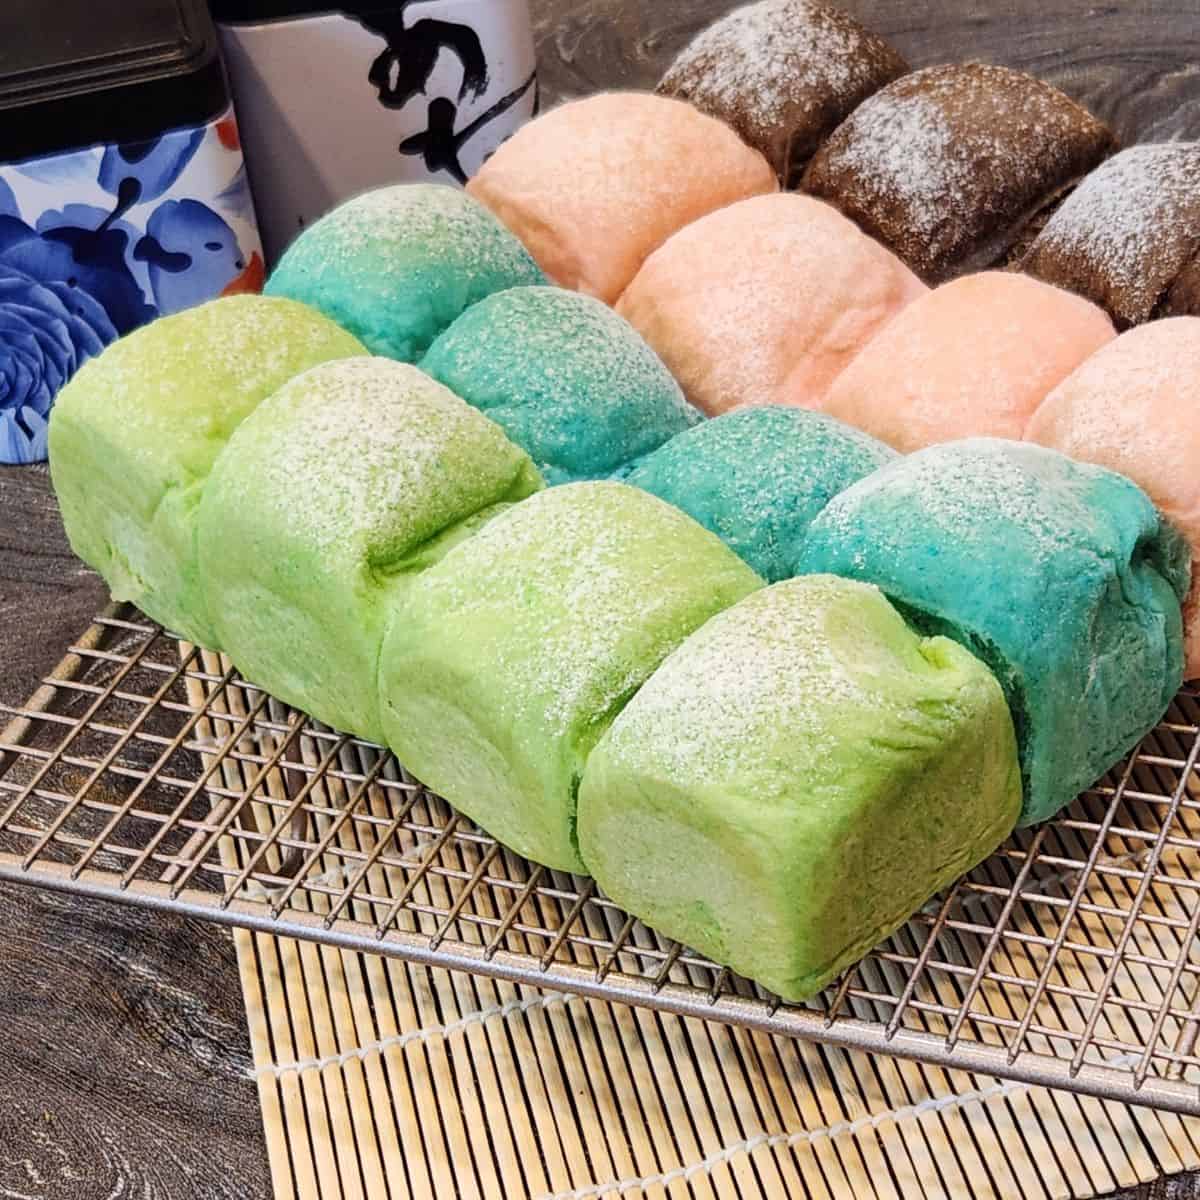
These Japanese milk buns are usually shaped into pastel-colored rounds, lightly dusted with flour, and filled with luscious custard or silky chocolate ganache. Soft, creamy, and pretty enough for a bakery window—they’re almost too cute to eat (almost).
Why You Will Love This Recipe
Recipe Ingredients

Ingredient Notes
Whipping Cream – I use non-dairy whipping cream for this recipe because it’s light. But feel free to use dairy whipping cream if that’s what you have on hand—both work beautifully in these buns. Just note that dairy cream will give a richer taste.
How to Make Japanese Milk Buns
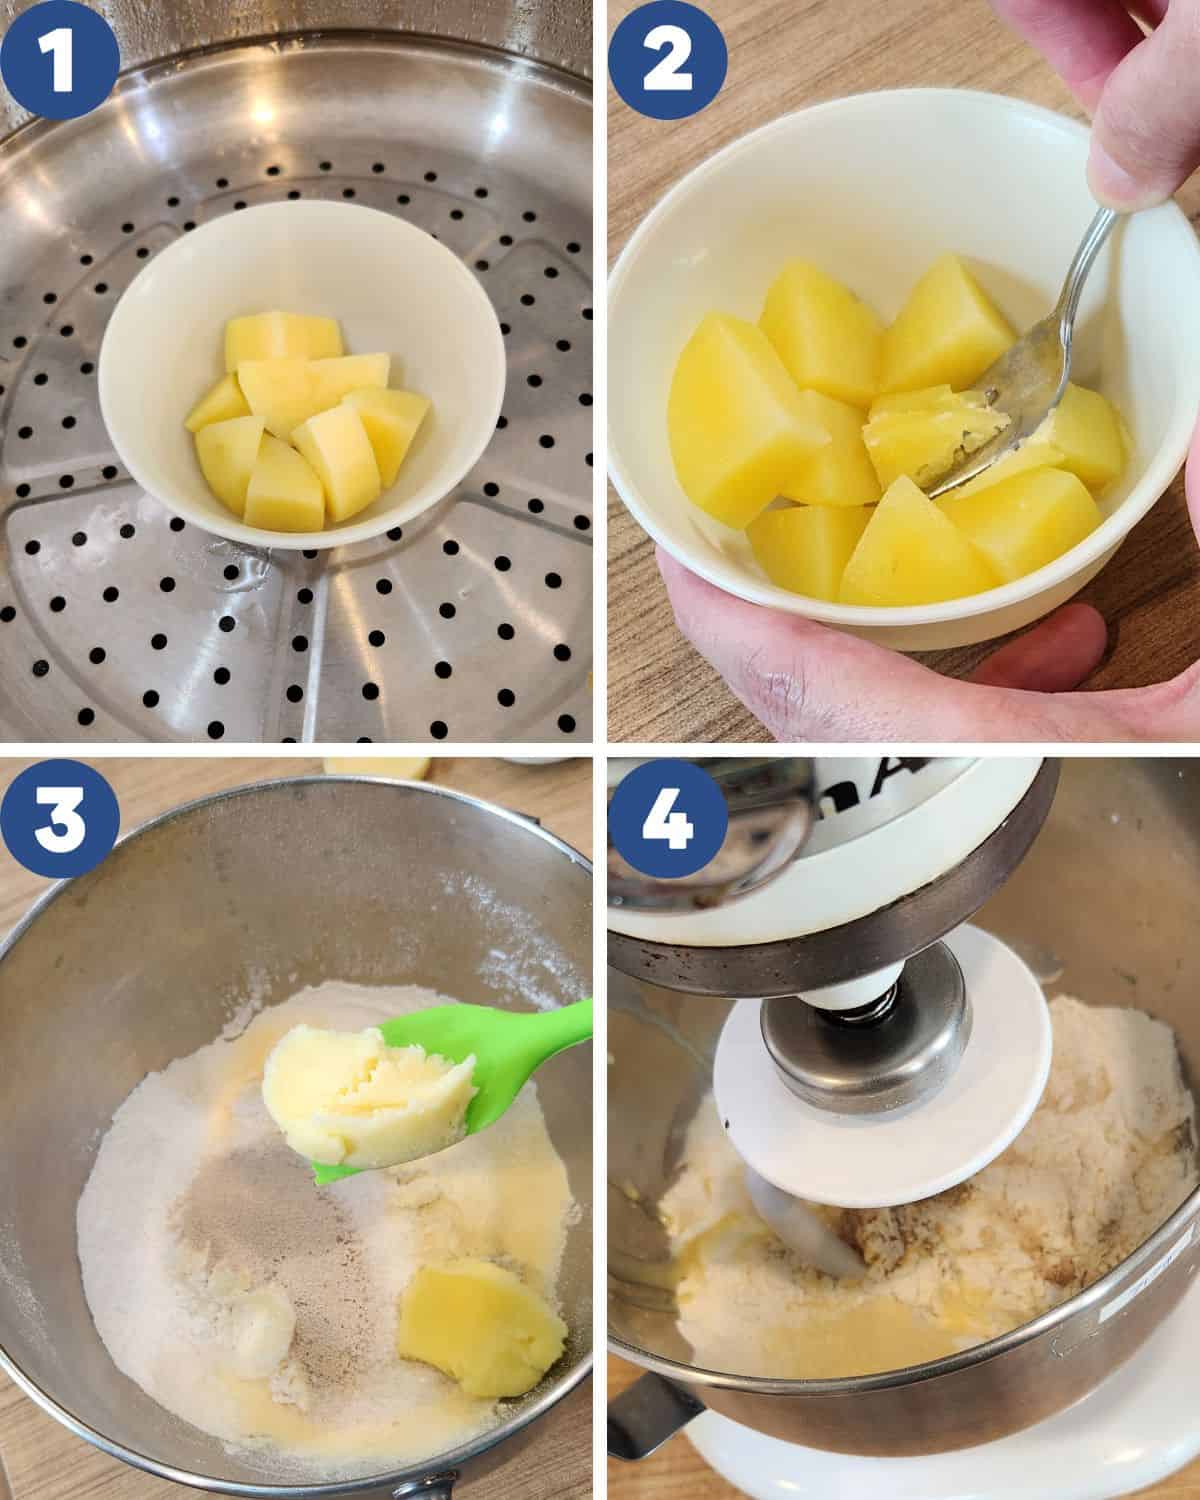
STEP 1. Peel and cut the potatoes into small pieces, then steam until soft. Mash them with a fork until smooth (Images 1, 2), then sift through a fine sieve for an extra silky texture. In a mixing bowl, sift in the bread flour and milk powder. Add sugar, instant yeast, and the mashed potatoes (Image 3). Pour in the whipping cream, condensed milk, and milk (Image 4). Mix until everything comes together into a smooth, elastic dough.
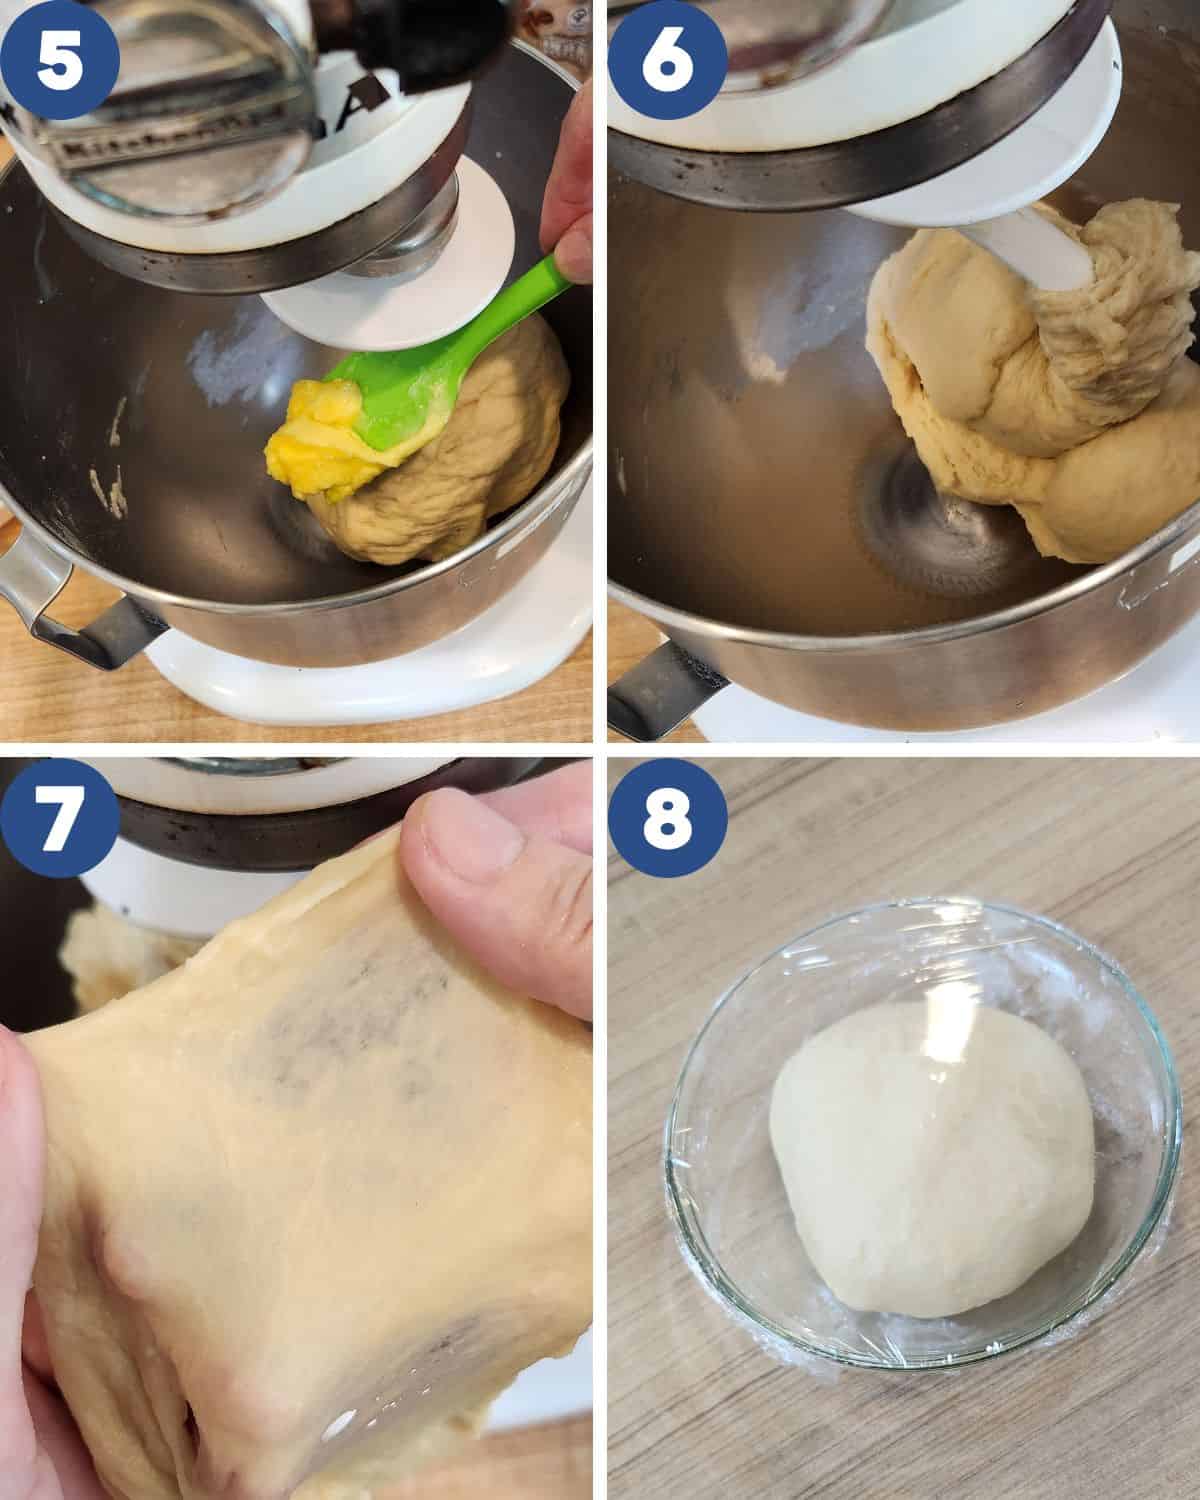
STEP 2. Once the dough is fairly smooth, add the butter and salt (Image 5). Continue kneading or mixing until fully elastic and smooth (Images 6, 7)—this usually takes about 20 minutes in total. To check, stretch the dough gently: if you can pull it thin without tearing (a.k.a. the “windowpane test”), you’re good to go. Transfer the dough to a lightly greased glass bowl, cover with cling wrap, and let it rise for 1 hour (Image 8).
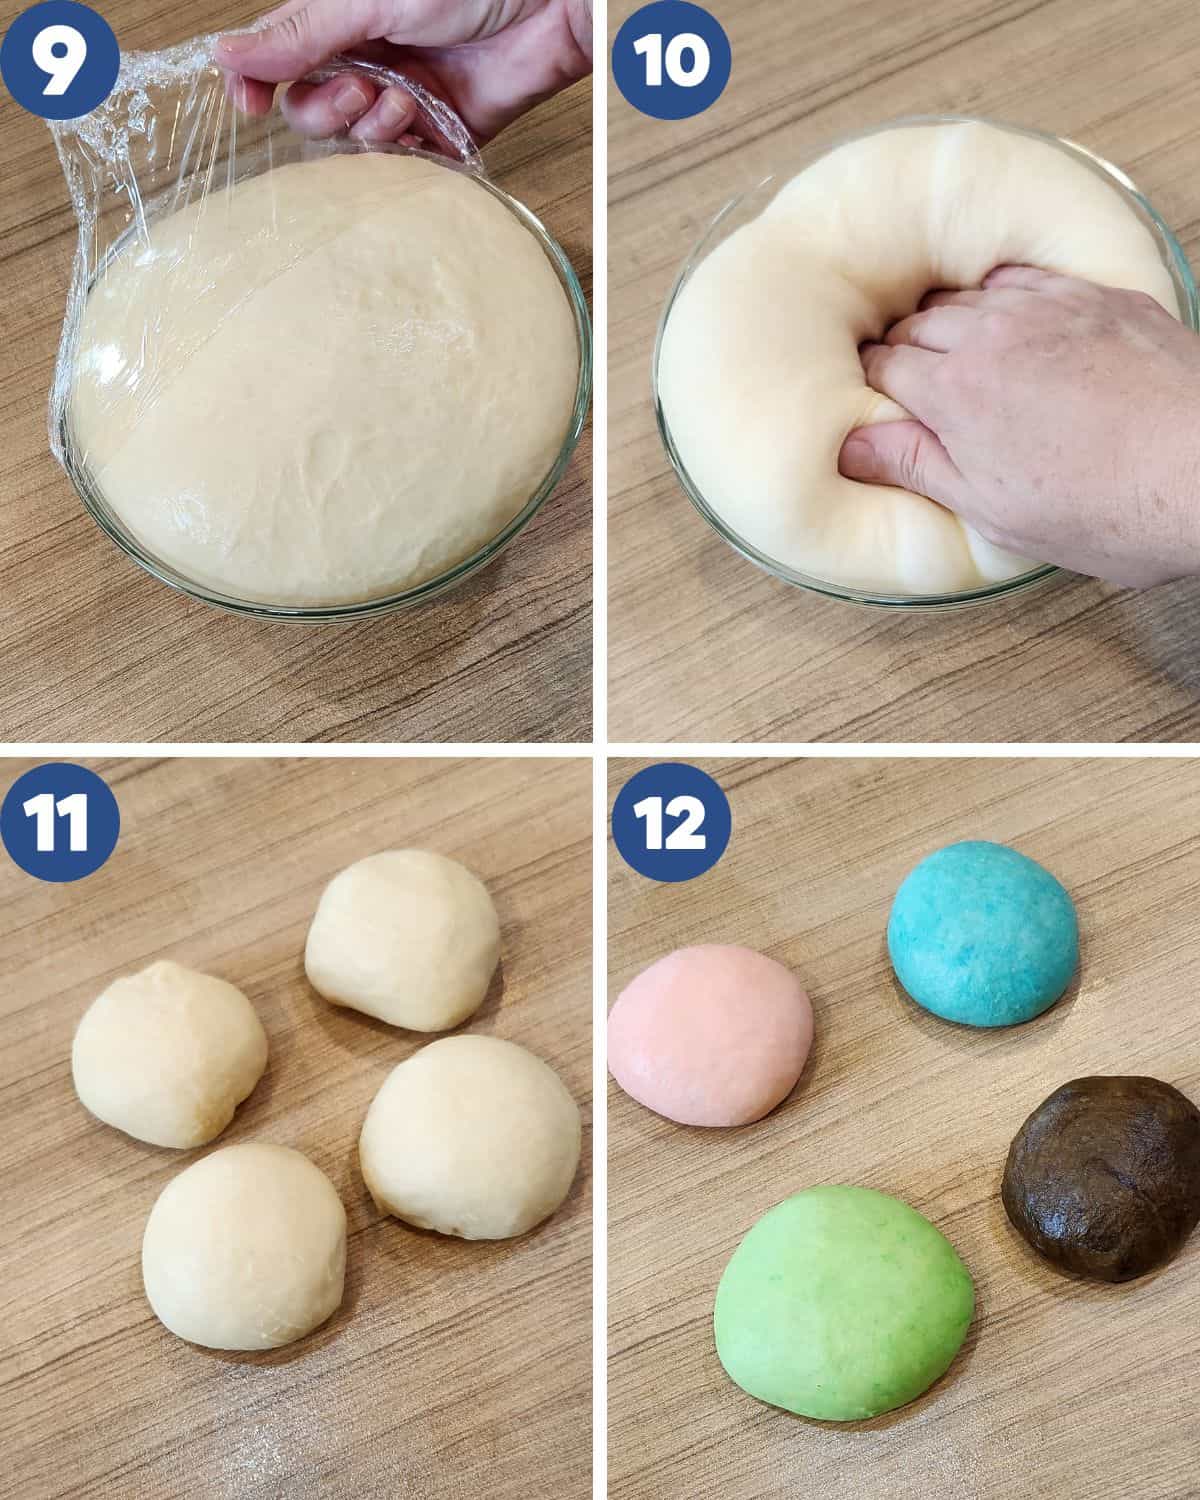
STEP 3. After one hour, the dough should have doubled in size (Image 9). Punch down to deflate, knead briefly on a lightly floured surface, and divide it into 4 equal portions (Images 10, 11). Add food coloring if you’d like—most Japanese milk buns have soft, pastel shades. Mix the color in evenly (Image 12). Cover the dough pieces with cling wrap and let them rest for 10 minutes.
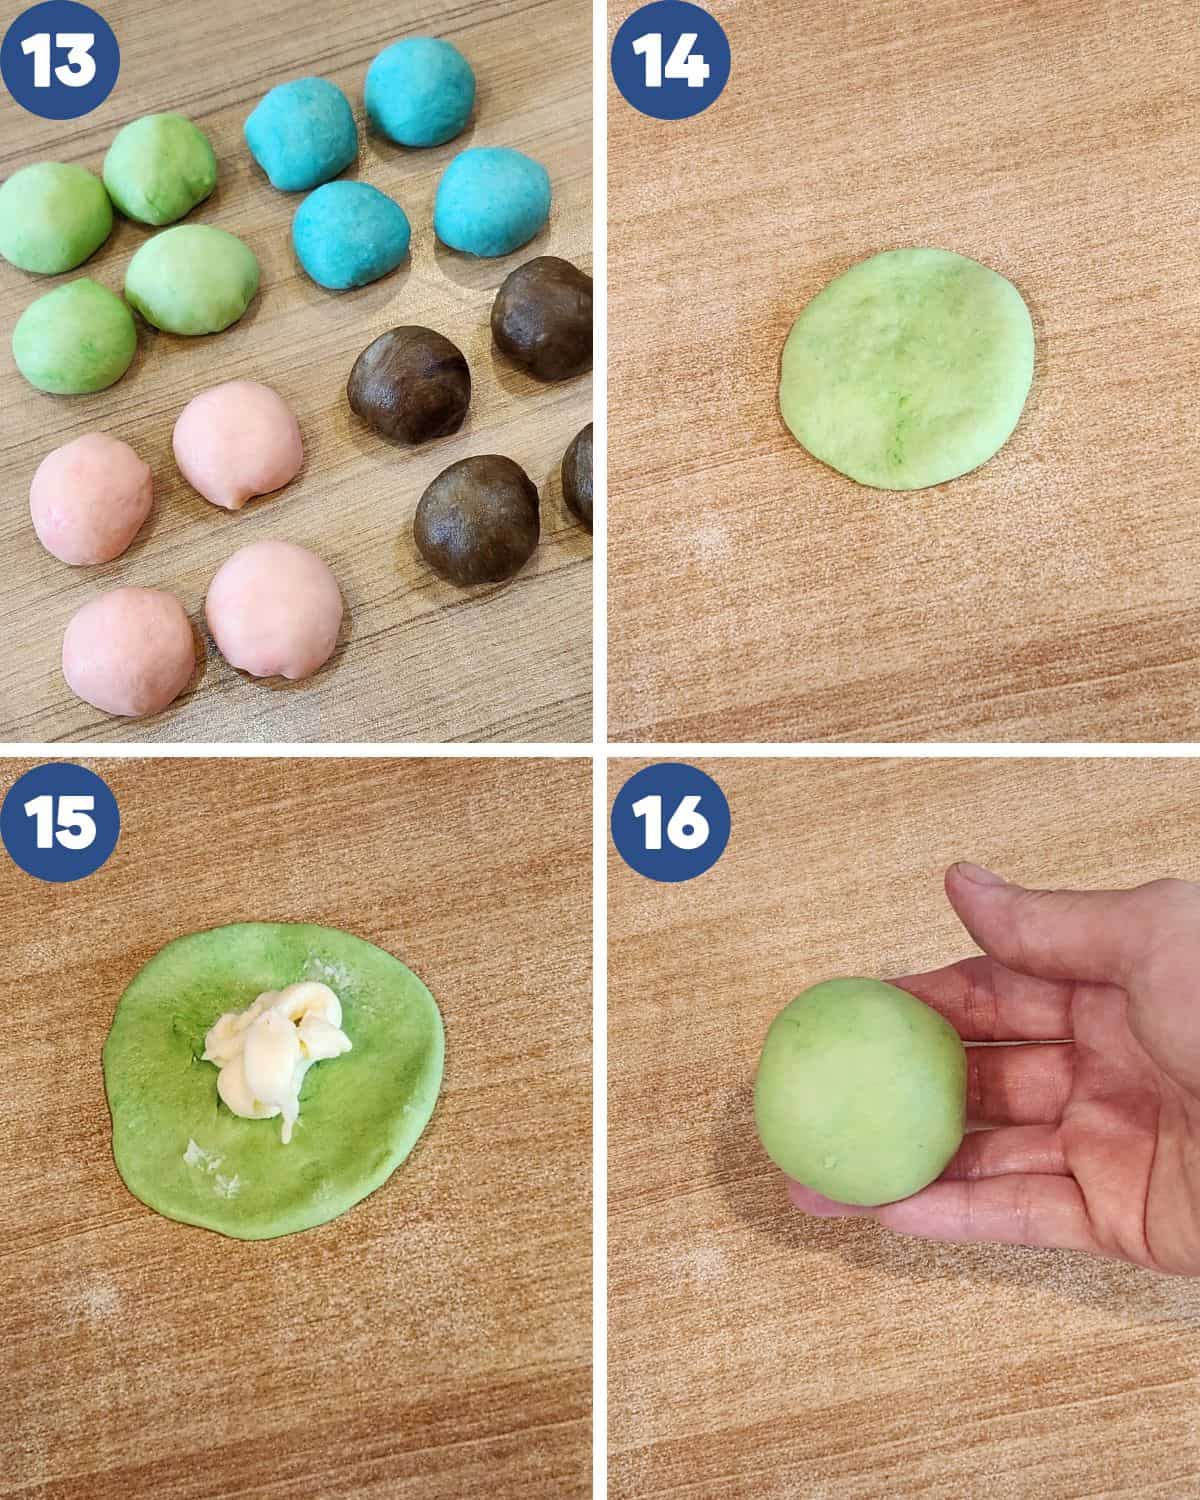
STEP 4. Prepare a 20×20 cm baking pan. Divide each colored dough into 4 smaller pieces (Image 13). Flatten one piece with a rolling pin, flip it so the smooth side faces down, and add your filling of choice (Images 14, 15). Pinch tightly to seal, then shape into a round bun (Image 16). Place it onto the baking pan, grouping by color if desired.
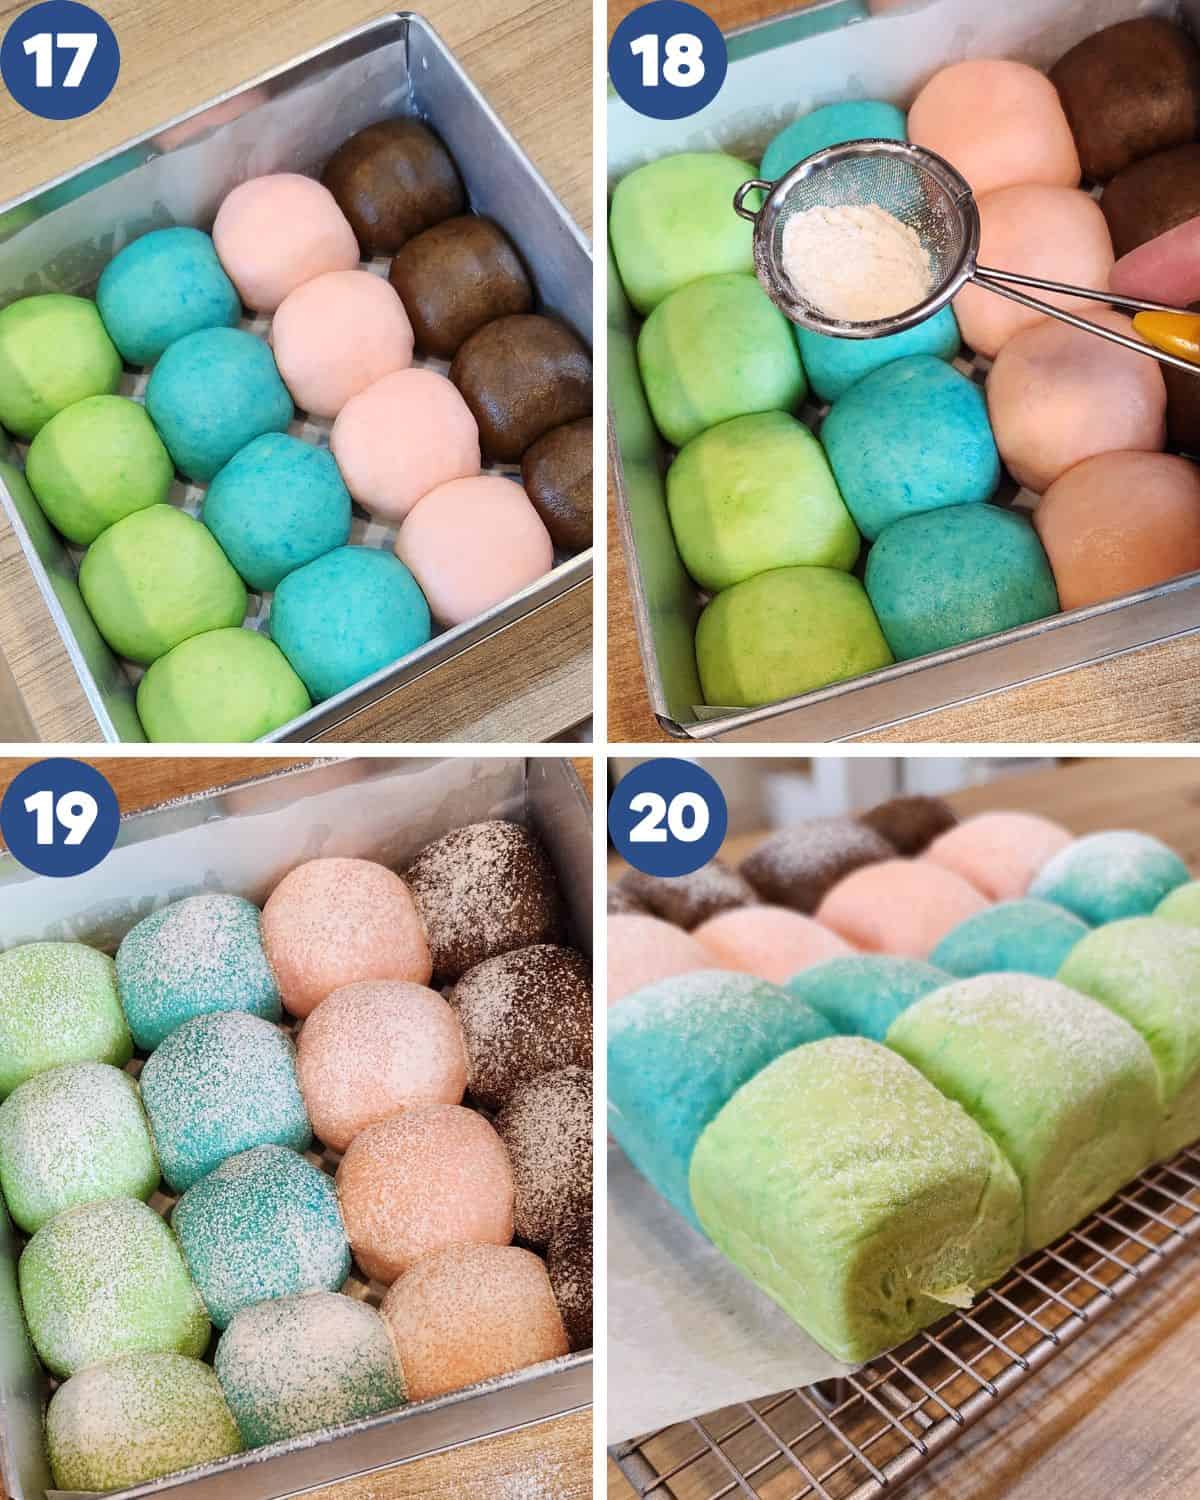
STEP 5. Cover the shaped dough with a clean cloth and let them rise again until doubled in size (Image 17). Dust the tops lightly with flour (Images 18, 19). Bake in a preheated oven at 338°F (170°C) for 17–20 minutes, or until the tops are just golden. Remove from the oven and cool completely on a wire rack (Image 20).
Enjoy your soft, fluffy Japanese milk buns—they’re as cute as they are delicious!
Pro Tips
- Steam and mash the potatoes while they’re still hot — they blend more smoothly that way. A food processor makes the job even easier.
- Use cold whipping cream and cold milk to help keep the dough cool and manageable, especially in a warm kitchen.
- Room-temperature butter is ideal—soft enough to mix easily, but not melty. Too soft and your dough may get greasy.
- To color your dough, you can use a mixer for convenience or knead by hand until the color is evenly incorporated.
- After the first rise, gently flatten the dough to release the trapped air. This helps ensure a fine, even crumb.
- Seal the buns tightly after filling—pinch the edges well so the filling stays put during baking. So there is no filling explosions.
- Let the bread cool completely before storing. Wrap it in plastic and keep it in an airtight container; it stays fresh for up to 5 days in the fridge.
FAQs about Japanese Milk Buns
Japanese milk bread—also called Hokkaido milk bread or Japanese milk buns—is known for its incredibly soft, fluffy texture and slightly sweet, milky flavor. It uses a unique method like tangzhong or a moisture-retaining ingredient (like mashed potatoes in this recipe) to create that tender, airy crumb that sets it apart from regular white bread.
Yes, you absolutely can! While tangzhong is a popular method, this recipe uses mashed potatoes instead—and it works beautifully. The natural starches in the potatoes help lock in moisture and keep the buns soft, fluffy, and light for days.
Yes! You can substitute dairy milk with non-dairy alternatives like soy milk, oat milk, or almond milk. Just make sure it’s unsweetened and unflavored.
Nope! While many versions are filled with custard, chocolate ganache, or sweet cream, plain Japanese milk buns are just as delightful. You can serve them as-is.
Yes! You can cold-proof the dough in the fridge overnight after the first rise. This actually helps develop more flavor and makes the dough easier to shape the next day.
Storage
The bread can stay fresh up to 2 days in room temperature, as long as you keep it in a closed container or a plastic bag. If you would like to keep it longer, you’d better keep it in the chiller. It can stay fresh up to 7 days.
More Japanese Recipes
- Hokkaido Cheese Tart
- Japanese Beef Croquette
- Japanese Gyudon
- Chicken Karaage
- Takikomi Gohan
- Japanese Pancake: Dorayaki
- Egg for Ramen
Japanese Milk Buns
Equipment
- 1 baking pan 8×8 inch baking pan
Ingredients
- 120 gr potato steamed and mashed
- 500 gr bread flour
- 80 gr sugar
- 30 gr milk powder
- 50 gr condensed milk
- 10 gr instant yeast
- 60 gr whipping cream
- 210 gr milk
- 60 gr unsalted butter
- 8 gr salt
Instructions
- Peel and cut the potatoes into small pieces, then steam until soft. Mash them with a fork until smooth (Images 1, 2), then sift through a fine sieve for an extra silky texture. In a mixing bowl, sift in the bread flour and milk powder. Add sugar, instant yeast, and the mashed potatoes (Image 3). Pour in the whipping cream, condensed milk, and milk (Image 4). Mix until everything comes together into a smooth, elastic dough.
- Once the dough is fairly smooth, add the butter and salt (Image 5). Continue kneading or mixing until fully elastic and smooth (Images 6, 7)—this usually takes about 20 minutes in total. To check, stretch the dough gently: if you can pull it thin without tearing (a.k.a. the "windowpane test"), you're good to go. Transfer the dough to a lightly greased glass bowl, cover with cling wrap, and let it rise for 1 hour (Image 8).
- After one hour, the dough should have doubled in size (Image 9). Punch down to deflate, knead briefly on a lightly floured surface, and divide it into 4 equal portions (Images 10, 11). Add food coloring if you’d like—most Japanese milk buns have soft, pastel shades. Mix the color in evenly (Image 12). Cover the dough pieces with cling wrap and let them rest for 10 minutes.
- Prepare a 20×20 cm baking pan. Divide each colored dough into 4 smaller pieces (Image 13). Flatten one piece with a rolling pin, flip it so the smooth side faces down, and add your filling of choice (Images 14, 15). Pinch tightly to seal, then shape into a round bun (Image 16). Place it onto the baking pan, grouping by color if desired.
- Cover the shaped dough with a clean cloth and let them rise again until doubled in size (Image 17). Dust the tops lightly with flour (Images 18, 19). Bake in a preheated oven at 338°F (170°C) for 17–20 minutes, or until the tops are just golden. Remove from the oven and cool completely on a wire rack (Image 20).
- Enjoy your soft, fluffy Japanese milk buns—they’re as cute as they are delicious!
Video
Notes
- Steam and mash the potatoes while they’re still hot — they blend more smoothly that way. A food processor makes the job even easier.
- Use cold whipping cream and cold milk to help keep the dough cool and manageable, especially in a warm kitchen.
- Room-temperature butter is ideal—soft enough to mix easily, but not melty. Too soft and your dough may get greasy.
- To color your dough, you can use a mixer for convenience or knead by hand until the color is evenly incorporated.
- After the first rise, gently flatten the dough to release the trapped air. This helps ensure a fine, even crumb.
- Seal the buns tightly after filling—pinch the edges well so the filling stays put during baking. So there is no filling explosions.
- Let the bread cool completely before storing. Wrap it in plastic and keep it in an airtight container; it stays fresh for up to 5 days in the fridge.


This is the soft, fluffy Japanese milk bread that is so popular worldwide. No tang zhong needed in this recipe, making it very easy for a beginner.