
Chinese Crispy Pork Belly
Crispy pork belly or 燒肉 siu yuk, Chinese roast pork is all about shatteringly crisp, golden skin over melt-in-your-mouth, juicy layers of meat. In this easy recipe, you’ll learn my foolproof Cantonese roasting method (no deep frying!) for getting that restaurant-quality crackling every single time. And the best part? It comes with a fiery green chili dipping sauce. It’s spicy, tangy, and refreshingly bright, the perfect match for rich, crispy pork.
Crispy pork belly or 燒肉siu yuk, Chinese roast pork is the ultimate choice of Cantonese BBQ. Think shatteringly crisp, golden skin over layers of juicy, flavorful meat, all roasted to perfection. In this recipe, I’ll show you exactly how to get that perfect crackle and tender bite, without any deep frying. You can use the oven or simply adapt it for an air-fryer. And to take it over the top, I’m including my zesty green chili dipping sauce. It is spicy, tangy, and refreshing, the perfect match for rich pork.
I love serving crispy pork belly with a bowl of Hainanese chicken rice or pairing it with honey-roasted BBQ pork, chicken shrimp potstickers, Shrimp Balls, or Asian fried meatballs for a full spread.
Achieving crackled skin and keeping the meat melt-in-your-mouth tender are the biggest challenge. I’ll walk you through both, step-by-step, with photos and a video, so you can master it at home in one go. This is my must-make dish for Chinese New Year, but honestly, it’s perfect any time you want.
Why You Will Love This Recipe
Recipe Ingredients
Ingredient Notes
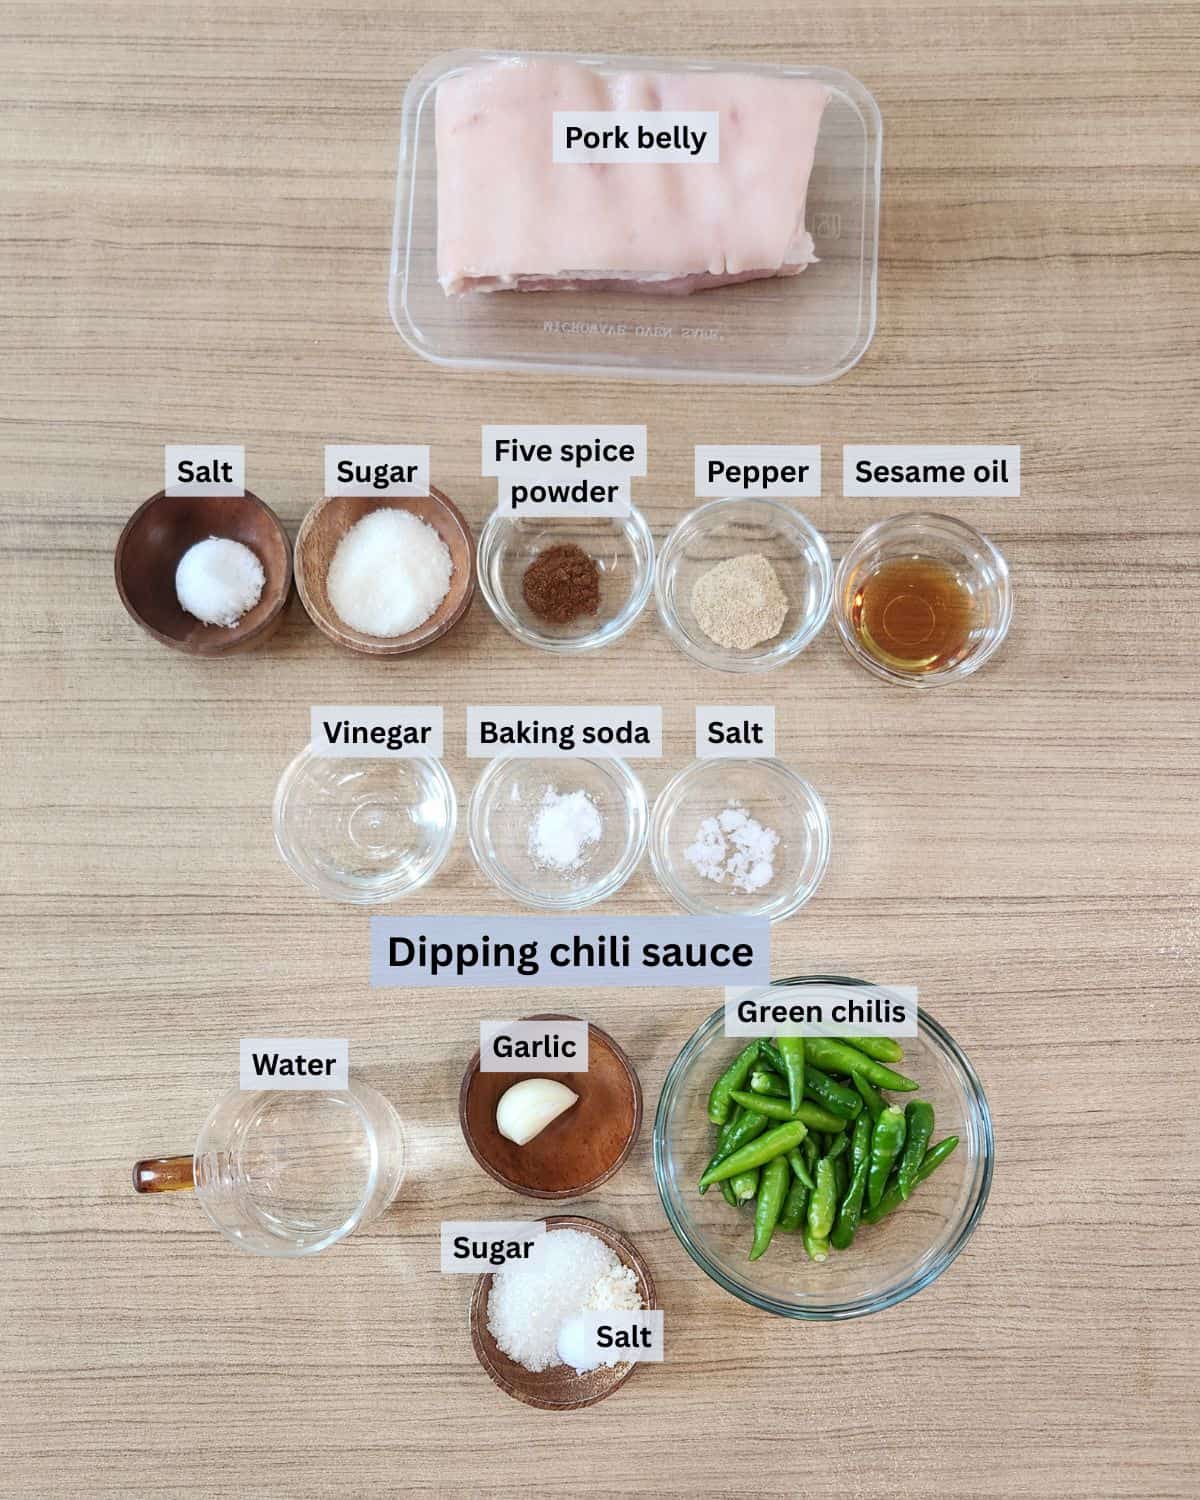
Pork Belly – Choose a five-layer pork belly (skin, fat, and meat) with enough fat for juicy texture and a rectangular shape for even roasting. This cut is the key to that perfect crispy skin and tender bite.
Five-Spice Powder – Classic in Cantonese crispy pork belly for its warm, aromatic flavor. I skip it in the video for a super simple version, but feel free to use it if you love that signature fragrance.
Baking Soda – Don’t skip this! It helps the skin blister into a light, crispy layer while staying tender to the bite. I’ve tested without it, and the result was hard, tough skin, not what you want for siu yuk. Use just enough, and always wait until the bubbling subsides before brushing it on.
Vinegar & Salt – A dynamic duo for drawing moisture to the surface. The drier the skin, the better the blistering. Salt seasons and dehydrates, while vinegar gives extra lift to the crackle. Prepare a generous amount of salt to really pull the moisture out for maximum crispiness.
Be sure to check out the full recipe and ingredient list below
How to Make Crispy Pork Belly
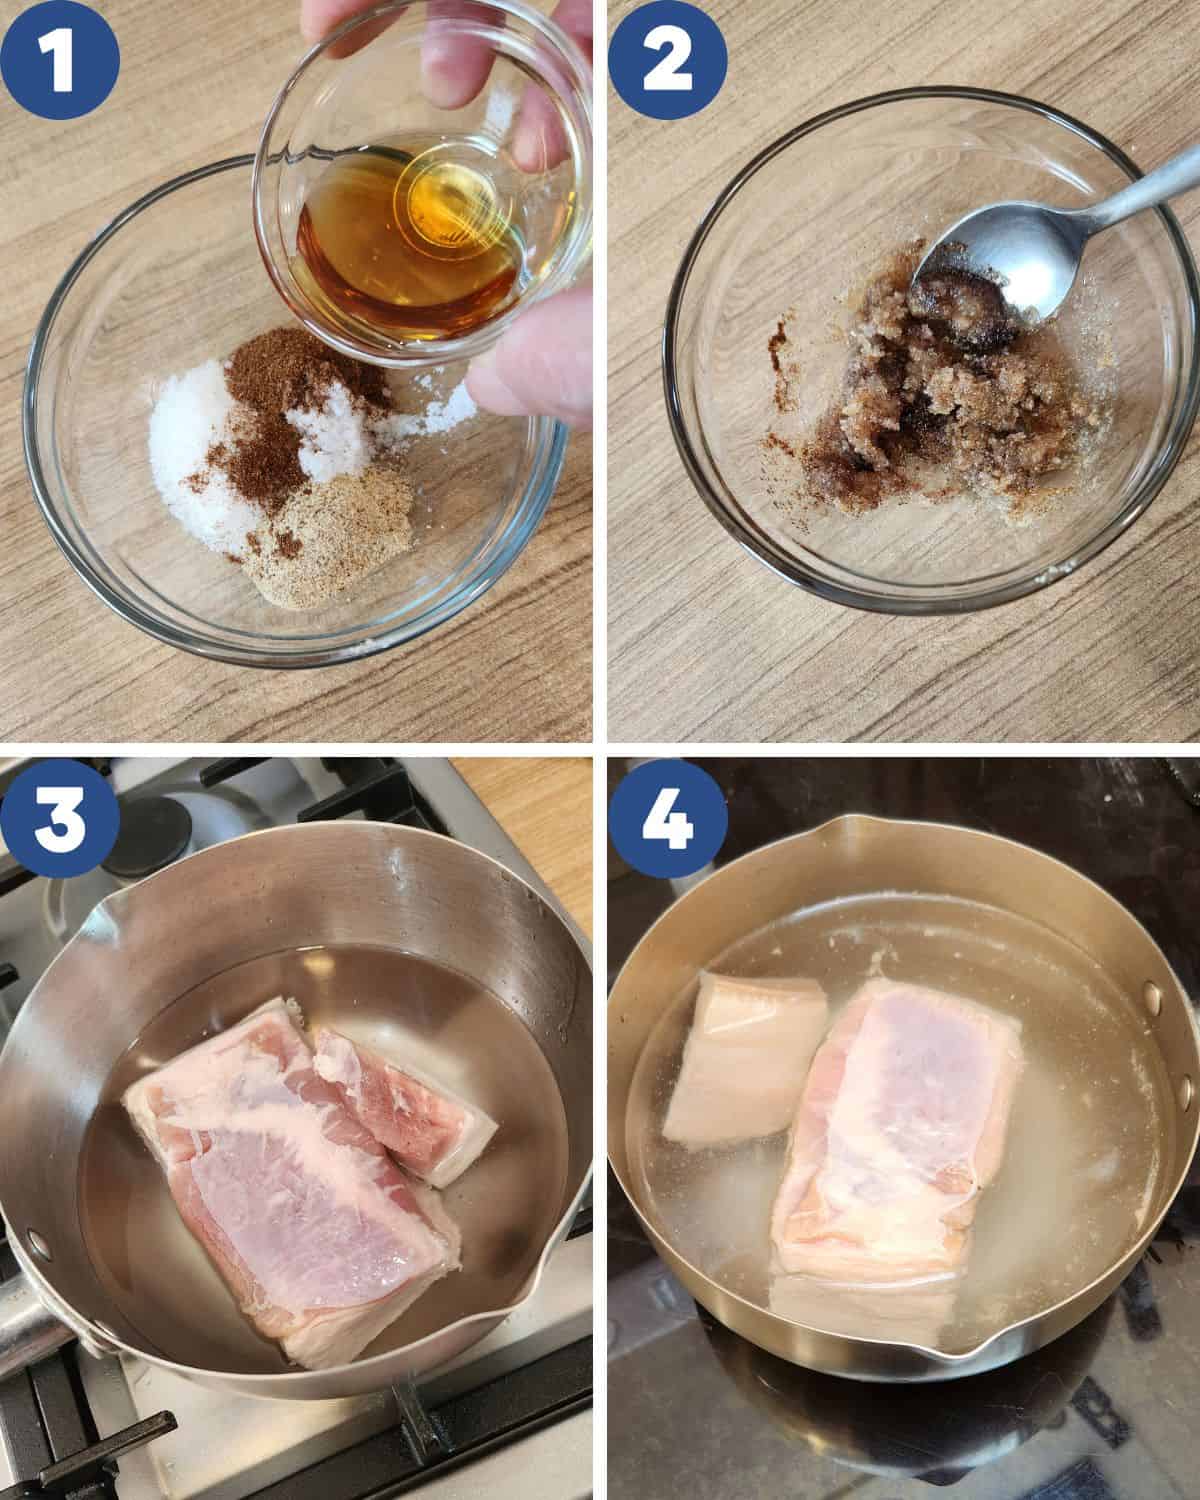
STEP 1. Get the seasoning ready: salt, sugar, pepper, mushroom powder, and sesame oil (Image 1). Mix and set aside (Image 2).
Boil enough water to cover just the skin side of the pork belly. Place the pork skin-side down and parboil 5 minutes (Image 3). Lift out and rinse in clean cold water for 5 minutes to draw out any remaining blood (Image 4). Transfer to your work surface.
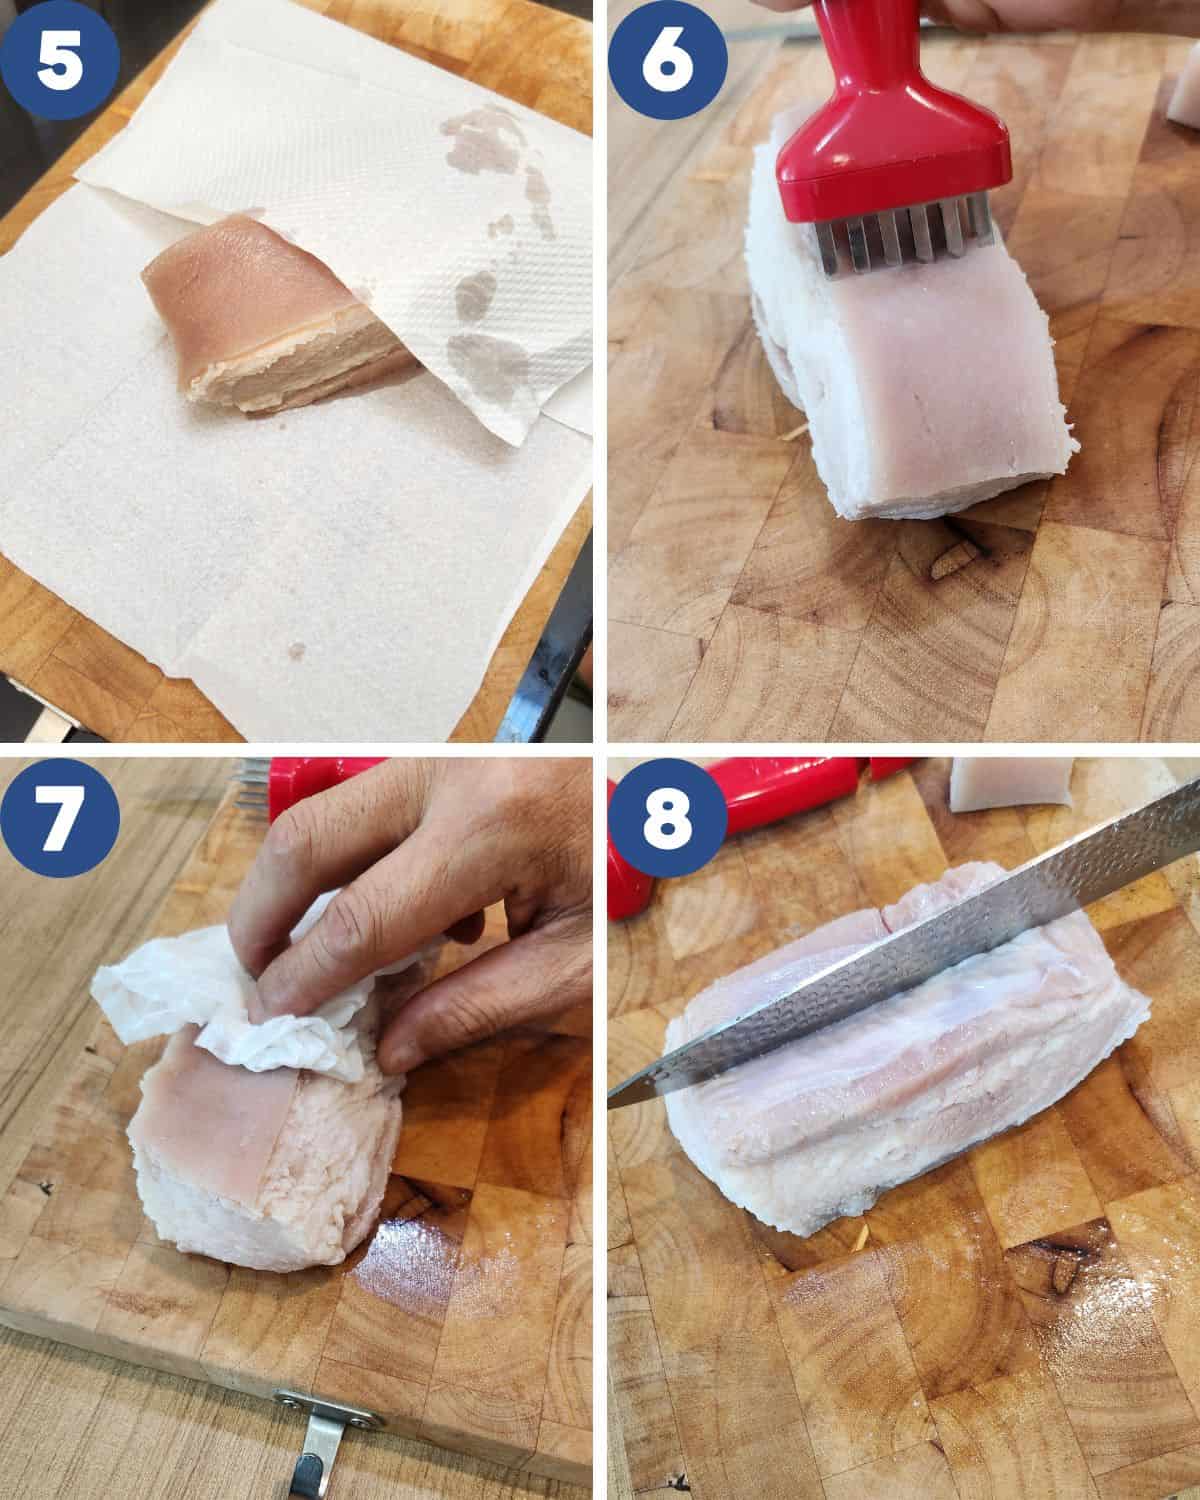
STEP 2. Lay out paper towels and place the pork belly skin-side up. Pat the skin very dry (Image 5).
Use a fork or meat tenderizer to lightly prick the skin about 5 mm deep (Image 6). Don’t go deeper—piercing the fat layer causes it to leak during roasting and can stop the crackling from puffing.
Pat dry again (Image 7), flip the belly over, and make a lengthwise cut into the meat only (Image 8). Don’t pierce the skin. Create a central groove/crevice so seasoning penetrates and slicing later is easier.
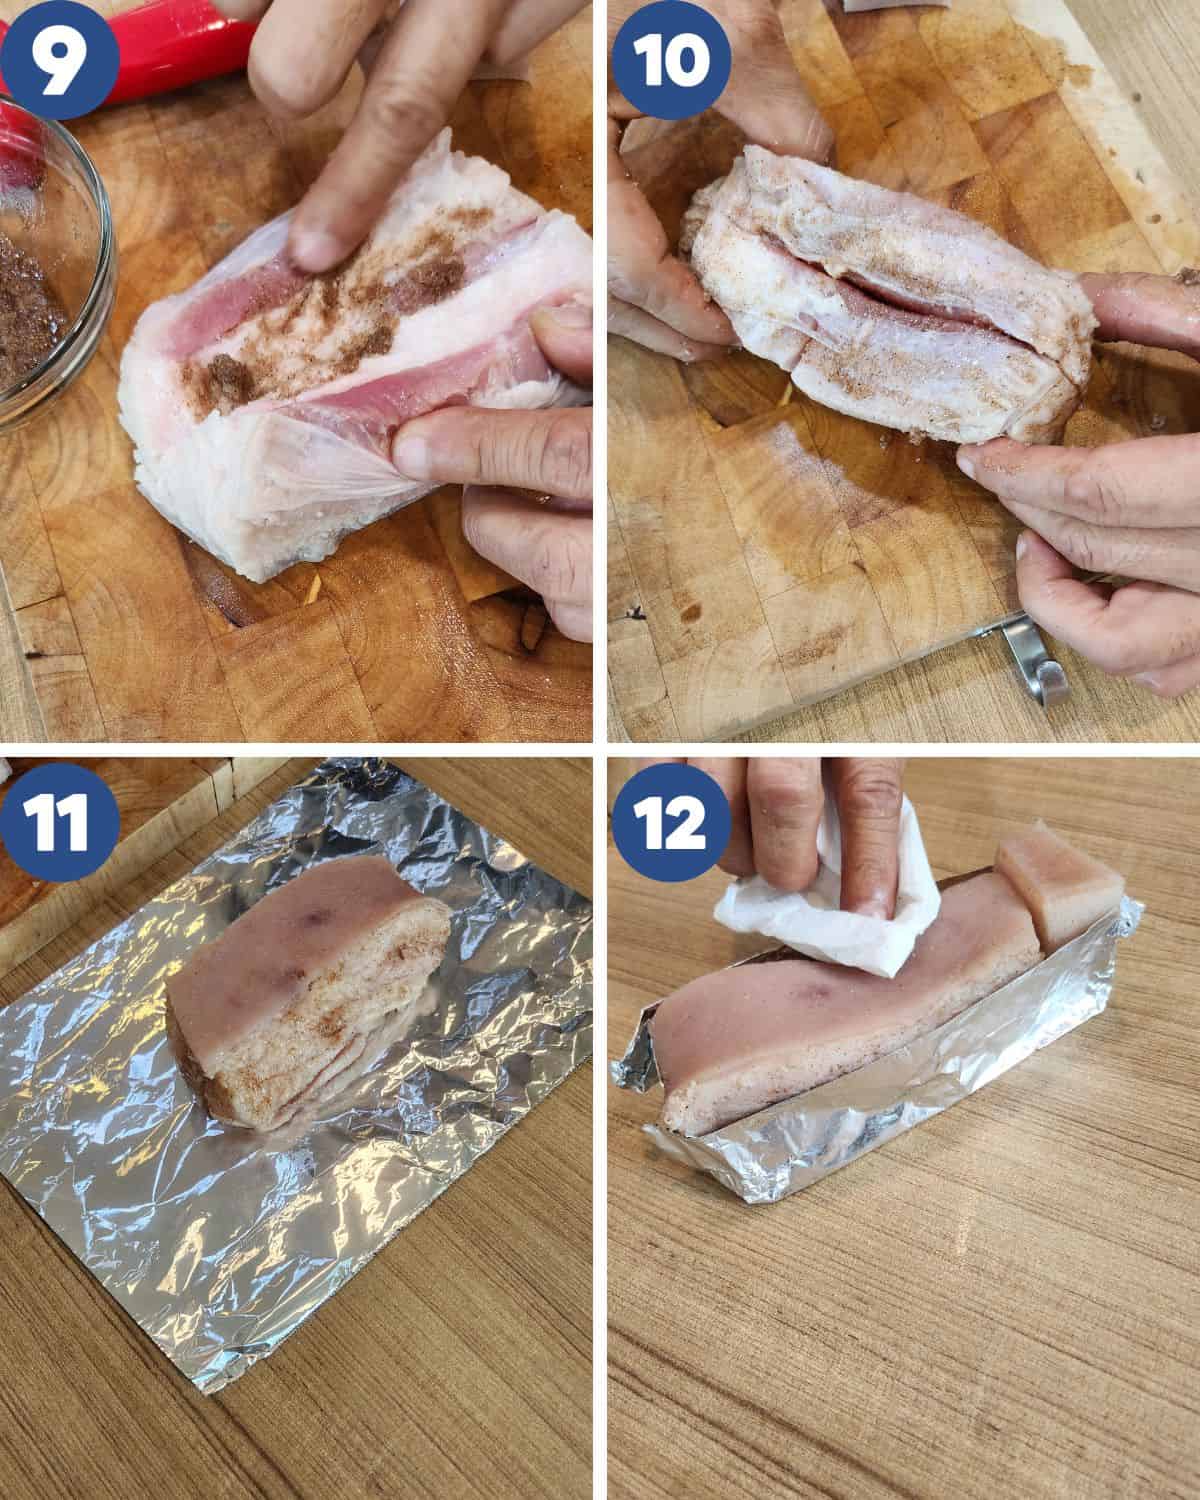
STEP 3. Rub the seasoning into the crevice and all over the meat (Images 9, 10). Do not put seasoning on the skin.
Wrap the meat portion snugly in aluminum foil, leaving the skin completely exposed (Image 11). Shape the foil into a neat rectangle to match the pork belly. Pat the skin dry once more and wipe off any stray seasoning (Image 12).
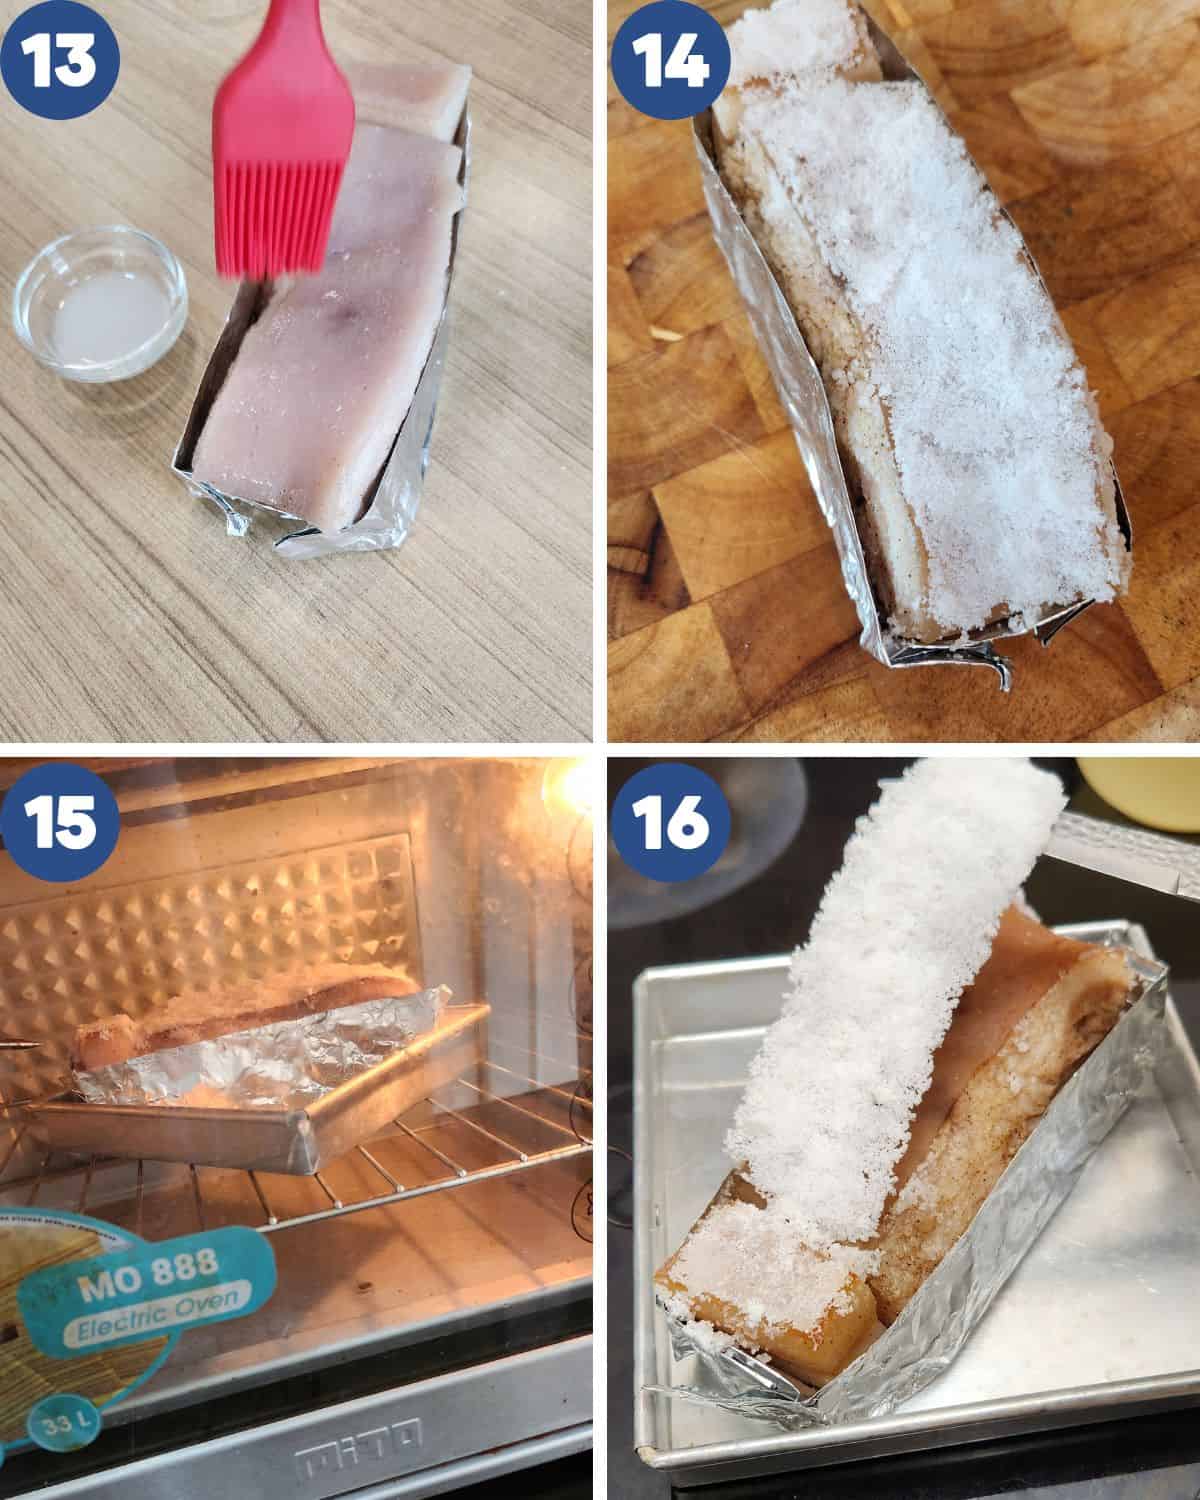
STEP 4. Mix salt, baking soda, and vinegar. Stir and wait until the bubbling subsides—no visible baking-soda bits (this keeps the skin crisp but not hard). Brush this mixture onto the skin only (Image 13), 1–2 light coats.
Refrigerate uncovered for at least 6 hours or, better, overnight to dry the skin.
Next day, preheat a convection oven to 320°F (160°C). Brush off any moisture and spread a dense, even layer of coarse salt over the skin (Image 14). This pulls moisture to the surface; it won’t make the pork too salty.
Roast on the middle rack for 25 minutes (Image 15). Remove, scrape off all the salt, and wipe the skin clean with paper towels (Image 16).
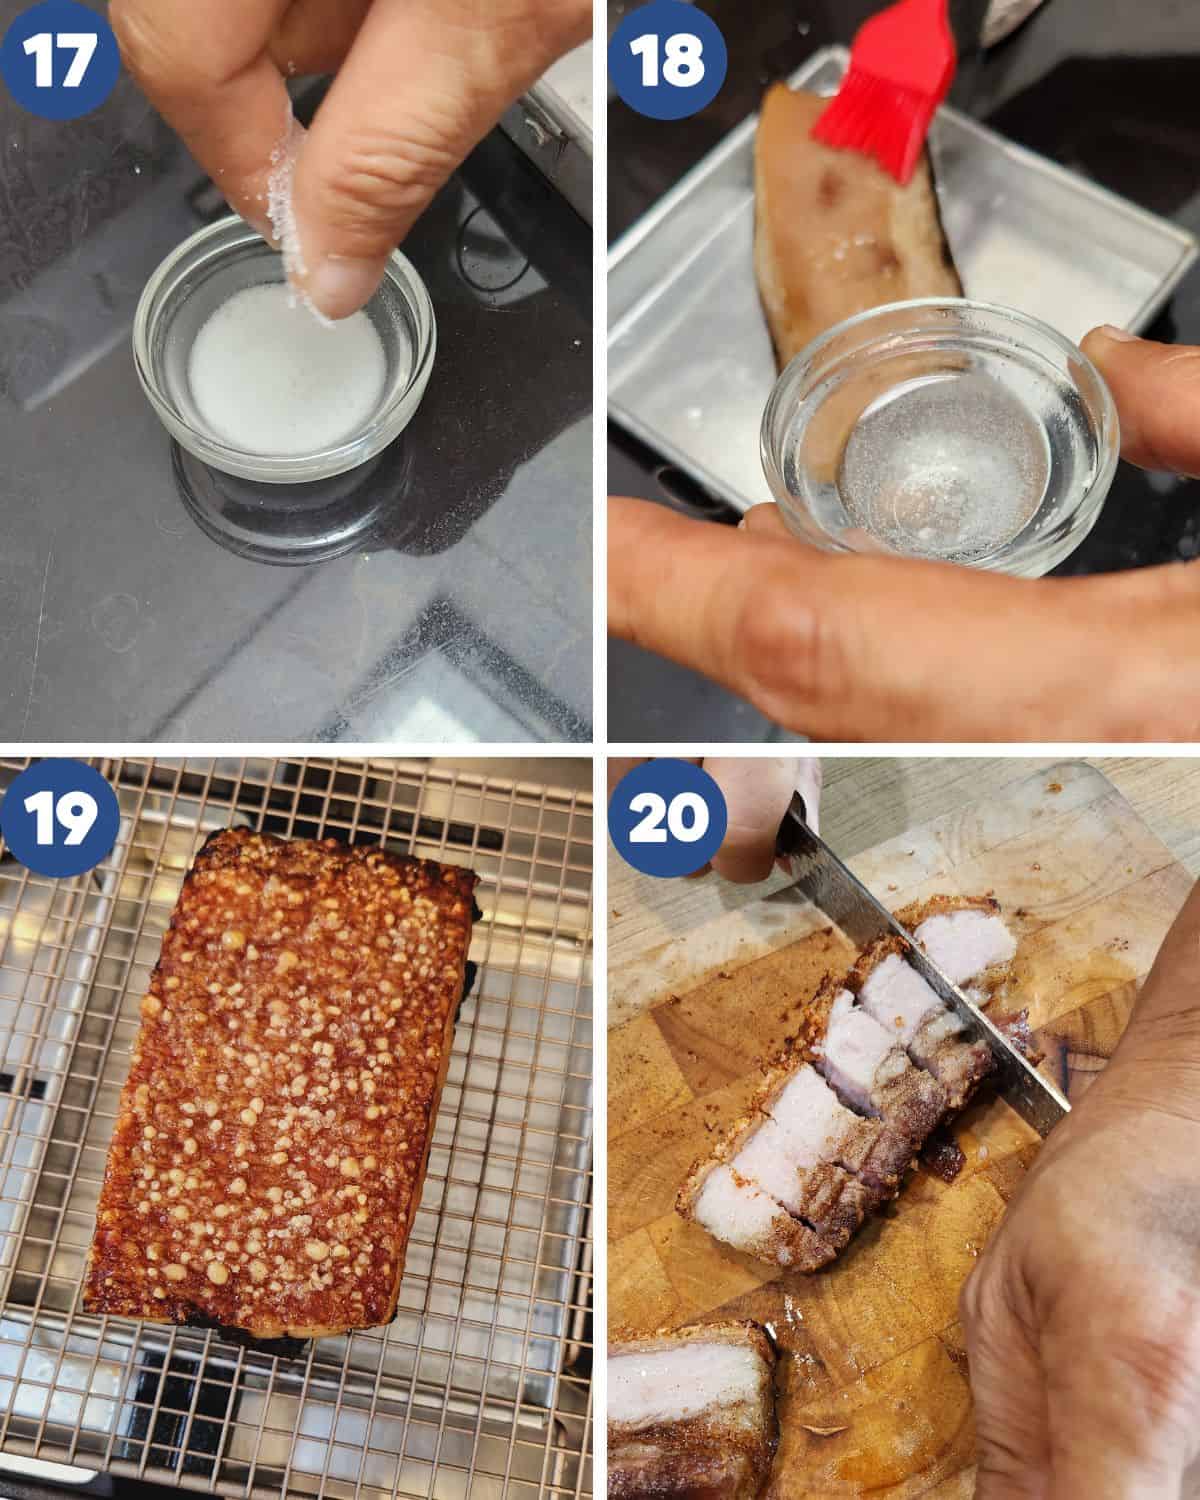
STEP 5. Brush the skin with a small batch of the mixture (a pinch of salt + pinch of baking soda + 1 tbsp vinegar). As always, wait until the bubbles subside before brushing (Images 17, 18).
Return to the oven at 320°F (160°C) for 25 minutes. Then increase to 392–482°F (200–250°C) and continue roasting, checking every 15 minutes. Rotate the pan as needed for even blistering. The skin will start to puff and crackle, honestly, the sound is beautiful.
Total roast time to full crackle: about 45–60 minutes, depending on your oven and the thickness of the cut.
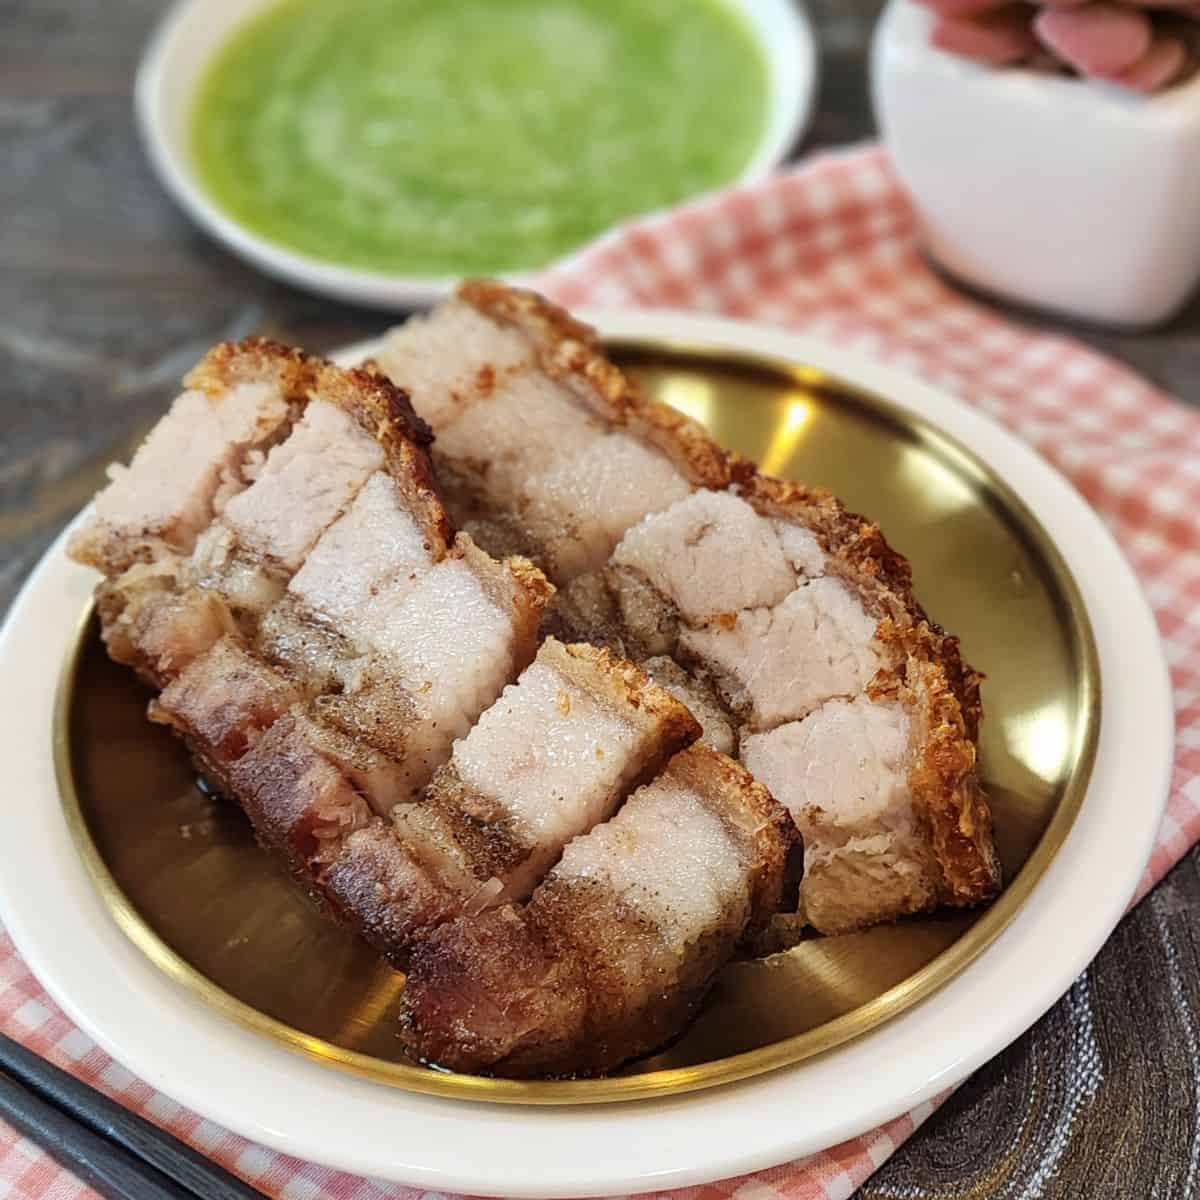
Remove from the oven and let it rest 30 minutes in the pan/foil so the meat reabsorbs juices and the crackling sets. Then unwrap (Image 19) and slice along the grooves you made earlier (Image 20).
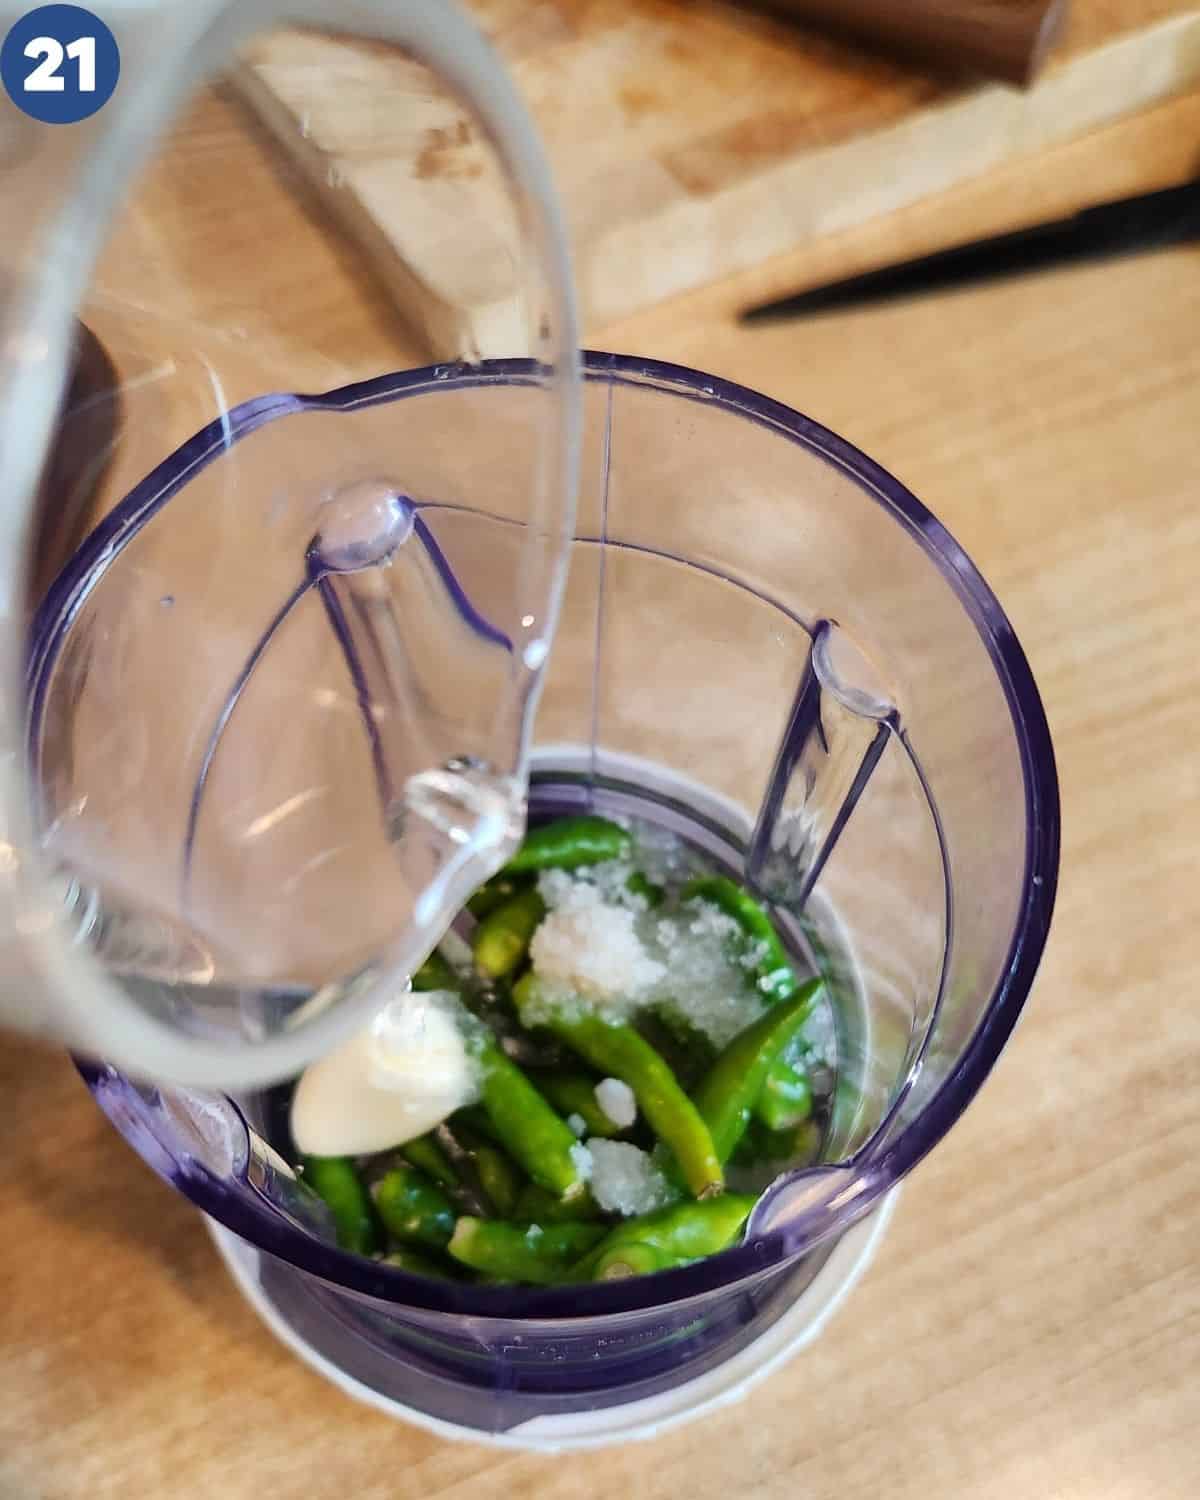
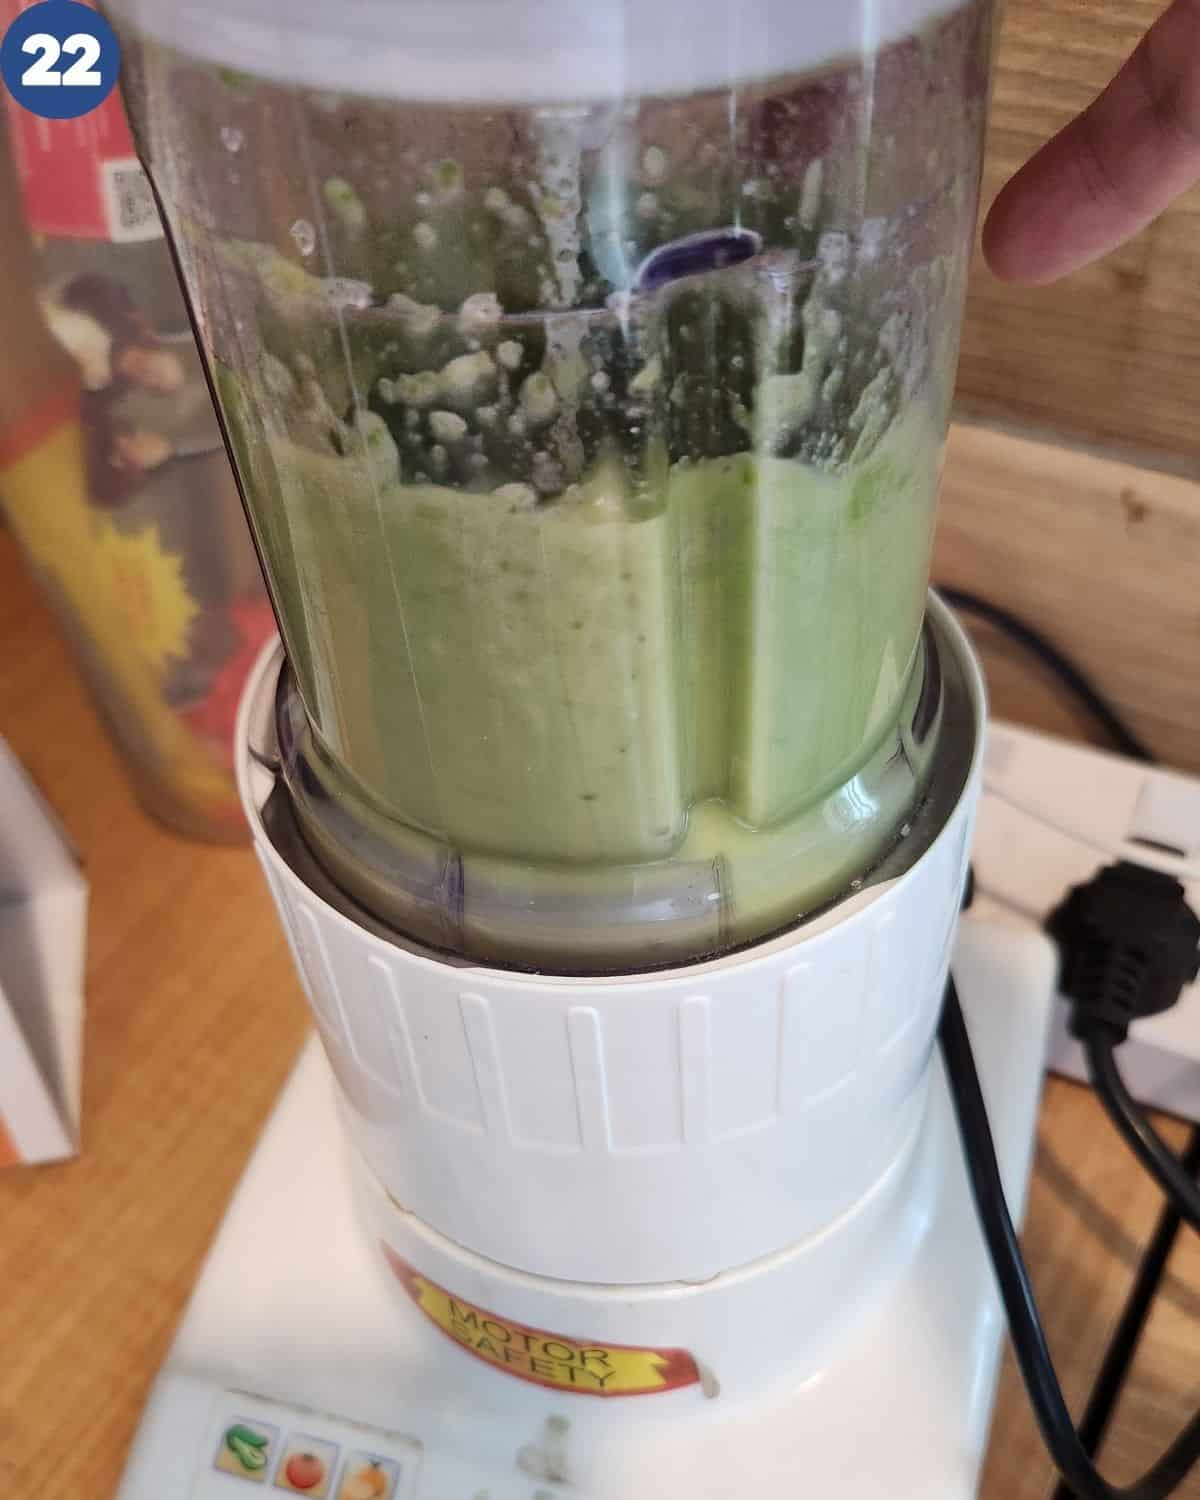
STEP 6. Make the Green Chili Dipping Sauce (While It Roasts). In a food processor, combine green chilies, garlic, salt, sugar, mushroom powder, and water.
STEP 7. Blend until smooth. Adjust seasoning to taste; it should be spicy, tangy, and fresh.
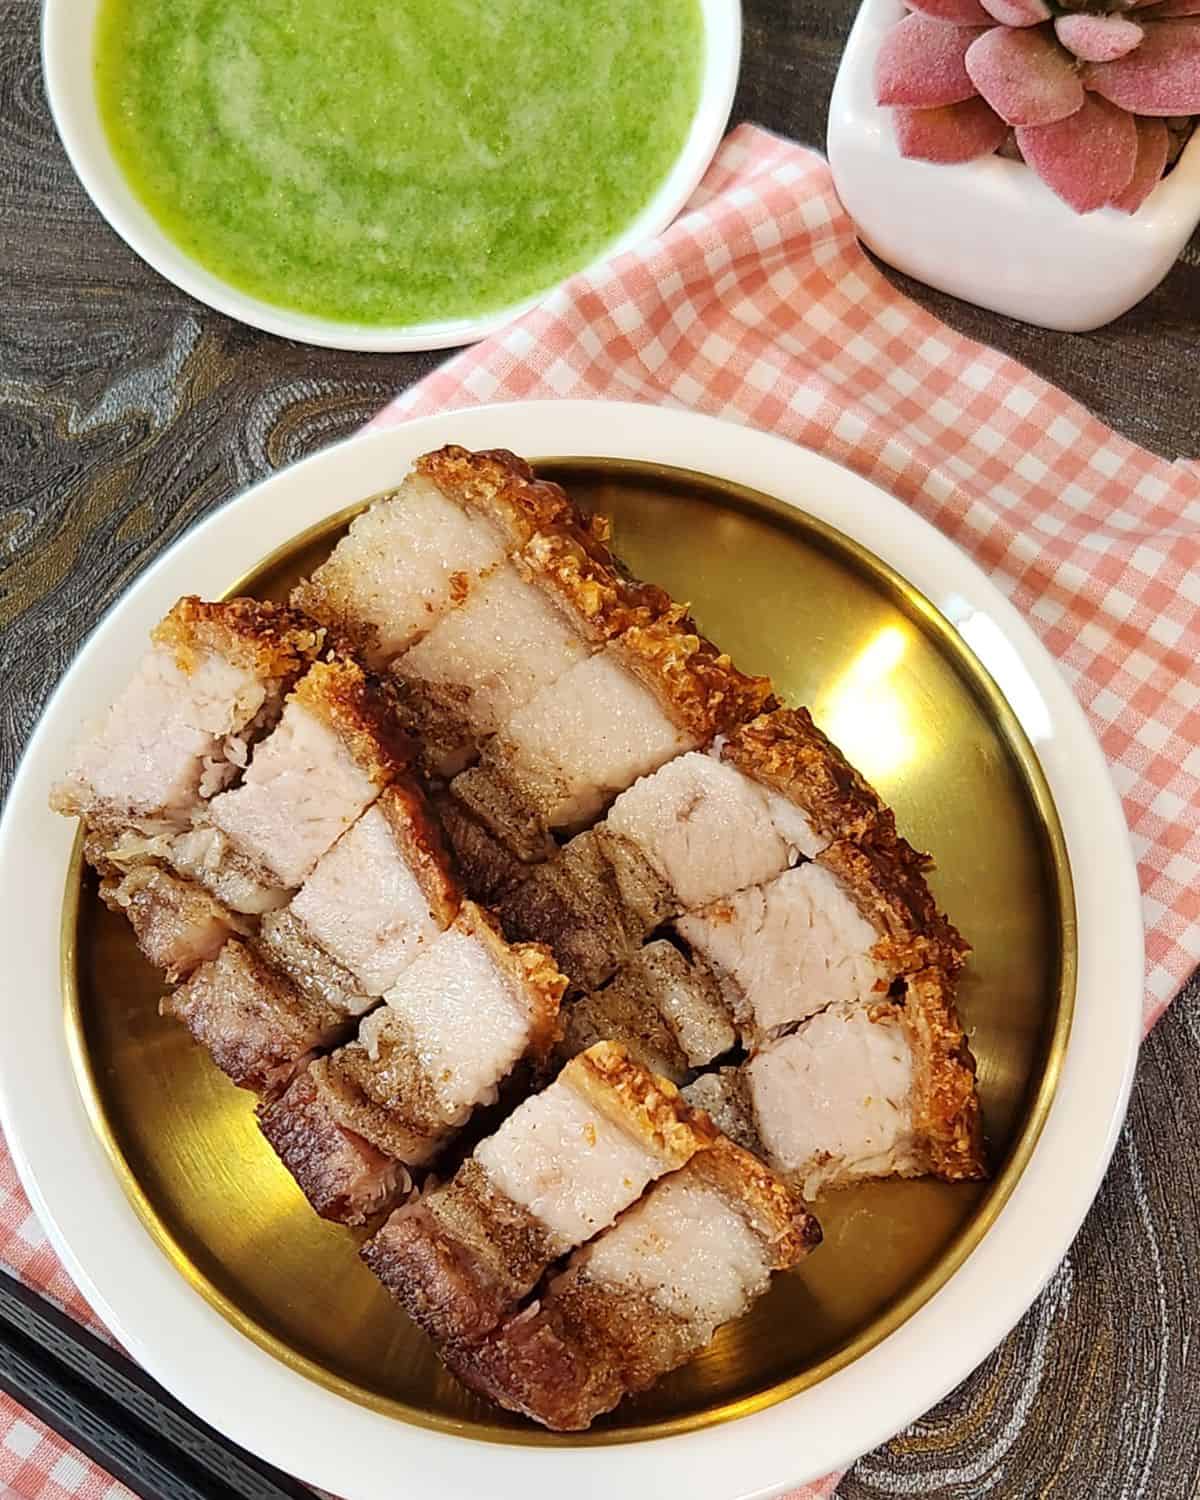
Serve crispy pork belly with the green chili dipping sauce!
Tips
- No thawing needed – If your pork belly is frozen, you can skip thawing since you’ll boil the skin right away.
- Vinegar isn’t for flavor here – It won’t make the skin taste sour. It simply draws out moisture. Combine it with rock salt or fine sea salt for maximum drying power. This won’t make the meat too salty.
- Let the bubbles settle – When mixing baking soda with vinegar, let the fizz subside before brushing it on. This avoids any bitter taste and helps keep the skin both crispy and soft.
- Parboil just enough – Boil the skin for only 5 minutes. This makes it soft enough to prick without breaking. Overboiling can make it fragile.
- Prick, don’t pierce – Aim for just 5 mm deep when pricking the skin. Too deep and the fat will leak during roasting, which prevents puffing and blistering.
- Two applications of the magic mix – First, before refrigerating overnight. Second, after removing the salt crust.
- Fridge drying is key – Leave the pork belly uncovered in the fridge overnight. This air-dries the skin and helps it blister beautifully in the oven.
- Watch for uneven puffing – If a patch isn’t blistering during the high-heat stage, rotate the pan and give it a few extra minutes.
- Mind the salt layer thickness – Dense but not overly thick, too much salt can slow down the drying process under heat.
Serving
Crispy pork belly is the ultimate centerpiece, perfect for everything from weekend family dinners to Chinese New Year banquets. Pair it with minced pork noodles for a comforting, hearty meal, or balance the richness with a light egg drop soup.
For a takeout-style feast at home, serve it with egg fried rice or shrimp fried rice. If you want something soft and fluffy to soak up the juices, steamed buns (mantou) are perfect for making little pork belly sliders. Add a vegetable side for extra balance, try green beans with eggs for a quick fiber boost, or pork and broccoli stir-fry for a classic pairing. And of course, don’t skip the green chili dipping sauce from this recipe — its spicy, tangy kick cuts through the richness beautifully.
This dish is also a hit at special occasions like Chinese New Year, family celebrations, or potluck gatherings. With its golden crackling skin and juicy layers, it’s a showstopper that gets people talking (and reaching for seconds).

FAQs about Crispy Pork Belly
Up to 24 hours for best flavor and texture. Keep the skin uncovered in the fridge so it dries out for maximum crispiness.
Yes, a regular fork works if you don’t have a meat pricker. Just prick gently about 5 mm deep to avoid piercing the fat layer.
Yes! Set the air fryer to 320°F (160°C) for the initial roast, then increase to 400–430°F (200–220°C) for the crisping stage. Cooking times may be shorter than the oven, so check frequently.
Common reasons include: skin not dried properly, pricking too deep (letting fat leak out), oven temperature too low during the final stage, or skipping the salt/vinegar/baking soda treatment.
No, it should stay skin-side up the entire time so the skin dries and blisters evenly.
Yes. You can freeze uncooked pork belly for up to 3 months (wrap well). For cooked pork belly, store in an airtight container and freeze for up to 1 month. Re-crisp in the oven before serving.
Reheat in a preheated oven at 350°F (175°C) for 10–15 minutes to restore the crackle. Avoid microwaving, it softens the skin.

Storage and Reheating
Store the leftover in an airtight container in the fridge. The next day when you want to eat it again, reheat in the oven for 10-15 minutes at 160°C – 180°C. Take it out from the oven, let it cool for 5 minutes. It should be crispy again.


Crispy Pork Belly – Chinese Roast Pork
Equipment
- 1 oven
Ingredients
- 1 kg pork belly 5 layer
Seasoning
- 1-2 tsp fine salt
- 1 tsp sugar
- 1 tsp pepper
- ½ tsp mushroom powder optional
Skin
- 2 tbsp vinegar
- ¼ tsp fine salt
- ½ tsp baking soda
Green chili sauce
- 30 gr fresh green chilis
- 1 garlic
- 1-2 lime wedges
- 50 ml water
- ½ tsp salt
- 2 tsp sugar
Instructions
- Prepare the pork belly. Clean the skin with knife to remove any leftover fur with a torch if there is any.
- If the pork belly is straight from the freezer, no need to thaw it because you’re going to boil the skin right away.
- Boil some water, enough to cover the skin part. Put the skin facing down in the boiling water. Boil it for 5 minutes.
- After 5 minutes, take out the pork belly and soak in a clean water. This is to let any leftover blood in the meat come out. Soak for 5 minutes and take the pork belly to the working table.
- Prepare some kitchen towel on the working table. Put the pork belly, skin facing up.
- Dab the skin with kitchen towel to remove excess water.
- Use fork or meat tenderizer to poke the skin. Do not poke too deep. Just poke for 5 mm. If you poke too deep, the fat layer under the skin will ooze out the fat while roasting. This can prevent the skin from puffing up while roasting.
- After drying the skin with the kitchen towel, turn the pork belly upside down. Cut the meat lengthwise and in the middle. Do not cut through the skin. Create crevices deep enough to let the seasoning go through. This will also help you cut the pork belly easily later after it is done.
- Get ready with the seasoning: salt, sugar, pepper and mushroom powder. Mix well.
- Use a teaspoon to put the seasoning in the meat crevices and every corner of the meat. Do not apply to the skin. Just apply to the crevices you made before. Rub it all and massage so the seasoning can be absorbed evenly.
- Prepare aluminum foil to wrap the meat. Wrap the meat part with the skin unwrapped.
- Make a rectangular shape following the shape of the pork belly with the aluminum foil.
- Dab the skin with kitchen towel. Make sure it is clean from the seasoning.
- Now let’s mix the skin potion. Mix salt, baking soda, and vinegar together. This mixture will help make the skin crunchy and crispy but not hard.
- Stir well until the bubble subsides. Make sure there is no baking soda residue in the mixture. Apply using a brush on the skin only. You can brush it a few times.
- Put the pork belly in the chiller for at least 6 hours or better overnight. Do not cover the skin. This is drying up process. The next day, take out the pork belly. You can process it right away.
- Preheat the oven at 160°C. The oven I use is convection oven with a fan.
- Apply coarse salt on top of the pork belly so it covers the whole skin. Try to apply it as dense as possible. Do not apply too thick as it won’t be necessary. The salt will absorb moisture underneath the skin. It will not make the skin too salty. So don’t worry!
- Put on a tray and start roasting in the oven. Place it in the middle rack and roast for 25 minutes.
- After 25 minutes, take it out and start scraping the salt gently and clean up with kitchen towel.
- Apply another brush of baking soda, salt, and vinegar. This time only a pinch of salt, a pinch of baking soda and 1 tbsp of vinegar. Always wait until the bubble subsides and apply.
- Put it back into the oven. Roast for another 25 minutes.
- The vinegar will not make the skin taste sour. It will help absorb the water content.
- After 2×25 minutes, turn up the oven to 200-250°C. Roast and check for every 15 minutes. You may want to rotate the pan every 15 minutes.
- The skin will start crackling. I like to watch in amazement as the ugly rubbery skin starts to puff and crackle! Even the crackling sound is so beautiful to hear. It is really nice to hear that!
- The total roasting time until you see the skin is all crackling and crispy is 45-60 minutes.
- After it is done, take it out from the oven. Let it cool inside the pan for 30 minutes. The meat will absorb the juice in the aluminum foil and the skin will settle for its crispiness and crunchiness.
- After 30 minutes, take it out from the aluminum foil. You can start cutting the pork belly following the lines that you made in the beginning.
- For the green chili sauce: bring the water to boil. Put fresh green chilis and garlic into boiling water. Do not let the green chilis turn dark, so when the water simmers for a while, take out the chilis. Blend them all together. Serve the crispy pork belly with green chili sauce and coriander leaves.
Video
Notes
- No thawing needed – If your pork belly is frozen, you can skip thawing since you’ll boil the skin right away.
- Vinegar isn’t for flavor here – It won’t make the skin taste sour. It simply draws out moisture. Combine it with rock salt or fine sea salt for maximum drying power. This won’t make the meat too salty.
- Let the bubbles settle – When mixing baking soda with vinegar, let the fizz subside before brushing it on. This avoids any bitter taste and helps keep the skin both crispy and soft.
- Parboil just enough – Boil the skin for only 5 minutes. This makes it soft enough to prick without breaking. Overboiling can make it fragile.
- Prick, don’t pierce – Aim for just 5 mm deep when pricking the skin. Too deep and the fat will leak during roasting, which prevents puffing and blistering.
- Two applications of the magic mix – First, before refrigerating overnight. Second, after removing the salt crust.
- Fridge drying is key – Leave the pork belly uncovered in the fridge overnight. This air-dries the skin and helps it blister beautifully in the oven.
- Watch for uneven puffing – If a patch isn’t blistering during the high-heat stage, rotate the pan and give it a few extra minutes.
- Mind the salt layer thickness – Dense but not overly thick, too much salt can slow down the drying process under heat.


I have tried so many crispy pork belly and I have failed a lot! This is the only recipe with tricks to make crispy pork belly successfully. I use this so many times and my family love it!