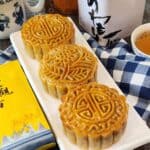
Traditional Mooncake
Celebrate the Mid-Autumn Festival with this easy mooncake recipe! These traditional Hong Kong–style mooncakes feature a thin golden crust and classic fillings like lotus seed paste and salted egg yolk, perfect for those who love authentic, classic mooncakes made from scratch.
Servings: 12 pcs
Calories: 169kcal
Equipment
- 1 mooncake mold 100 gr
Ingredients
Pastry Skin
- 130 gr cake flour
- 130 gr bread flour
- 160 gr golden syrup
- 12 gr lye water
- 30 gr coconut oil
- 1 egg yolk
- 25 gr creamy peanut butter
Filling
- White lotus paste
- Salted egg yolk
Egg Wash
- 2 egg yolk
- ½ egg white +- 20 gr
Instructions
- In a bowl, mix golden syrup, egg yolk, and peanut butter. Stir until smooth. Sift the flour into the bowl and mix again until fully incorporated.
- Knead the dough with your hands until it’s smooth and no longer sticky. Place it in a plastic bag and let it rest for 1–2 hours. This helps the dough relax and absorb the syrup evenly.
- Lightly spray the salted egg yolks with water, then roast them at 160°C for 5 minutes to keep them moist. Mix sunflower seeds evenly into the lotus-paste filling. Adjust the amount of filling based on your mold size — for a 100 g mold, use about 65 g of filling.
- Wrap each roasted salted egg yolk with the prepared filling and set aside. Weigh 35 g of dough for the outer skin, round it, then flatten it thinly with a rolling pin.
- Place the filling in the center of the dough and wrap it gently. Smooth and round the dough ball. Lightly dust the mooncake mold with flour, then place the dough inside.
- Press the mold firmly to imprint the pattern. Arrange the shaped mooncakes on a lined baking tray. Bake in a preheated oven at 180°C (356°F) for 8–10 minutes, until the surface looks set. Prepare the egg wash and strain it for a silky-smooth glaze.
- Brush a light, even layer of egg wash over the surface and bake for 5 minutes. Repeat with another thin coat and bake again for 5 minutes, or until the crust turns beautifully golden brown.
- Transfer the mooncakes to a wire rack to cool completely. Store them in an airtight container for at least one day before serving. This resting period allows oil from the filling to migrate into the crust, making it glossy, tender, and aromatic. Enjoy your mooncakes from the second day onward for the best flavor!
Video
Notes
- Lightly dust your mold – Coat the mooncake mold with a thin layer of flour, then shake or brush off any excess. This helps the dough release smoothly after pressing, keeping the edges neat and clean.
- Don’t forget the piston – Dust the mold’s piston with flour as well, and tap off the extra. A lightly floured surface prevents sticking and keeps the pattern imprint crisp.
- Press with control – Place the rounded dough into the mold, press it down onto the baking tray, and hold for a moment to let the pattern form evenly. For the most defined result, press gently several times rather than once with full force.
- Strain the egg wash glaze – Use a fine mesh strainer to sieve the egg wash mixture. This removes bubbles and gives you a silky-smooth finish on the crust.
- Brush thinly and gently – Apply the egg wash in a light, even layer to preserve the pattern details. Avoid letting it pool in the crevices—if it does, blot gently with a kitchen towel before baking.
- Weigh your dough correctly – The skin should be about 35% of your total mold size. For a 100 g mold, that means around 35 g of dough and 65 g of filling. This ratio ensures the right balance between thin crust and generous filling.
Nutrition
Serving: 1pcs | Calories: 169kcal | Carbohydrates: 27g | Protein: 4g | Fat: 5g | Saturated Fat: 3g | Polyunsaturated Fat: 1g | Monounsaturated Fat: 1g | Cholesterol: 49mg | Sodium: 14mg | Potassium: 40mg | Fiber: 1g | Sugar: 11g | Vitamin A: 65IU | Calcium: 10mg | Iron: 0.4mg