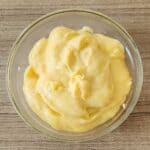
Custard Filling
Creamy custard filling that is light and less sweet. Made from scratch with just milk, eggs, sugar, and vanilla.
Servings: 250 grams
Calories: 200kcal
Ingredients
- 2 egg yolks
- 35 gr sugar
- 13 gr cake flour cornstarch
- 160 gr milk
- 10 gr butter
- ½ tsp vanilla extract
Instructions
- In a bowl, whisk together the egg yolks, sugar, and vanilla extract until the sugar is dissolved and the mixture turns pale and slightly thickened. Sift in the flour (or cornstarch) and whisk again until smooth with no lumps.
- Slowly pour in the milk while whisking to combine. Strain the mixture into a saucepan to ensure a smooth, lump-free custard base.
- Place the pan over low to medium heat. Stir constantly with a whisk or spatula, making sure to scrape the sides and bottom so it doesn’t burn. Once the mixture begins to thicken, add the butter. Keep stirring until it becomes smooth and glossy.
- Transfer the cooked custard filling into a clean bowl. Cover the surface directly with plastic wrap to prevent a skin from forming. Let it cool to room temperature, then refrigerate until chilled. Your creamy, silky custard filling is ready to use!
Notes
- Stir constantly - Custard thickens fast once it heats up, so keep whisking gently. This prevents lumps and keeps your custard smooth and silky.
- Use low to medium heat - Don’t rush the process, high heat can make the eggs scramble or cause curdling. Slow and steady wins the custard race.
- Strain before cooking - Sifting the mixture before it goes into the pan ensures a lump-free, smooth filling every time.
- Watch the thickness - The custard should coat the back of a spoon, not run off too quickly. If it’s too runny, cook it a little longer while stirring.
- Cover it right - When chilling, press plastic wrap directly against the surface of the custard. This prevents a skin from forming and keeps it smooth.
- To fix lumpy custard - If it thickens too quickly and forms lumps, remove from heat immediately and whisk vigorously. You can also strain it through a fine sieve while still warm.
- For extra shine and richness - Stir in a small knob of butter after cooking. It makes the custard filling glossy and even creamier.
Nutrition
Serving: 100grams | Calories: 200kcal | Carbohydrates: 0.2g | Protein: 0.1g | Fat: 0.1g | Saturated Fat: 0.05g | Polyunsaturated Fat: 0.01g | Monounsaturated Fat: 0.03g | Trans Fat: 0.001g | Cholesterol: 2mg | Sodium: 1mg | Potassium: 1mg | Fiber: 0.001g | Sugar: 0.2g | Vitamin A: 4IU | Calcium: 1mg | Iron: 0.004mg