
Roti Sisir – Indonesian Pull Apart Bread
Roti Sisir is a soft, buttery Indonesian pull-apart bread that’s as fun to eat as it is nostalgic. Fluffy and golden, each slice is brushed with butter, then topped with sugar, chocolate, or cheese. One bite, and you’ll be reaching for another!
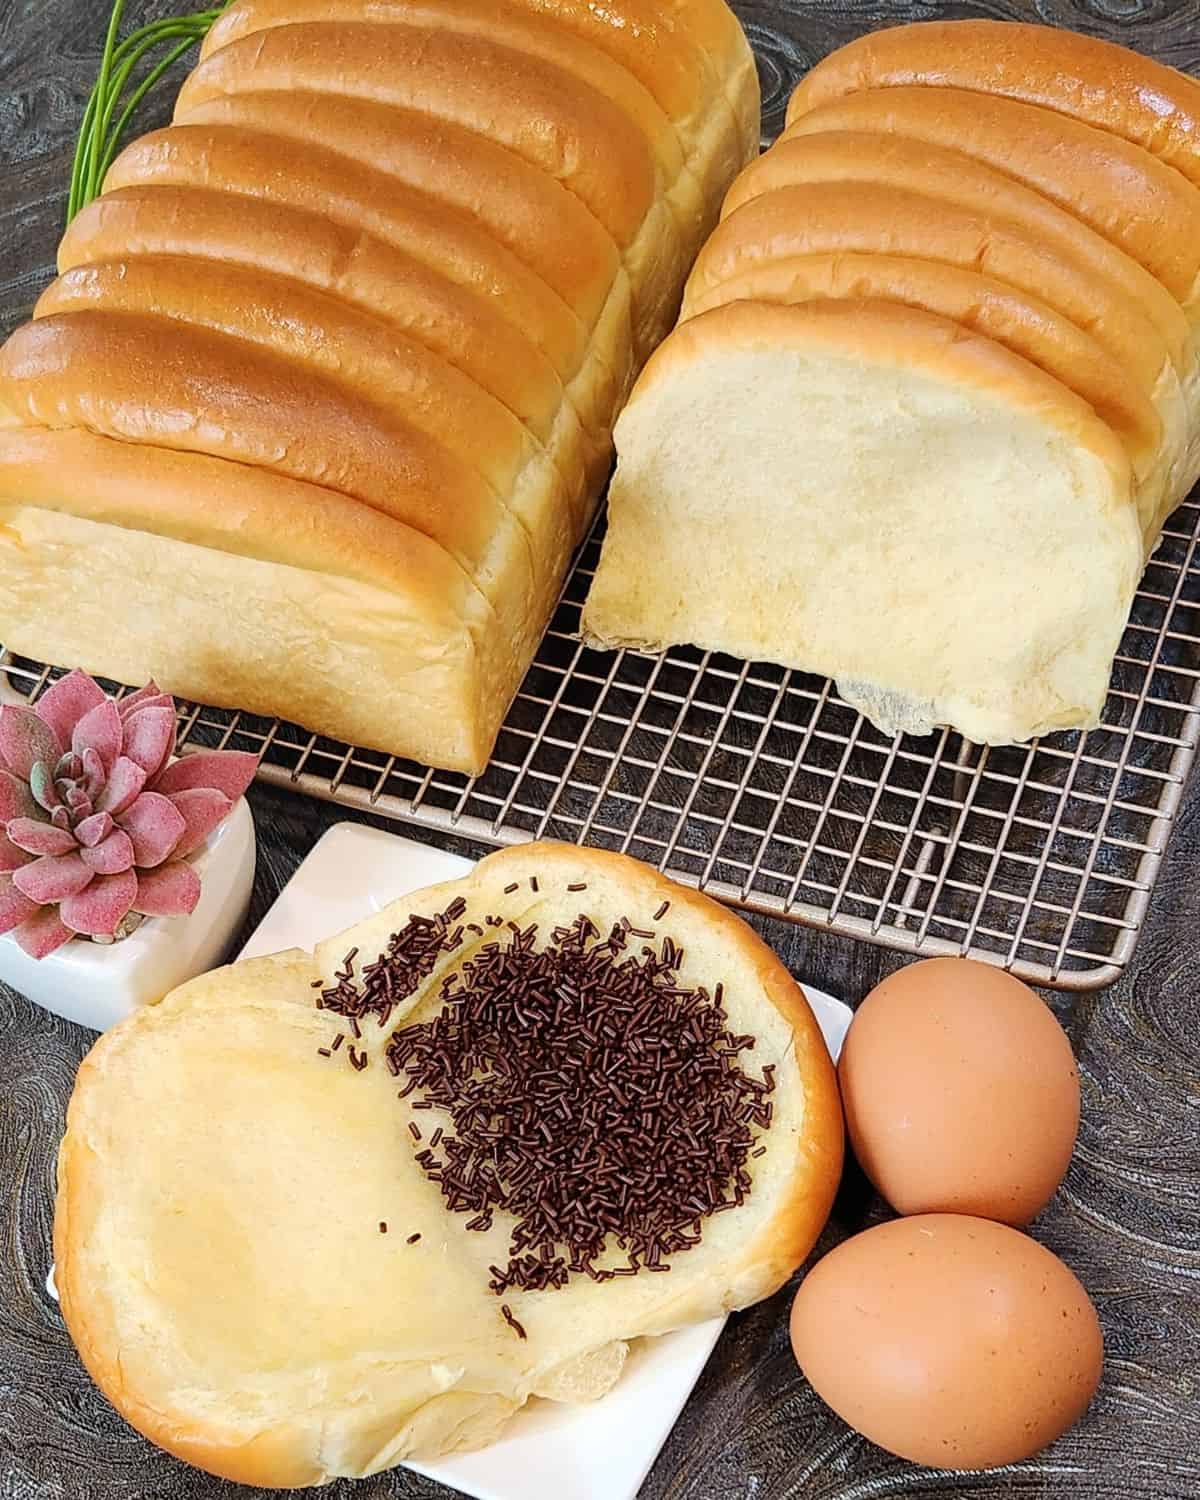
Roti Sisir is one of Indonesia’s most iconic breads, beloved for its soft, fluffy texture and rich buttery flavor. This pull-apart bread dates back to the Dutch colonial era and has stood the test of time—gracing bakery shelves and family tables for generations. The pandan version, Roti Sisir Pandan, adds a fragrant twist with its vibrant green hue and tropical aroma, making it both nostalgic and refreshing.
While modern creations like Cranberry Cream Cheese Bread, Japanese Milk Bread, Korean Sausage Bread, Roti Gulung Abon, and even Cloud Bread often steal the spotlight, Roti Sisir holds a special place in many hearts. It’s simple, comforting, and endlessly customizable—whether topped with sugar, chocolate sprinkles, or cheese, it never goes out of style.
Why You Will Love This Recipe
Recipe Ingredients

Ingredient Notes
Bread Flour – High in protein, bread flour gives Roti Sisir its soft yet chewy texture. You can use all-purpose flour, but the result may be a bit less fluffy.
Butter – Butter adds richness and that classic glossy top. Use unsalted, softened butter for easier mixing—and don’t skimp on that final buttery brush!
Be sure to check out the full recipe and ingredient list below
How to Make Roti Sisir
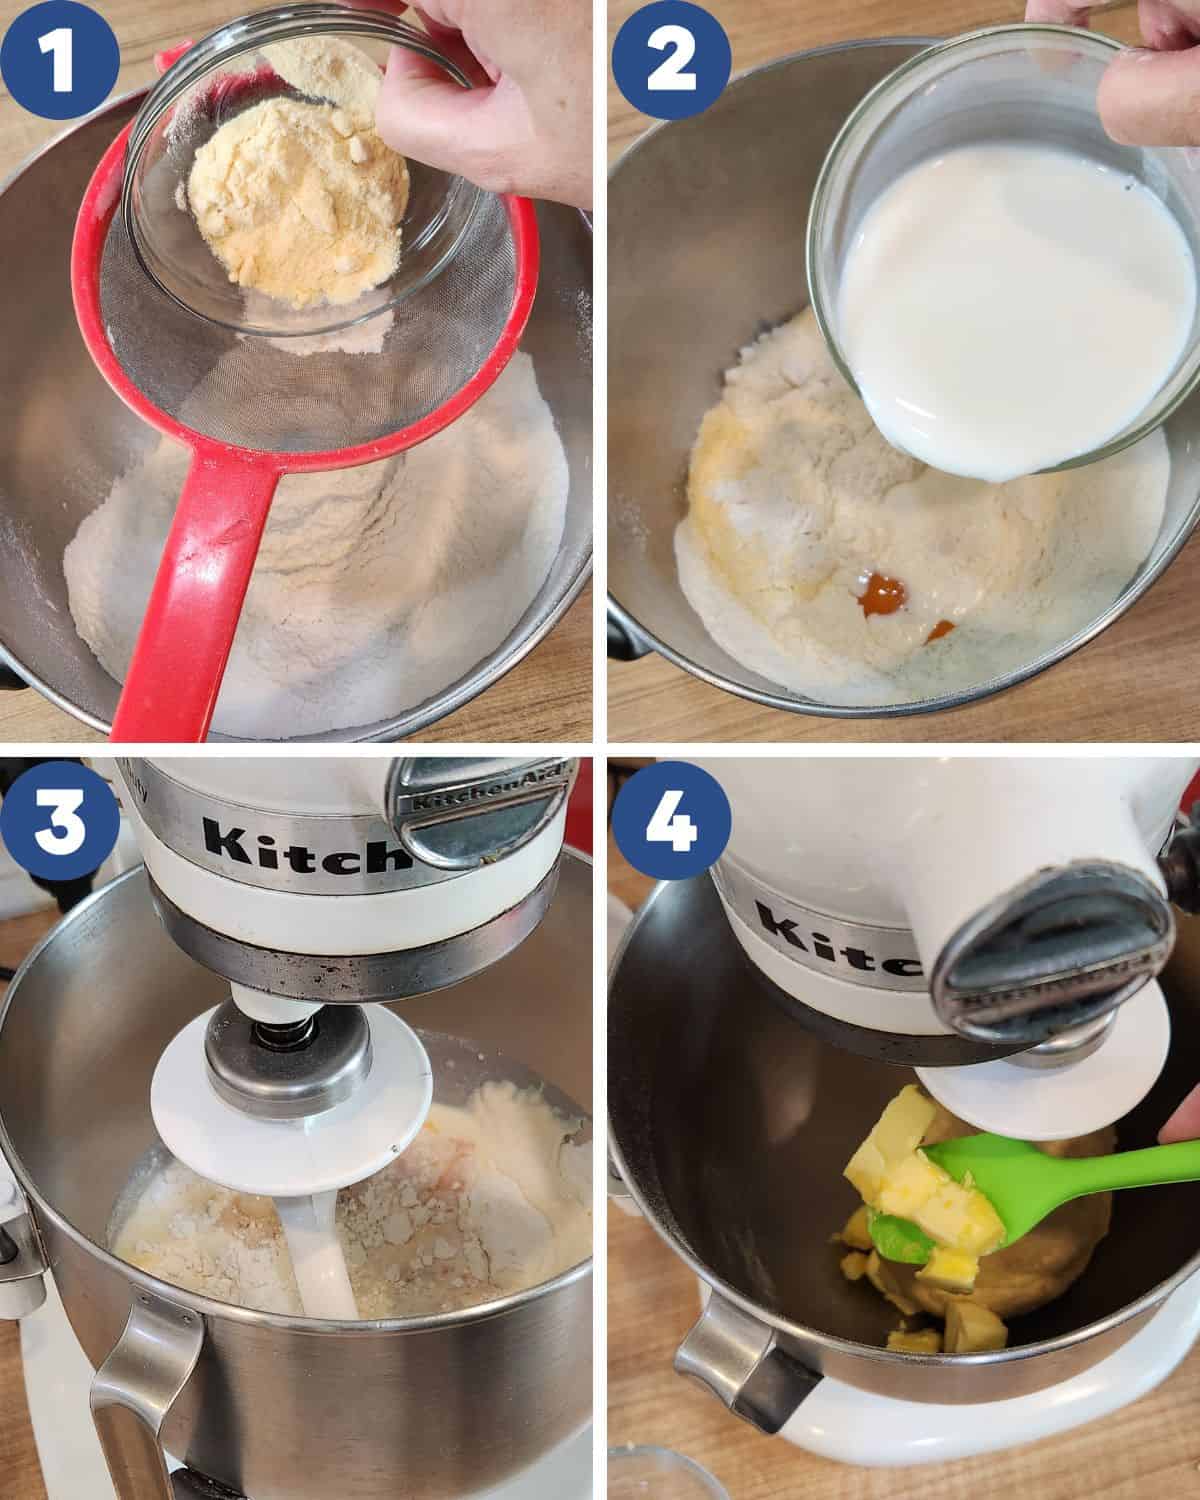
STEP 1. Sift the flour and milk powder into a mixing bowl (Image 1). Add the sugar, instant yeast, egg yolks, and milk (Image 2). Mix on medium speed until the dry ingredients are fully incorporated. Then, add the butter and salt (Images 3, 4).
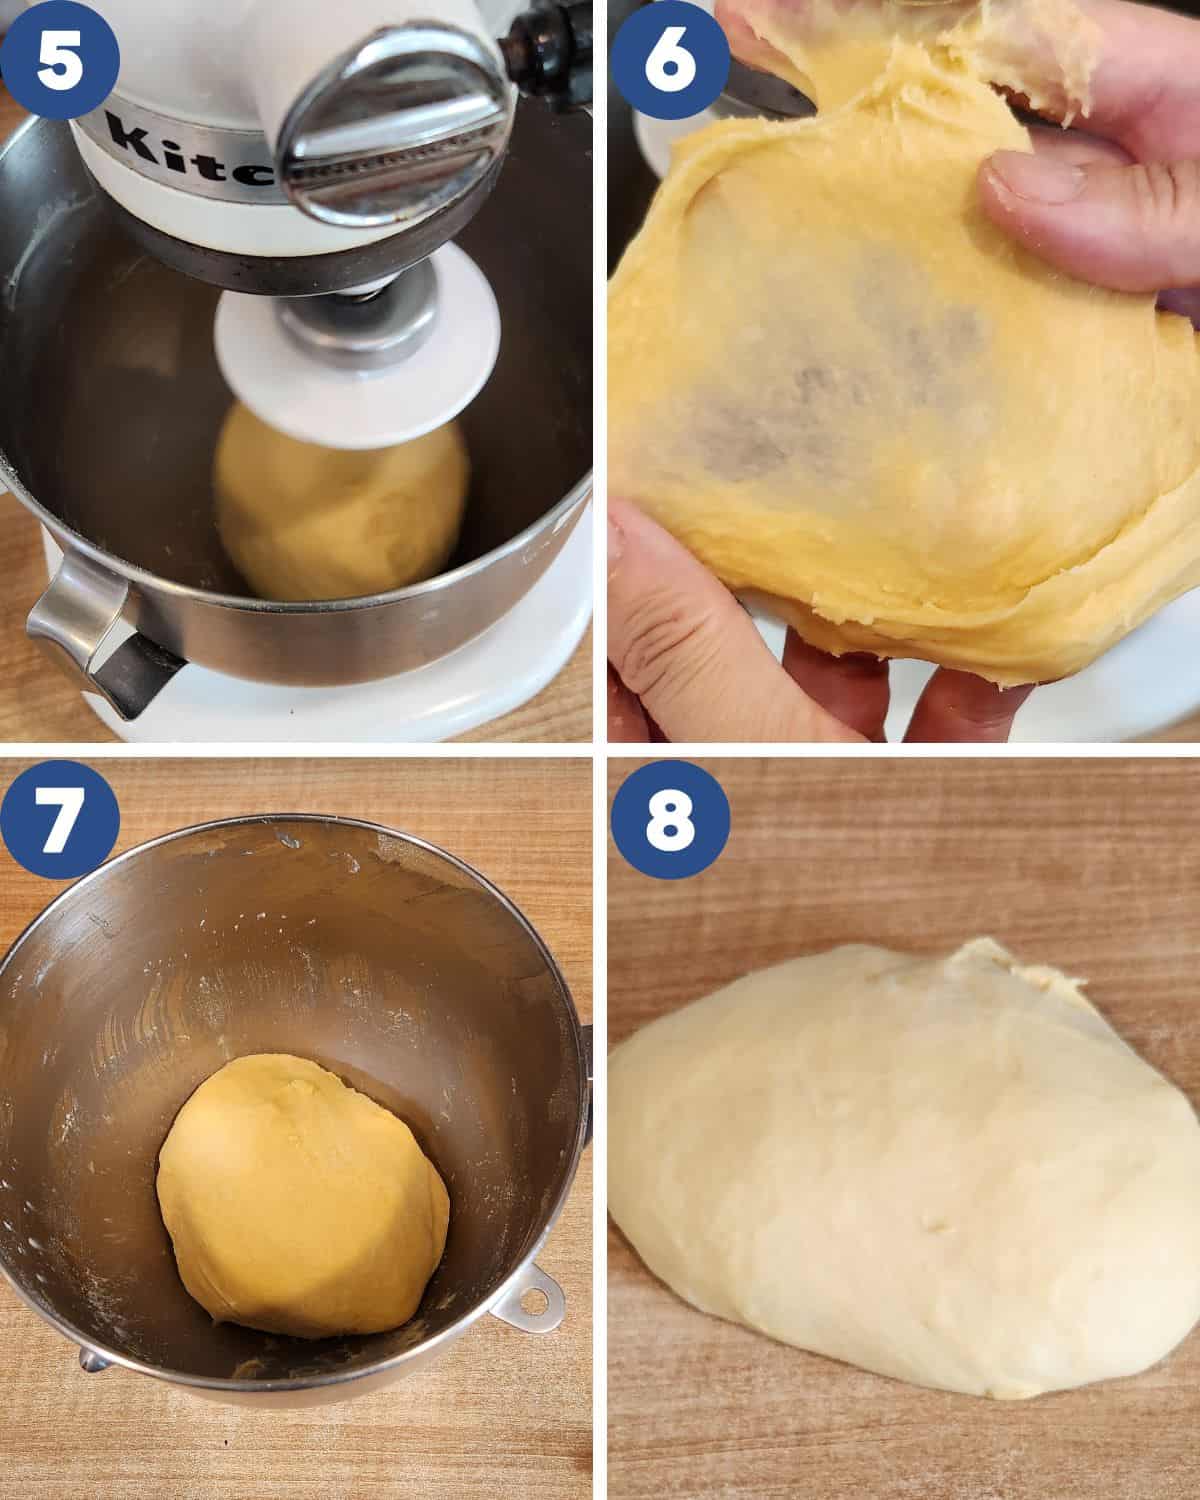
STEP 2. Continue mixing until the dough is smooth and elastic (Image 5). To check, take a small piece of dough and gently stretch it—if it forms a thin “windowpane,” it’s ready (Image 6). Cover the bowl and let the dough rest for 30 minutes (Image 7). After resting, transfer the dough to a lightly floured work surface (Image 8).
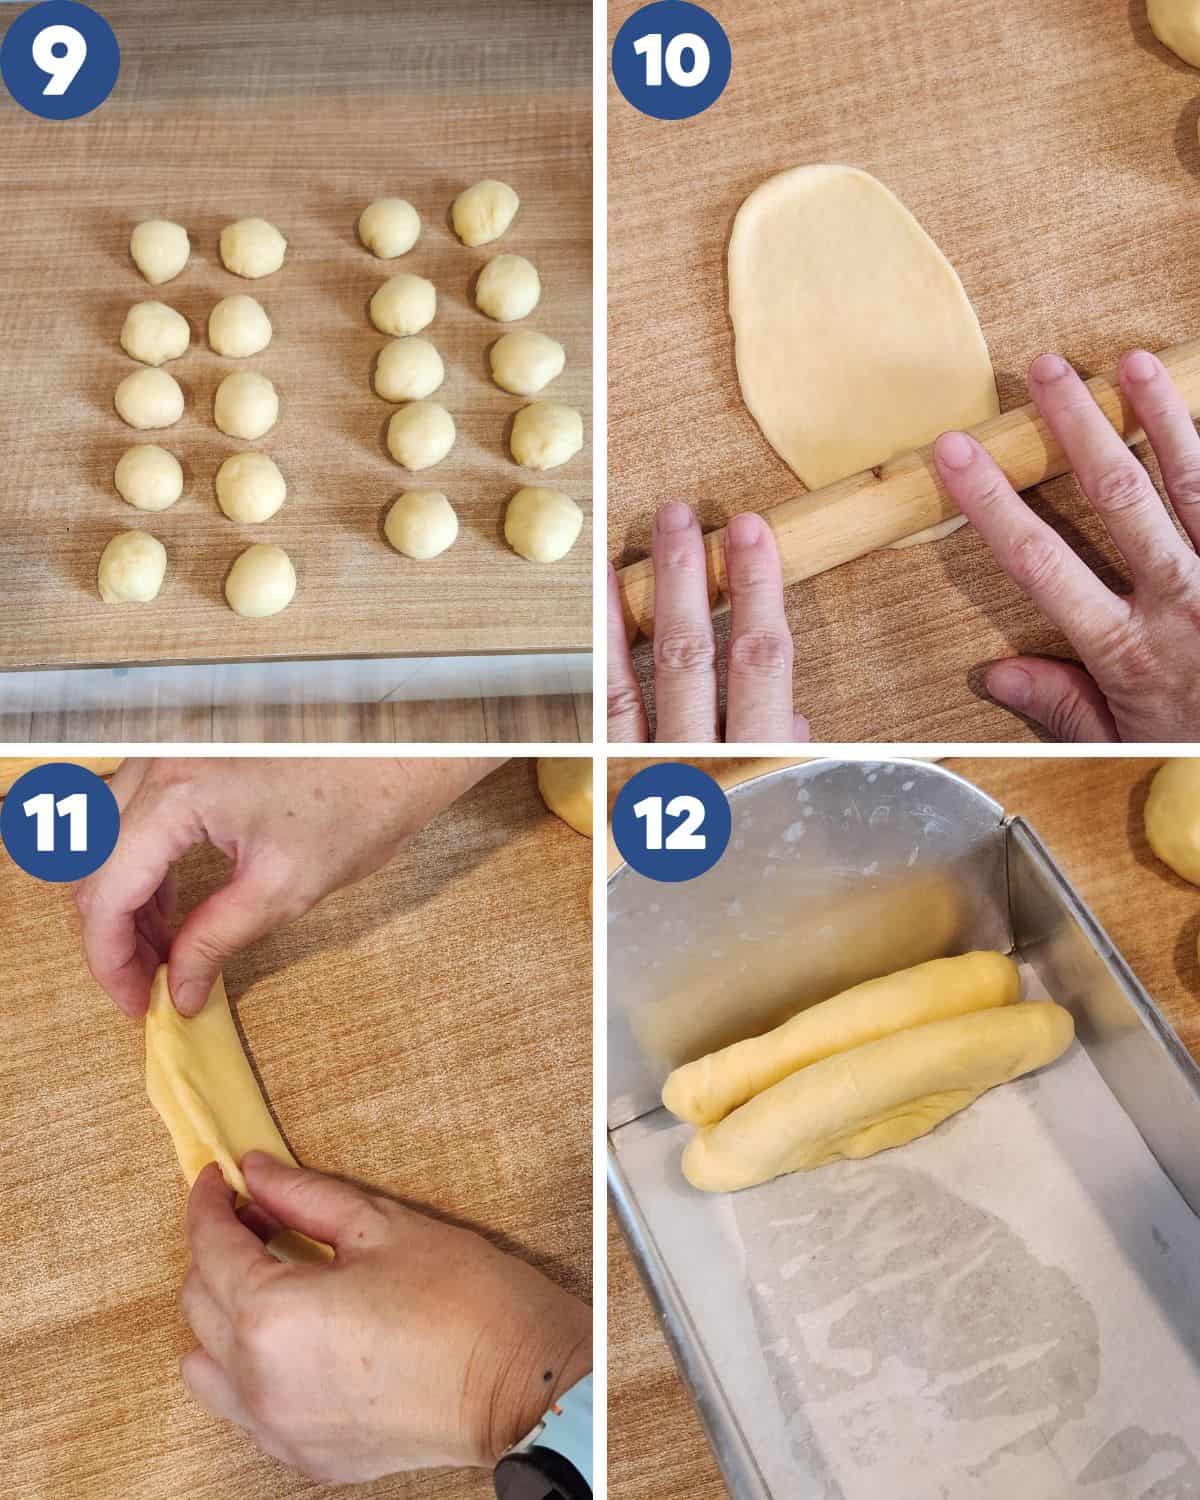
STEP 3. Divide the dough into 20 equal pieces (Image 9). Cover with a cloth and let rest for 15 minutes. Take one piece, flatten it with your hand, roll it out with a rolling pin, then fold it lengthwise (Images 10, 11). Place each piece upright in a loaf pan, with the seam side (opening) facing down (Image 12).
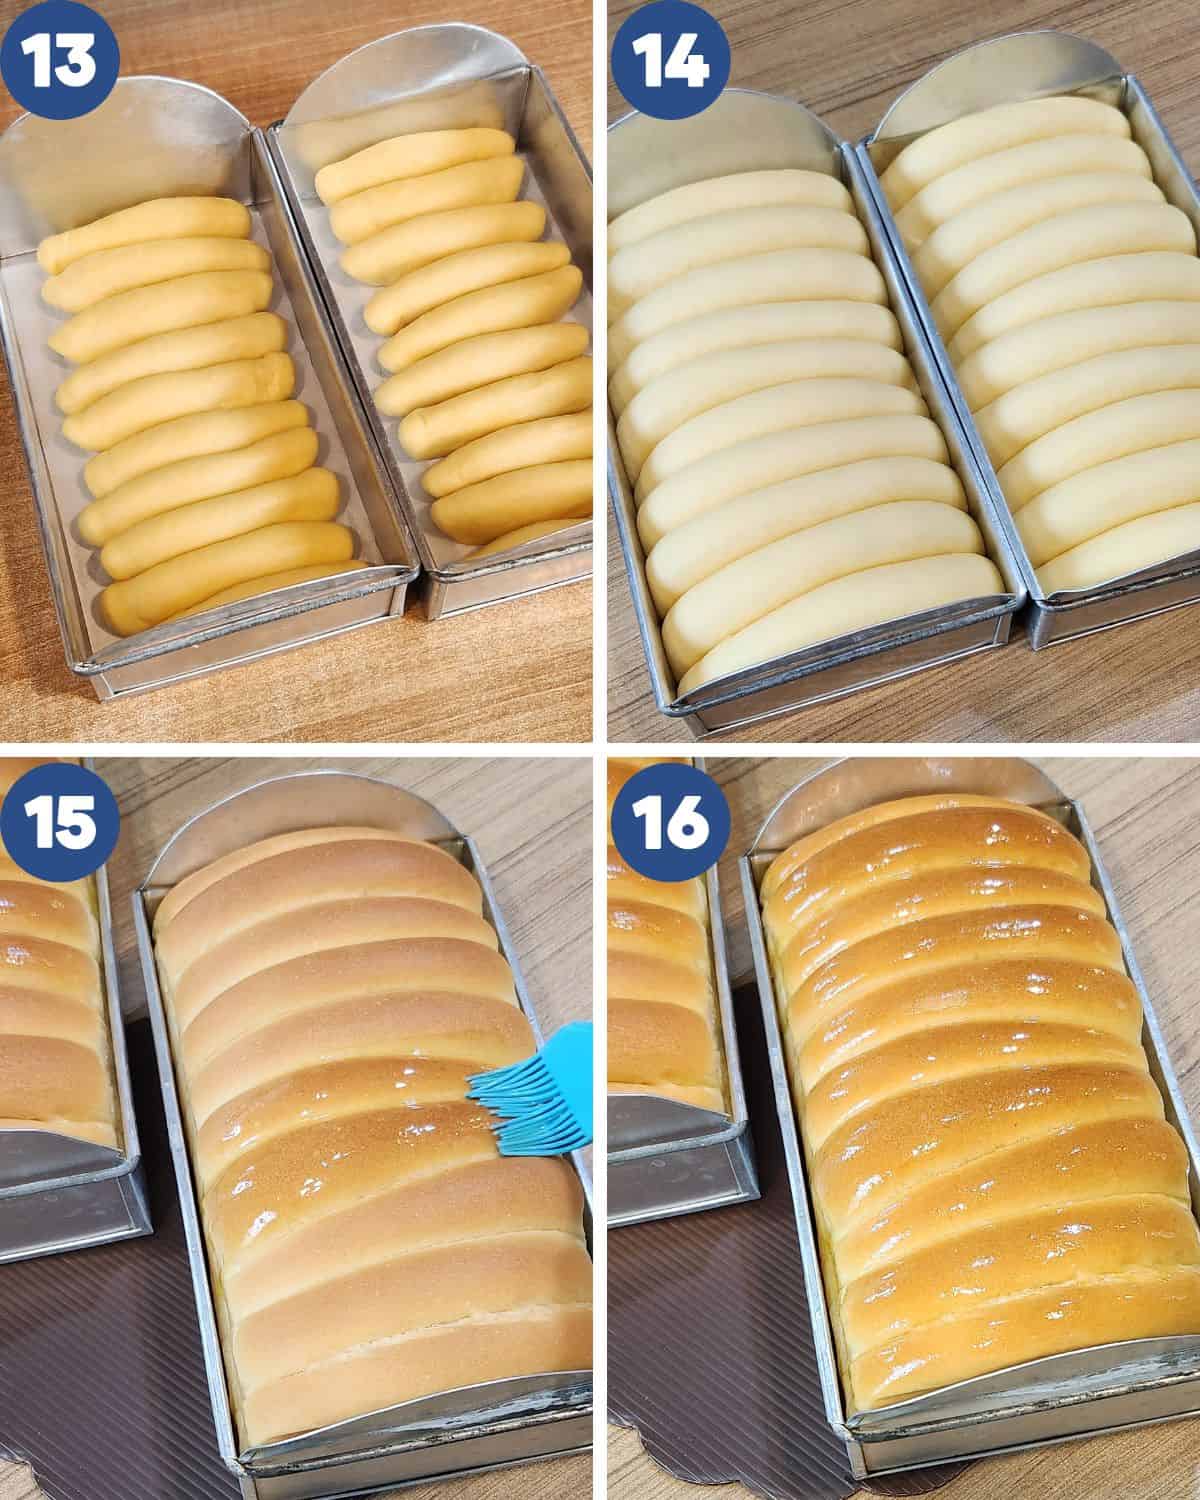
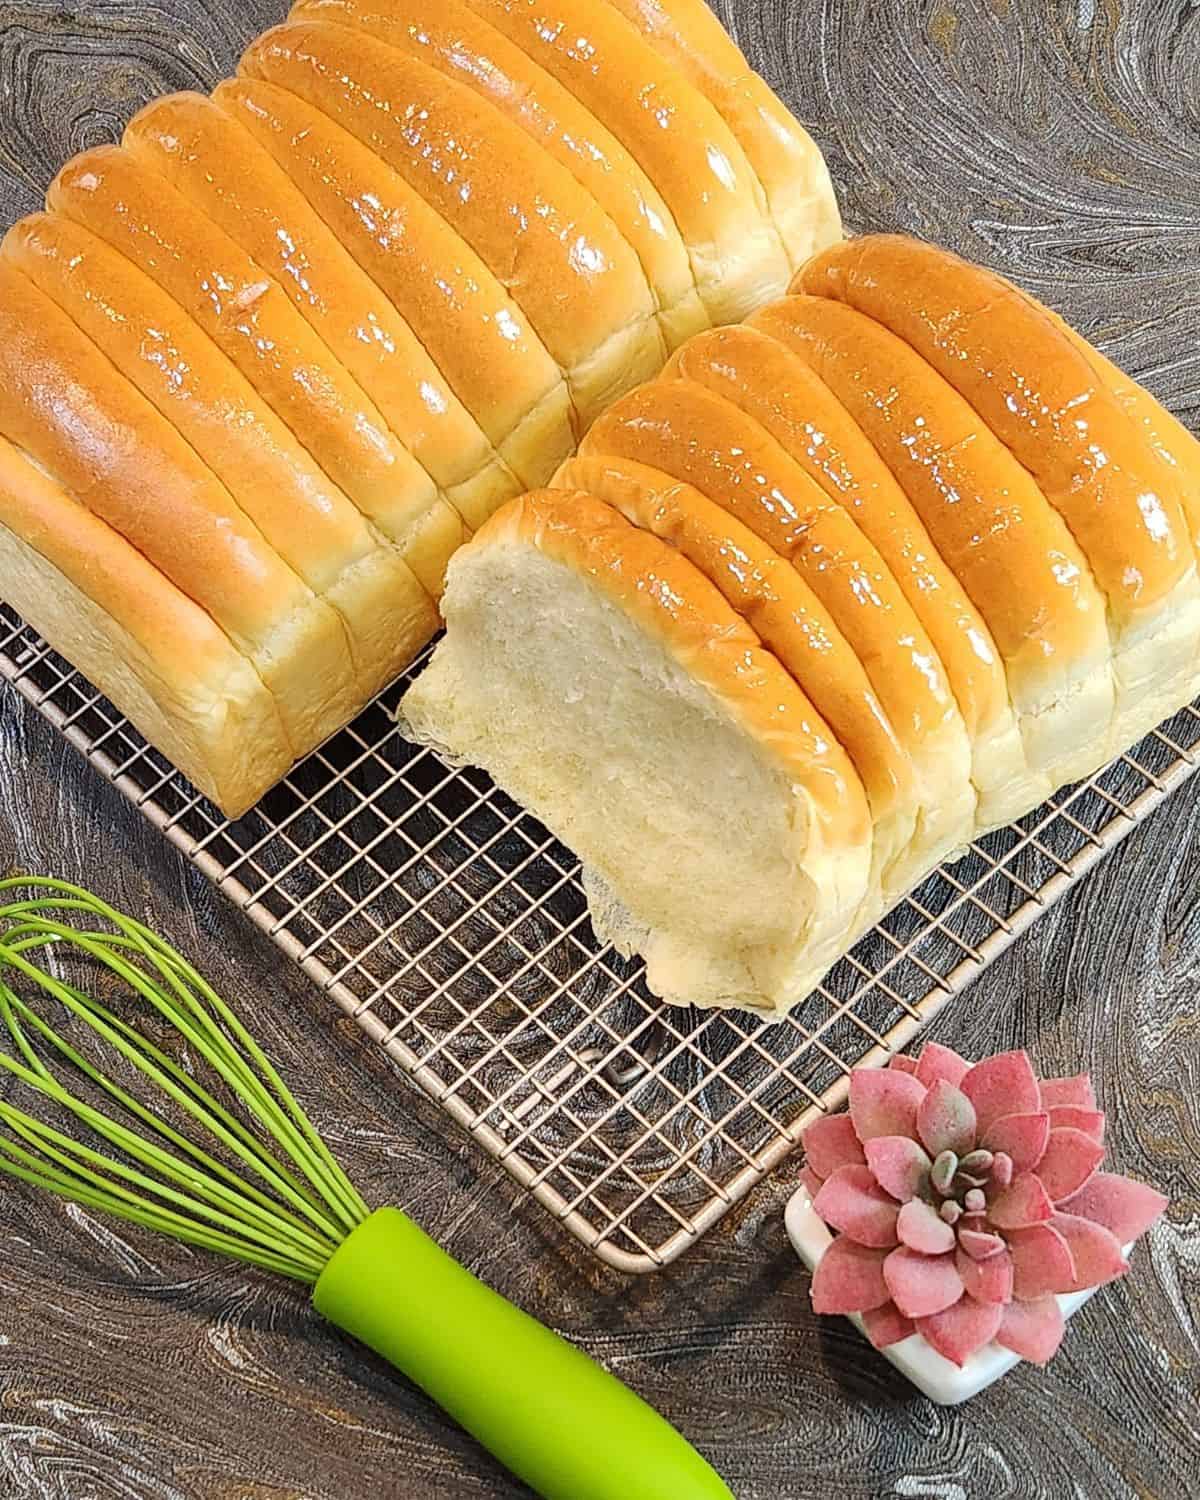
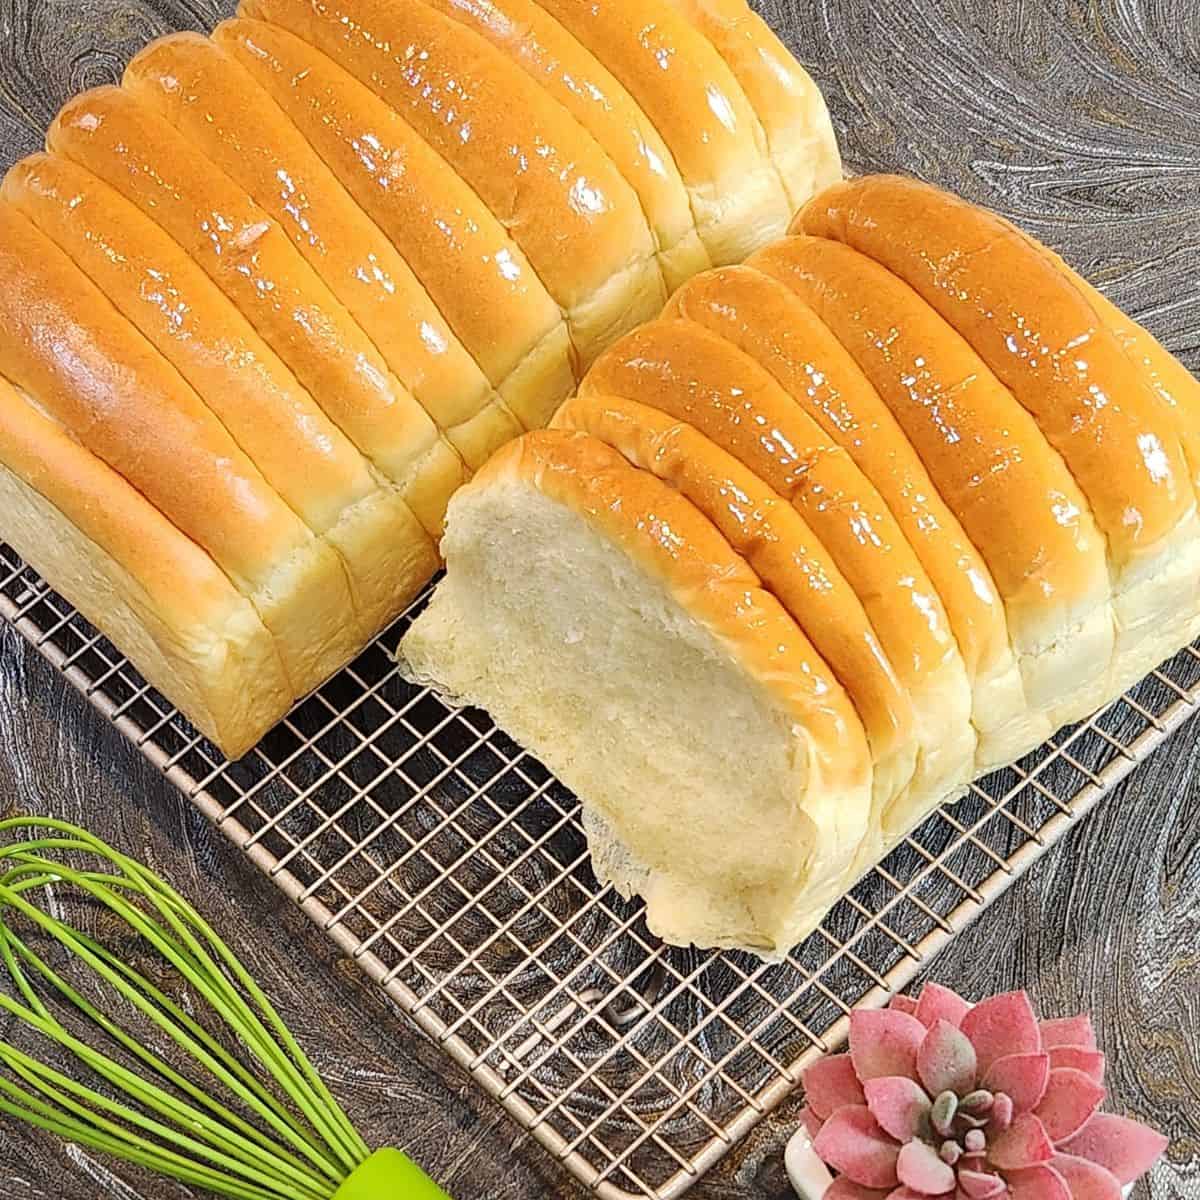
STEP 4. Repeat with the remaining dough. Let the shaped dough proof for 1 hour, or until doubled in size (Images 13, 14). Bake in a preheated oven at 338°F (170°C) for about 20 minutes or until golden brown. While still hot, brush generously with melted butter and remove from the pan to cool (Images 15, 16).
Enjoy your homemade Roti Sisir—warm, buttery, and perfectly pull-apart!
Pro Tips
- Use room-temperature ingredients – Cold milk or eggs can slow down yeast activity. Let everything come to room temp before mixing.
- Don’t rush the kneading – A well-kneaded dough should be smooth and pass the windowpane test. This ensures a fluffy, airy crumb.
- Rest = better shaping – Letting the dough rest before shaping makes it easier to roll and fold without tearing.
- Line up the folds properly – Place the folded dough seam-side down and neatly lined up to get that classic “sisir” (comb) look after baking.
- Brush while it’s hot – For that glossy, buttery finish, brush the top with melted butter as soon as it comes out of the oven.
- Keep it soft longer – Store in an airtight container once cool. You can also lightly warm it up the next day for that just-baked softness.
How to Serve
The classic way? Brush it with butter, sprinkle with sugar, and toast it until golden—just like the good old days. For a fun upgrade, add chocolate rice, grated cheese, or spread on kaya jam or ube halaya for a Southeast Asian twist. This nostalgic bread pairs beautifully with a cup of Earl Grey milk tea, strawberry milk, or a glass of butterfly pea latte.
FAQs about Roti Sisir
Roti Sisir is a soft, buttery Indonesian pull-apart bread that dates back to the Dutch colonial era. It’s typically sliced vertically and brushed with butter, sometimes topped with sugar, cheese, or chocolate sprinkles.
“Sisir” means “comb” in Indonesian. The bread gets its name from its signature look—neatly lined slices that resemble the teeth of a comb.
It’s all about the pull-apart presentation and the buttery finish. Unlike other enriched breads, Roti Sisir is often served with extra toppings after baking, like sugar, grated cheese, or even sweet spreads like kaya or ube halaya.
Yes, you can knead the dough by hand! It may take a little more time and effort, but the result will still be soft and fluffy—just make sure to knead until smooth and elastic.
All-purpose flour can be used as a substitute, though the bread may be slightly less chewy. For the best texture, bread flour is recommended due to its higher protein content.
Storage
Roti Sisir is best enjoyed fresh, but it can be stored for a few days. To preserve its freshness, keep it in an airtight container at room temperature for up to 2-3 days. For longer storage, you can refrigerate it for up to a week or freeze it for a month. Reheat gently before serving to restore its soft texture.
More Classic Recipes from Dutch Era


Roti Sisir – Indonesian Pull-Apart Bread
Equipment
- 2 baking pan 22x12x5 cm
Ingredients
- 350 gr bread flour
- 15 gr milk powder
- 50 gr sugar
- 5 gr instant yeast
- 220 gr milk
- 2 egg yolks
- 45 gr butter
- 5 gr salt
Instructions
- Sift the flour and milk powder into a mixing bowl. Add the sugar, instant yeast, egg yolks, and milk. Mix on medium speed until the dry ingredients are fully incorporated. Then, add the butter and salt.
- Continue mixing until the dough is smooth and elastic. To check, take a small piece of dough and gently stretch it—if it forms a thin “windowpane,” it’s ready (Image 6). Cover the bowl and let the dough rest for 30 minutes. After resting, transfer the dough to a lightly floured work surface.
- Divide the dough into 20 equal pieces. Cover with a cloth and let rest for 15 minutes. Take one piece, flatten it with your hand, roll it out with a rolling pin, then fold it lengthwise. Place each piece upright in a loaf pan, with the seam side (opening) facing down.
- Repeat with the remaining dough. Let the shaped dough proof for 1 hour, or until doubled in size. Bake in a preheated oven at 338°F (170°C) for about 20 minutes or until golden brown. While still hot, brush generously with melted butter and remove from the pan to cool.
Video
Notes
- Use room-temperature ingredients – Cold milk or eggs can slow down yeast activity. Let everything come to room temp before mixing.
- Don’t rush the kneading – A well-kneaded dough should be smooth and pass the windowpane test. This ensures a fluffy, airy crumb.
- Rest = better shaping – Letting the dough rest before shaping makes it easier to roll and fold without tearing.
- Line up the folds properly – Place the folded dough seam-side down and neatly lined up to get that classic “sisir” (comb) look after baking.
- Brush while it’s hot – For that glossy, buttery finish, brush the top with melted butter as soon as it comes out of the oven.
- Keep it soft longer – Store in an airtight container once cool. You can also lightly warm it up the next day for that just-baked softness.


I love the texture and buttery flavor of this bread and how versatile it is for sweet and savory toppings! This is a must-try bread for a beginner!