
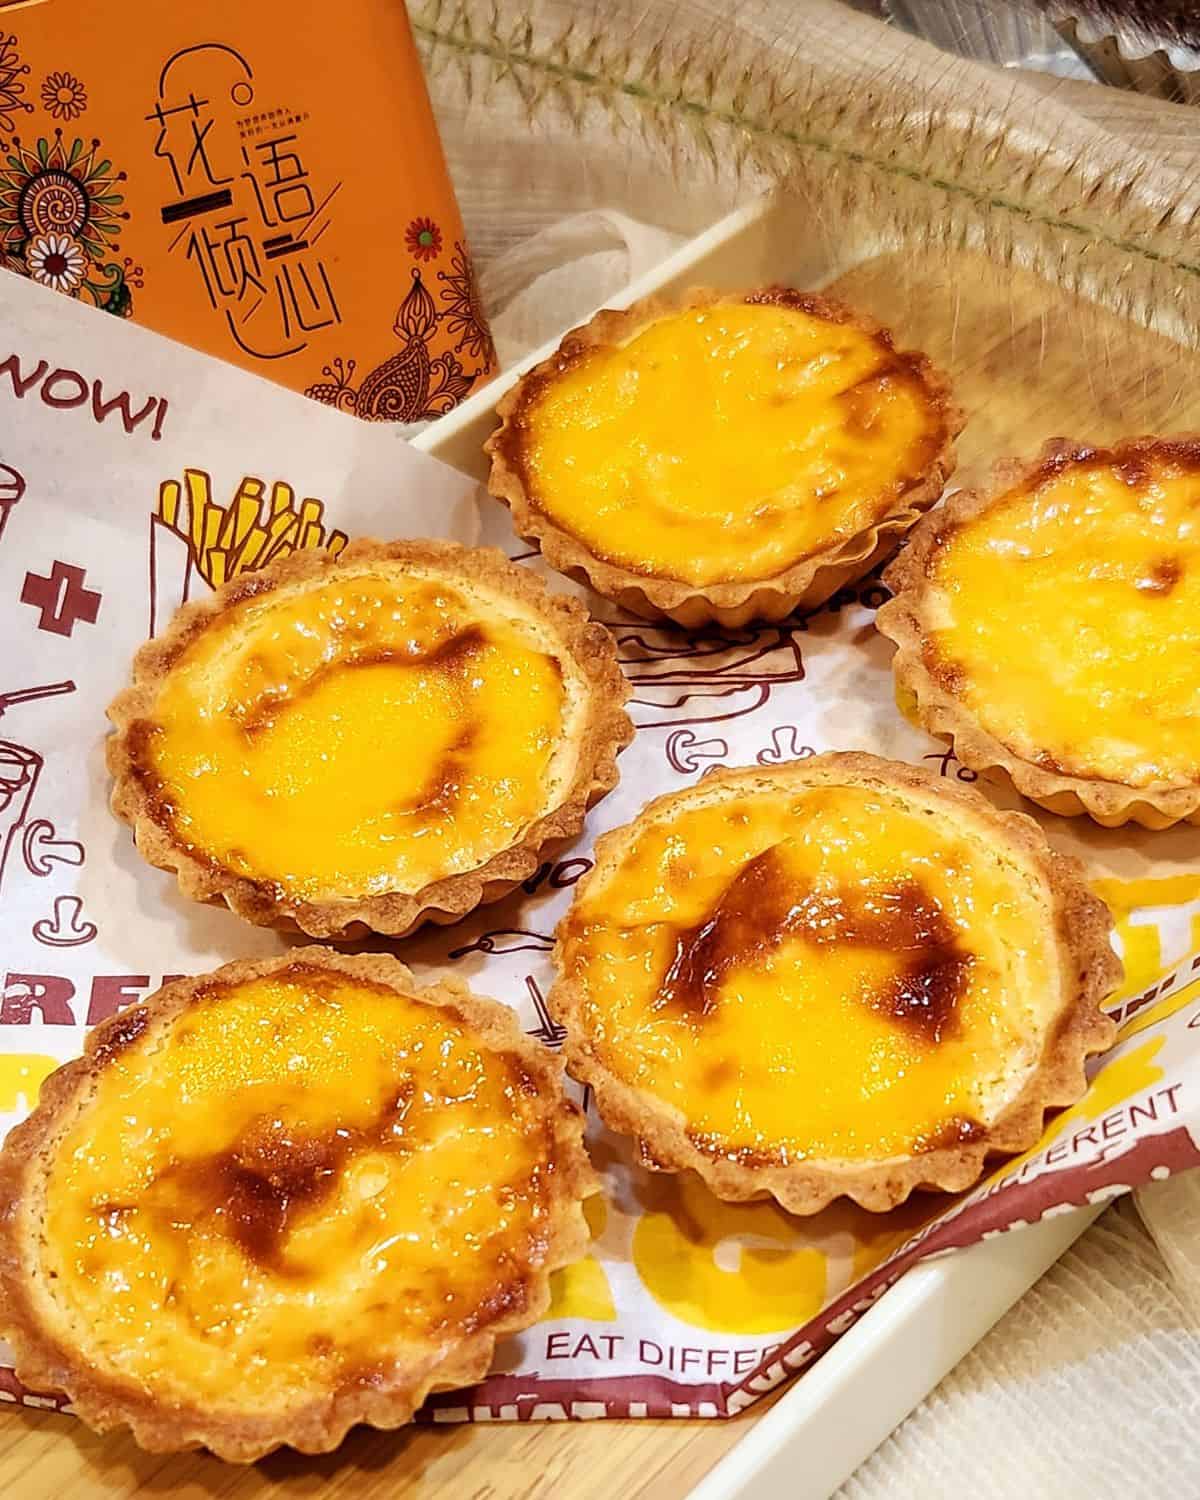
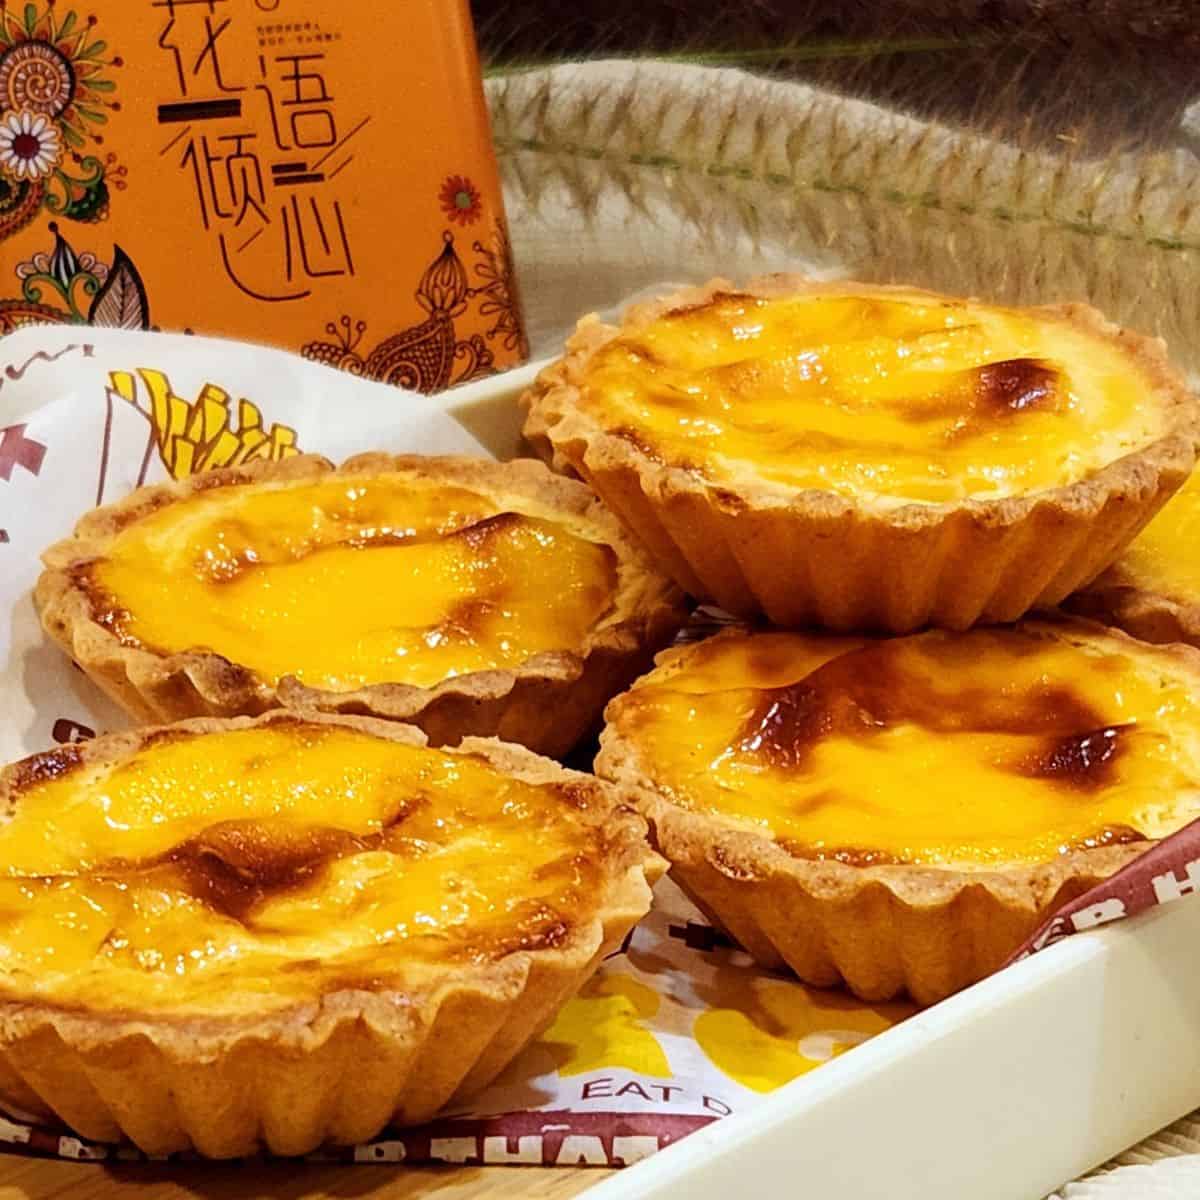
Hokkaido Cheese Tart Recipe (Creamy Japanese Baked Cheese Tart)
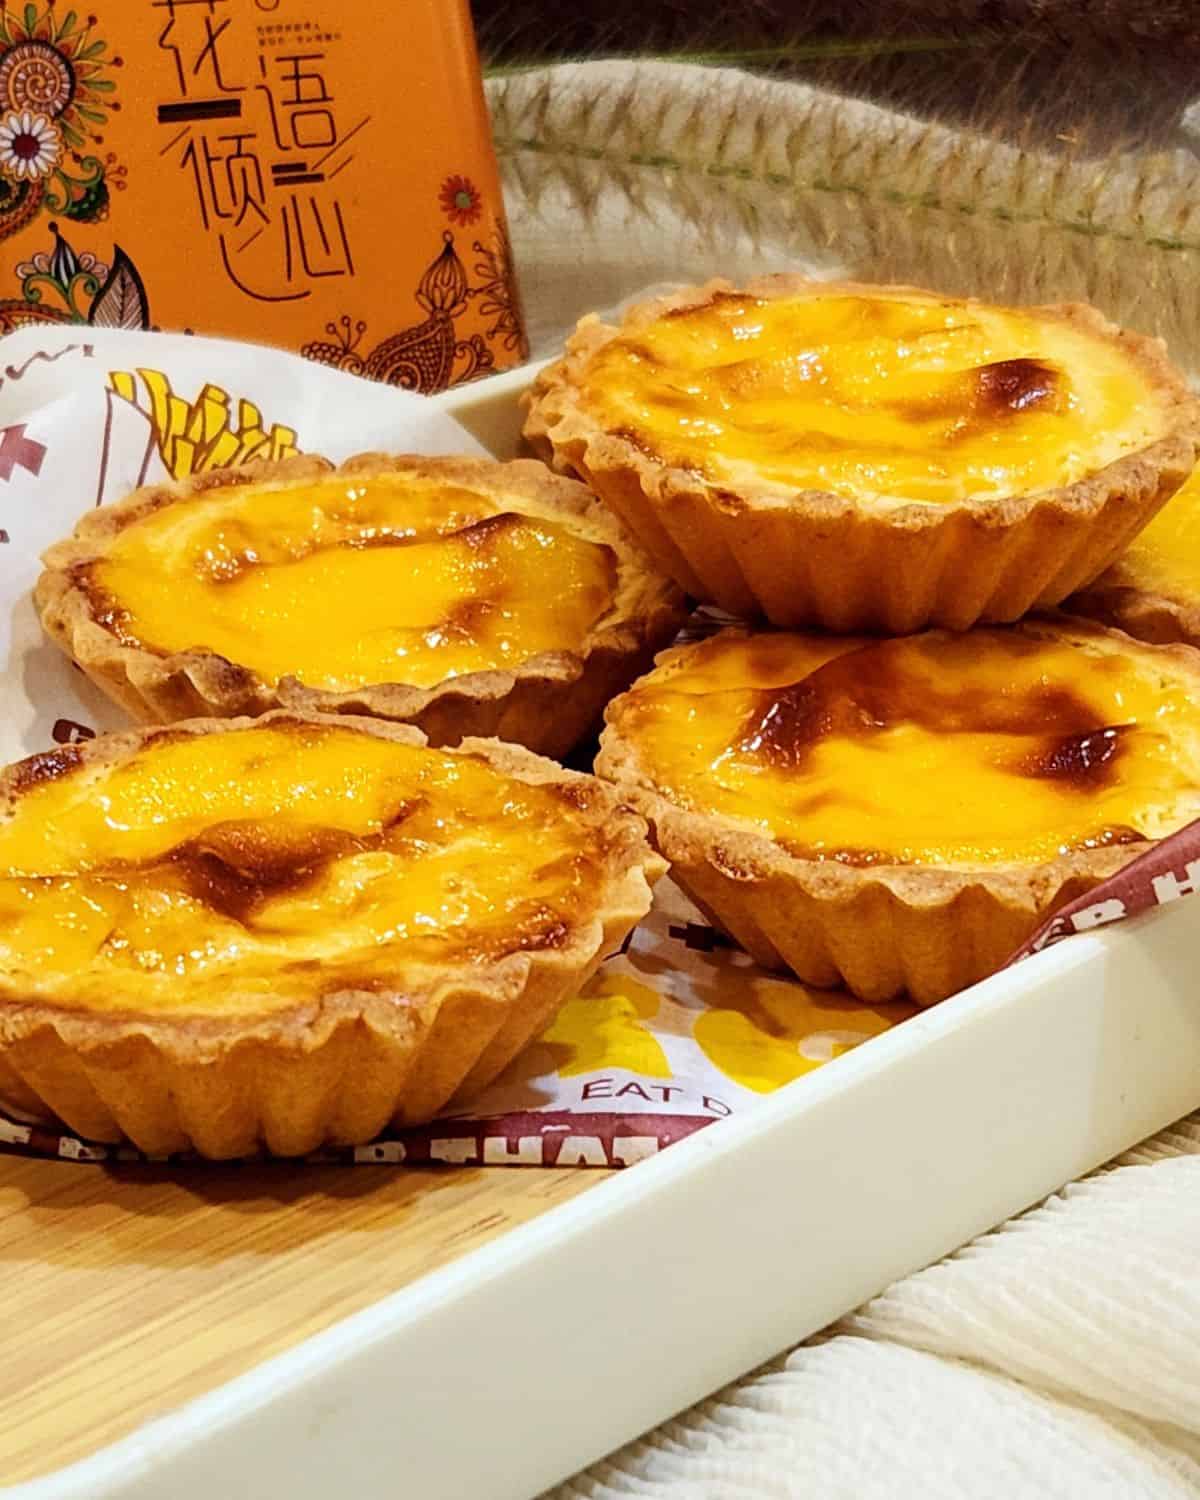
Hokkaido Cheese Tart is a rich Japanese baked cheese tart with a buttery crust and a creamy, slightly gooey cheese filling. Its sweet and tangy flavor with a lightly caramelized top makes it hard to stop at just one.
A Quick Look at the Recipe
🏷️ Recipe Name: Hokkaido Cheese Tart
⏱️ Ready In: ~ 35 minutes
🍽️ Serves: 20 pieces
🔥 Calories: 181 kcal per serving (estimate)
🧾 Main Ingredients: Cake flour, cornstarch, salt, confectionery sugar, butter, egg, cream cheese, mascarpone, heavy cream, milk, lemon, vanilla.
🥗 Dietary Info: Vegetarian
🧠 Difficulty: Intermediate
Have a question? Ask AI!
Hokkaido cheese tarts are rich Japanese baked cheese tarts with a buttery crust and a creamy, slightly gooey filling. Their sweet and tangy flavor with lightly caramelized tops makes them one of the most popular bakery treats in Japan.
What makes Hokkaido cheese tarts different?
Hokkaido cheese tarts use rich dairy ingredients and have a creamier, cheesier filling than many traditional custard tarts. The center stays smooth and slightly soft while the crust remains buttery and crisp.
How are Hokkaido cheese tarts different from Hong Kong egg tarts?
While Hong Kong egg tarts use silky egg custard filling, Hokkaido cheese tarts highlight rich cheese flavor with a creamier texture.
Japanese desserts and snacks have gained worldwide popularity, from soft and pillowy Japanese milk buns and buttery, crisp-on-the-outside salt bread to savory favorites like karaage and croquettes. Japan’s thoughtful balance of flavors also shines in everyday dishes such as gyudon, takikomi gohan, and ajitama eggs served with ramen. And of course, no list is complete without sweet treats like dorayaki or the richer chocolate dorayaki.
Why You Will Love This Recipe
Recipe Ingredients
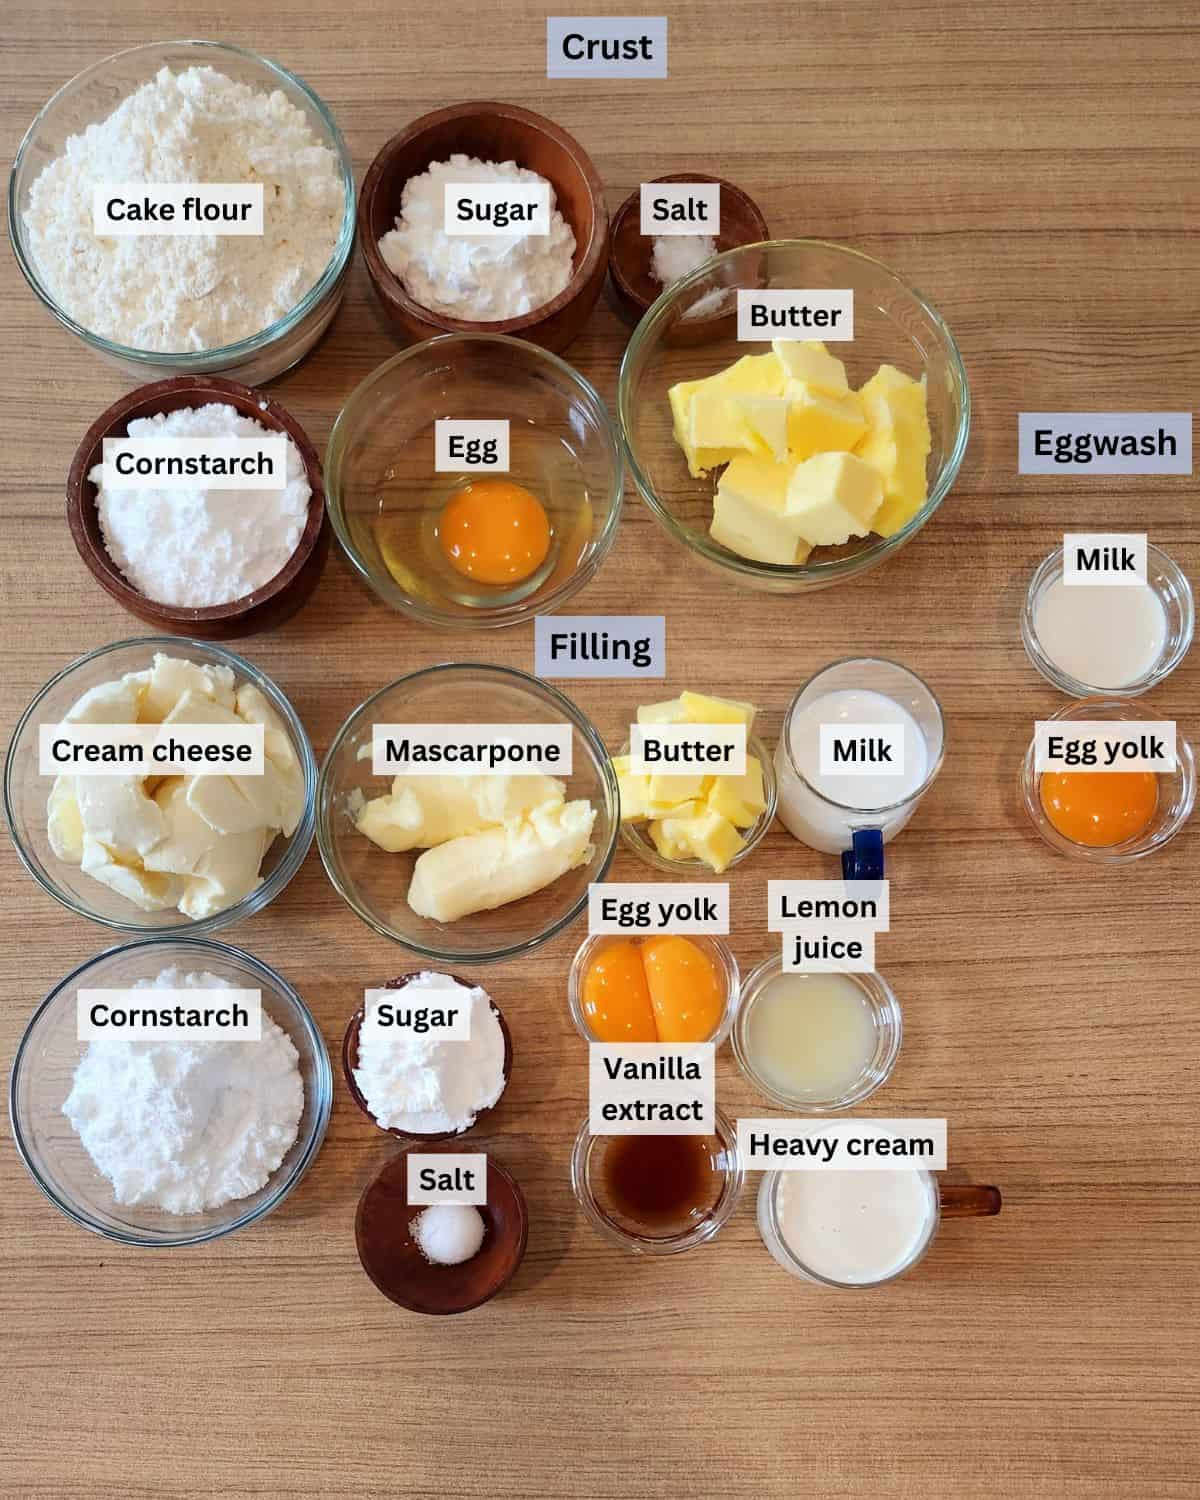
Ingredient Notes
Cream cheese – This is the base of the filling. It gives the Hokkaido cheese tart its rich, tangy flavor and smooth texture. Use full-fat cream cheese for the best result.
Mascarpone cheese – Adds a touch of sweetness and a velvety mouthfeel. It balances the tanginess of cream cheese and helps create that luscious, ooey gooey center.
Heavy cream – Makes the filling light, creamy, and perfectly melty when baked. It gives your tarts that soft, custard-like texture inside while keeping the top golden and glossy.
Be sure to check out the full recipe and ingredient list below
How to Make Hokkaido Cheese Tart
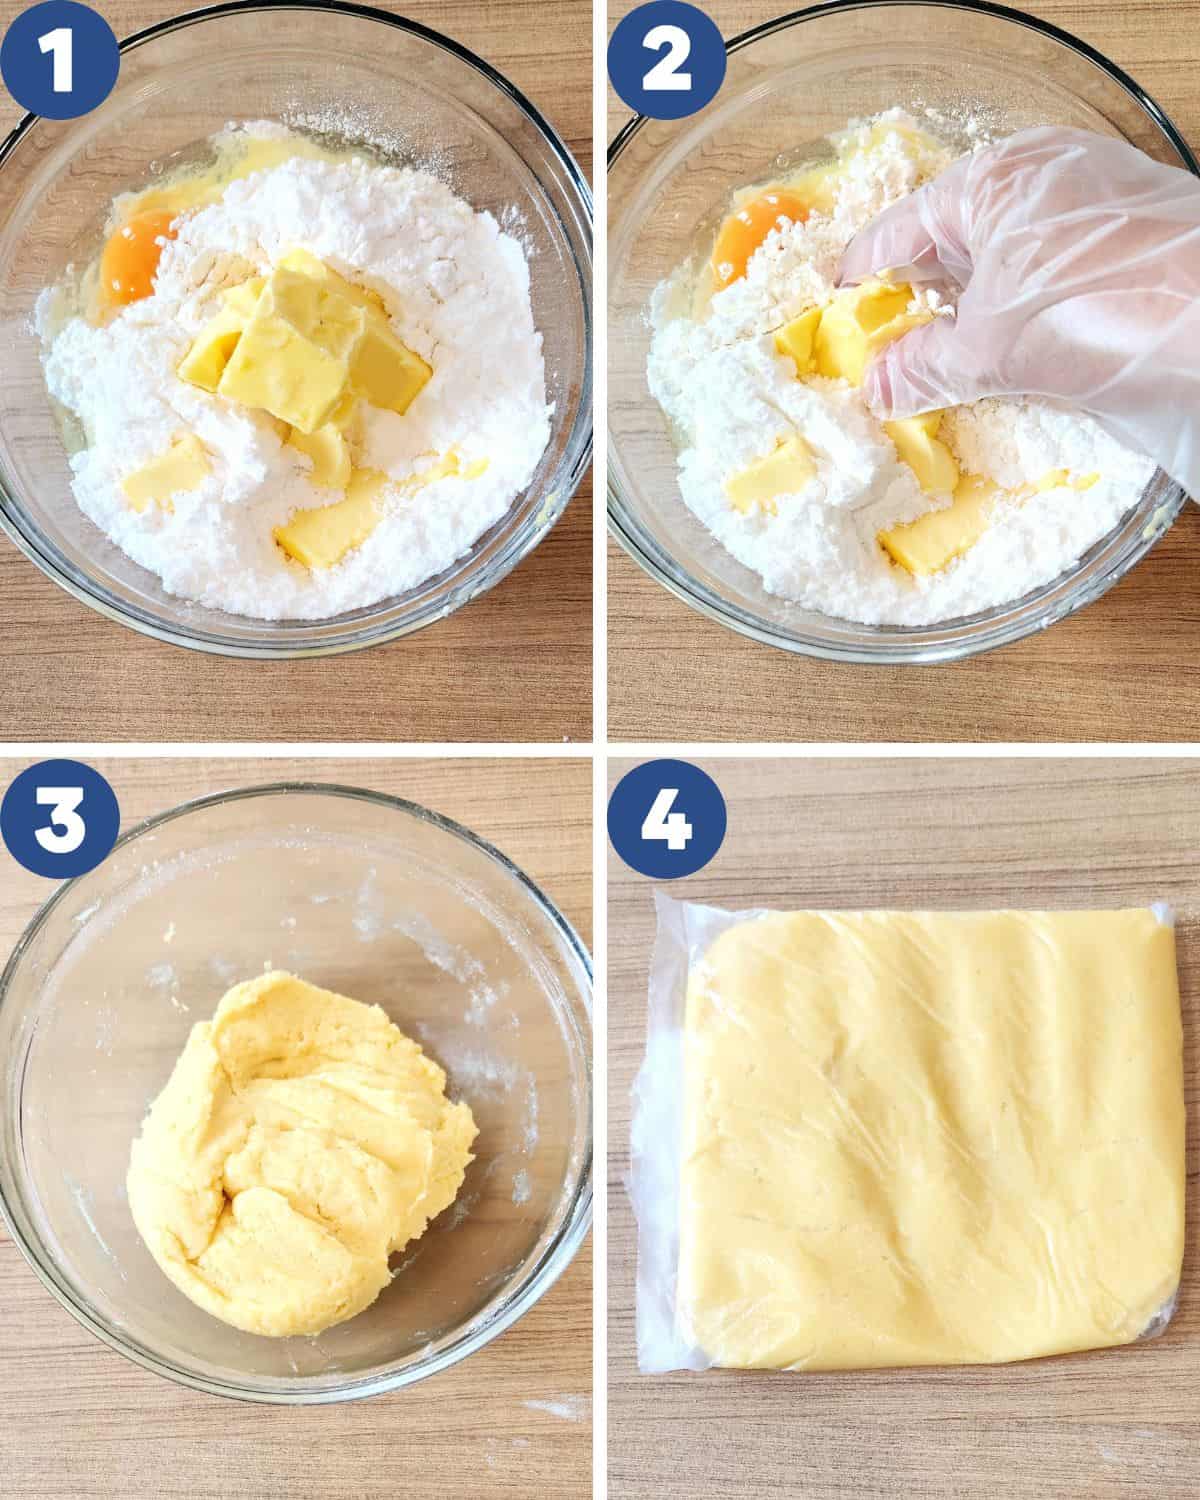
STEP 1. Make the crust. Sift cake flour, cornstarch, and confectioners’ sugar into a bowl; add a pinch of salt. Add the egg and butter (Images 1, 2). Knead just until the dough comes together (Image 3), then wrap and chill for 30 minutes (Image 4).
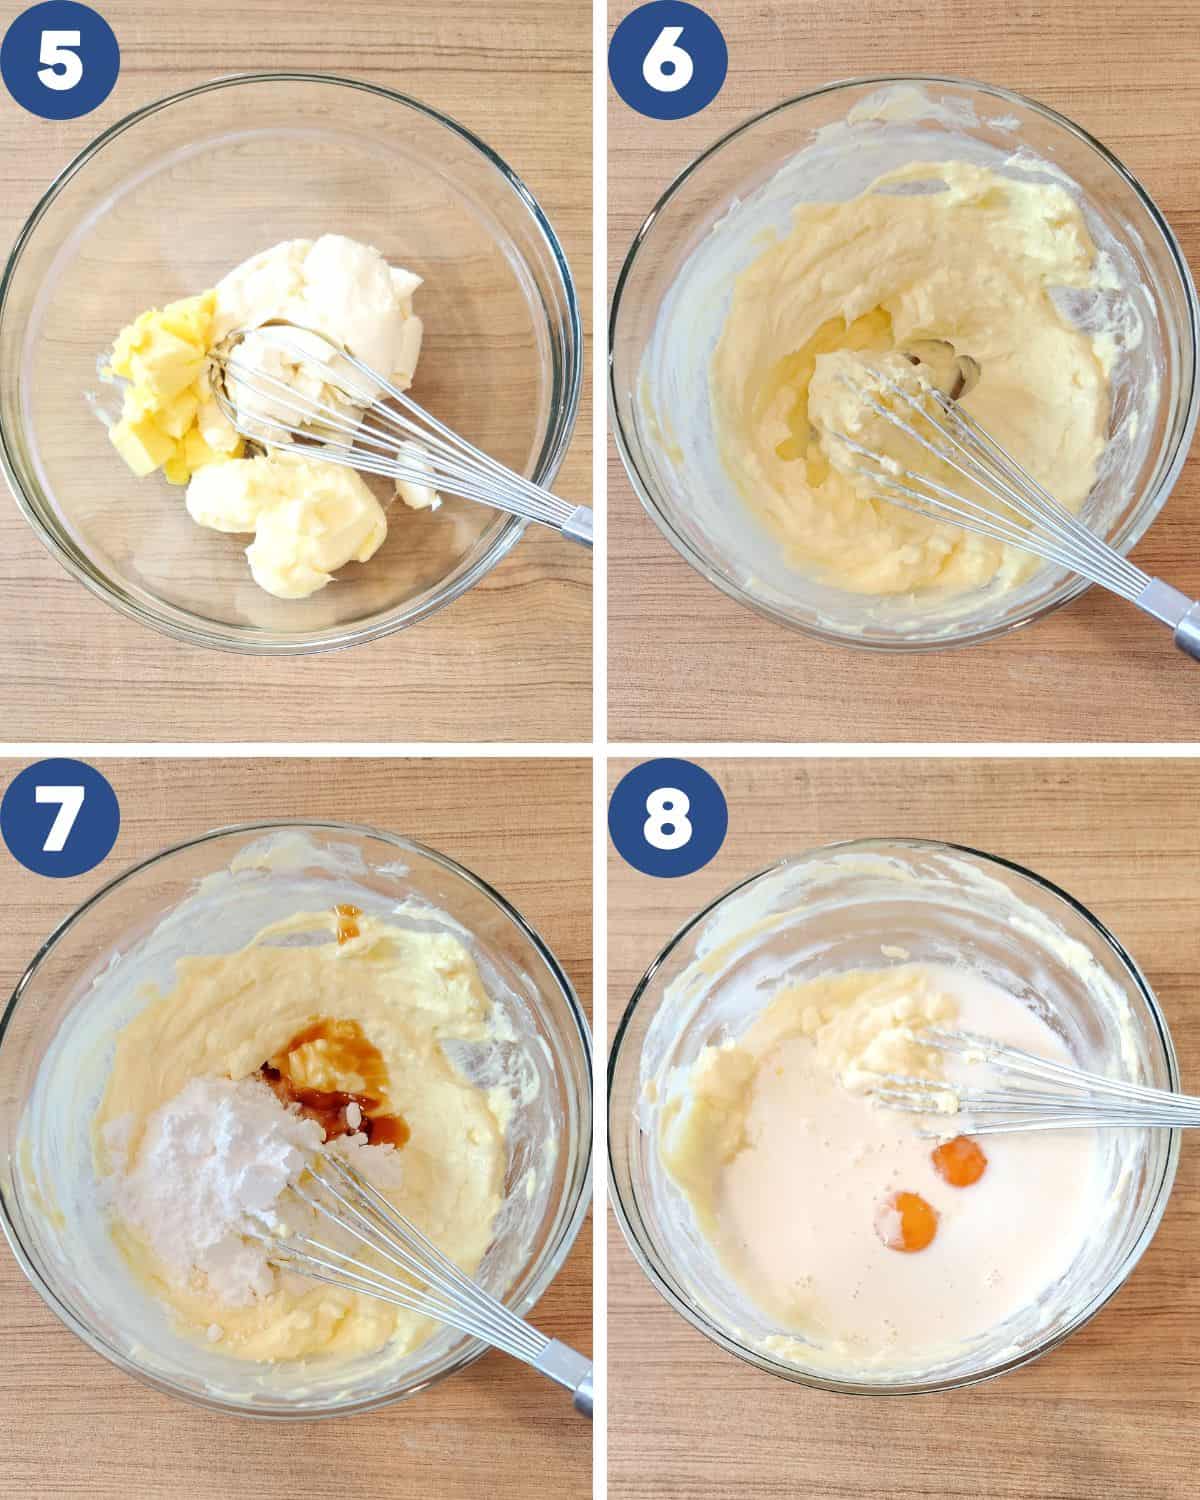
STEP 2. Make the creamy cheese filling. In a bowl, whisk cream cheese, mascarpone, heavy cream, and butter until smooth (Images 5, 6). Add sugar and vanilla (Image 7) and mix well. Whisk in egg yolk, milk, and lemon juice (Image 8).
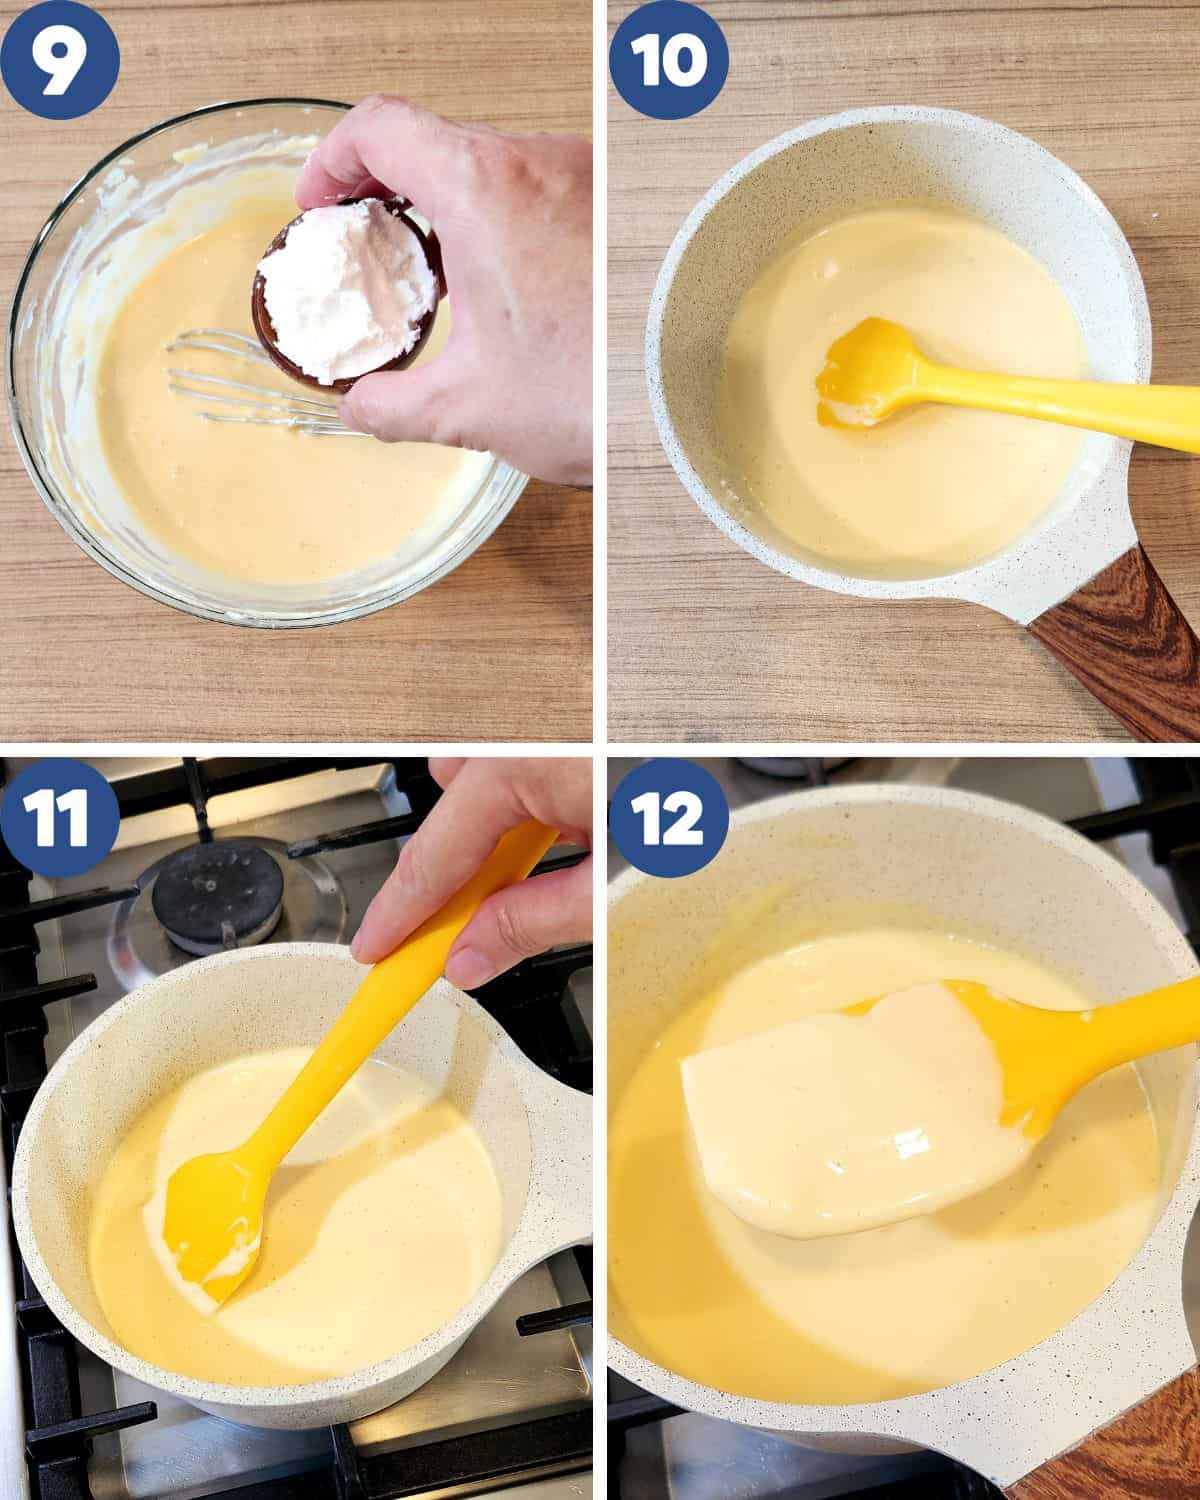
STEP 3. Thicken the filling. Whisk cornstarch into the mixture (Images 9, 10), then cook gently in a saucepan over medium-low heat, stirring until it thickens (Images 11, 12). Remove from heat.

STEP 4. Prepare tart shells. Strain the mixture for an ultra-smooth, gooey cheese filling (Image 13). Transfer to a piping bag and chill for 1 hour (Images 14, 15). Divide the chilled dough into 20 even pieces (Image 16).
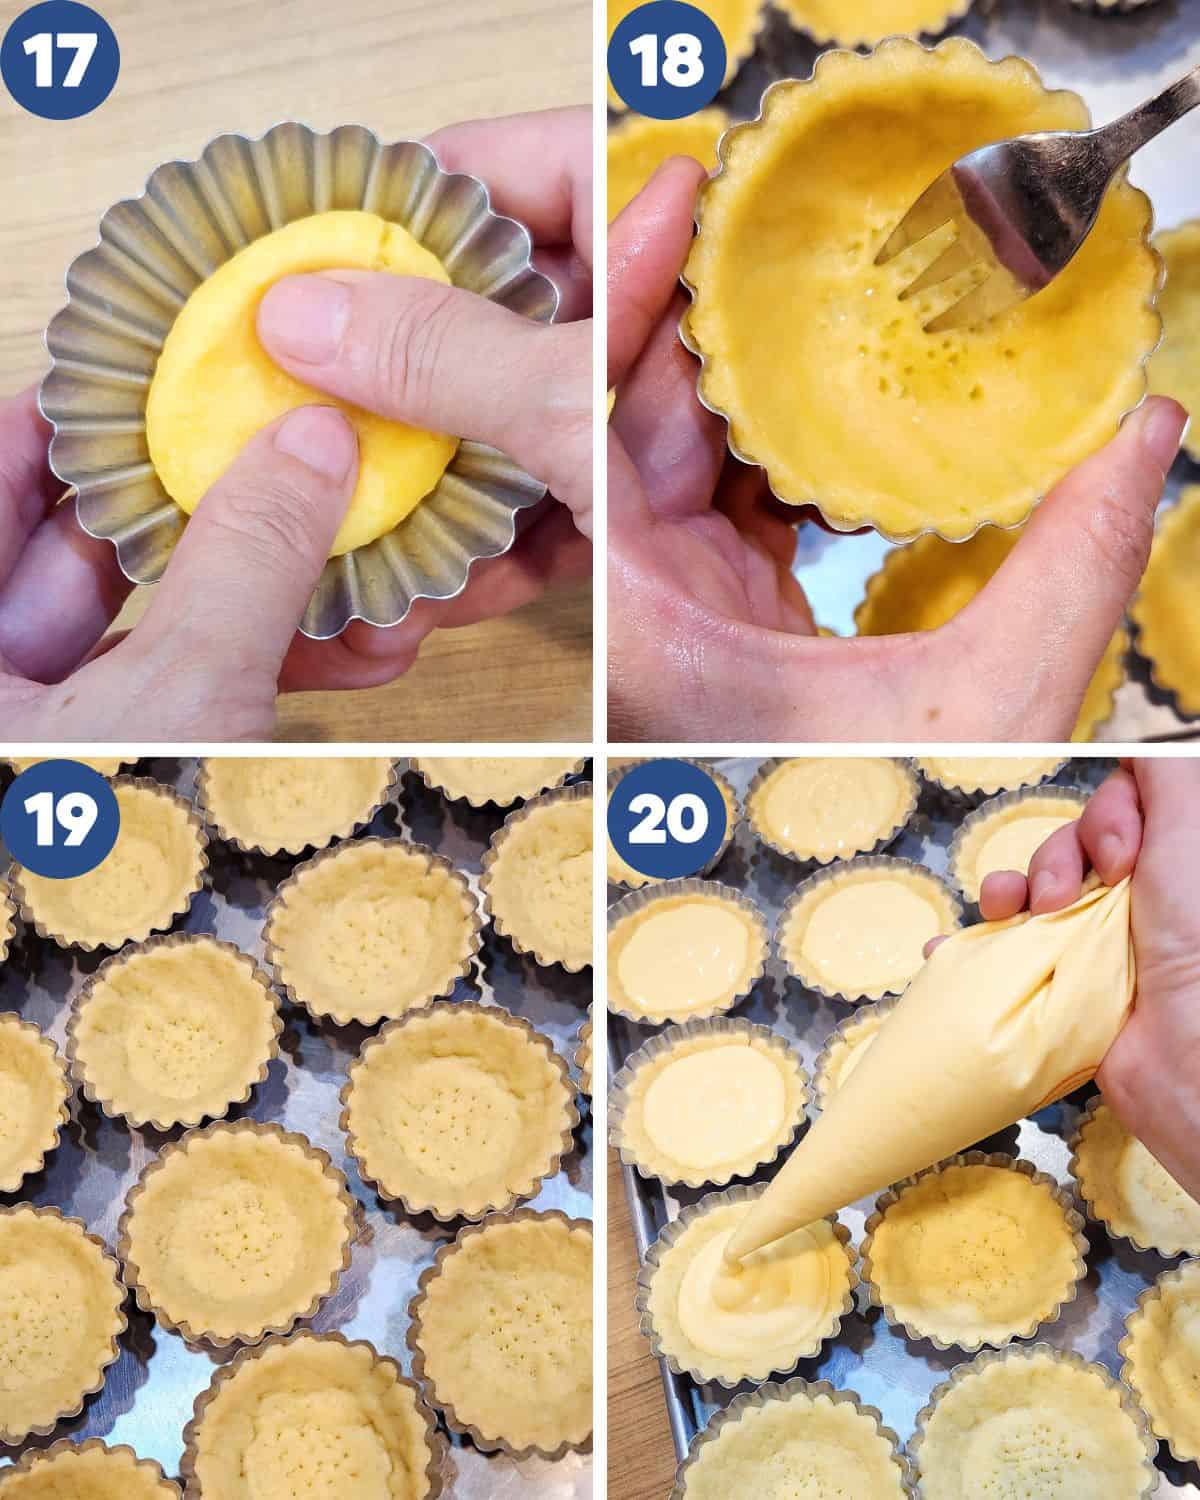
STEP 5. Fill & pre-bake. Press each portion into greased tart molds to form an even Hokkaido cheese tart crust (Image 17). Dock the base with a fork (Image 18). Bake at 180 °C / 356 °F for 15 minutes, until lightly golden (Image 19). Remove and cool slightly, then pipe the chilled filling into each crust (Image 20).
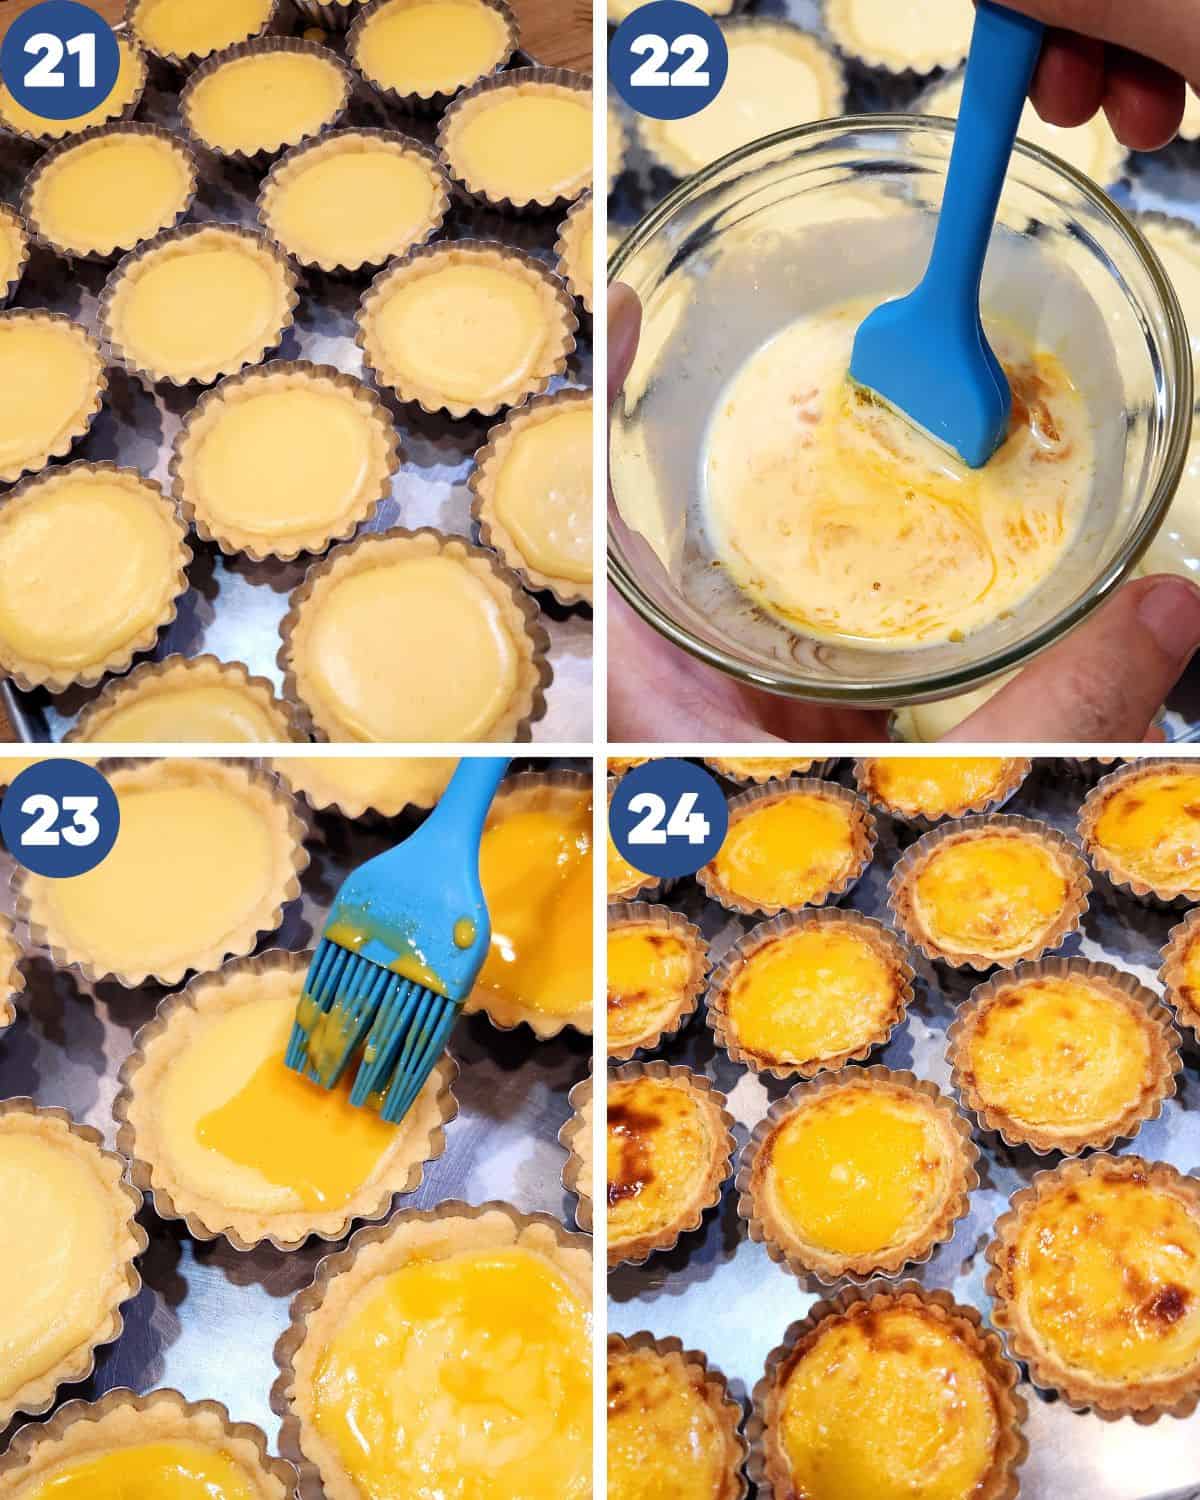
STEP 6. Bake & cool. Fill all tarts completely (Image 21). Brush the tops with egg wash (Images 22, 23) and bake again at 180 °C / 356 °F for 15–18 minutes, until the surface is lightly browned (Image 24). Remove from the molds, cool on a rack, and enjoy warm for that signature gooey-center!
Pro Tips
- Use a piping bag – Filling the crust is much easier and cleaner this way. Chill the cheese filling for 30 minutes to 1 hour so it’s thicker and less runny when piped.
- Dock the crust – Always poke small holes at the bottom of the tart shells with a fork before baking. This prevents the crust from puffing up and keeps it flat and even.
- Stay with the saucepan – When heating the cheese mixture, never leave it unattended. Stir continuously with a spatula until the filling thickens to a creamy, smooth texture.
- Fix runny filling before eggwash – If the filling feels too soft, skip the eggwash first. Bake the tarts for 5–10 minutes until the surface firms up, then brush with eggwash and continue baking.
Serving Suggestions
Hokkaido Cheese Tarts are delicious on their own, but a few simple additions can make them even more irresistible. If you love fruity toppings, add a spoonful of my homemade strawberry compote. You can also dust the tops with a little powdered sugar or drizzle them with honey for a quick finish.
For drinks, these mini cheese tarts pair wonderfully with warm, cozy beverages. Try them with a cup of ginger lemon drink for a refreshing contrast, Earl Grey milk tea for a fragrant floral note, or oolong milk tea if you prefer something creamy and balanced. Each sip complements the buttery crust and soft, custardy center perfectly.
Hokkaido Cheese Tart FAQs
Yes, non-dairy alternatives such as almond milk, coconut milk, or cashew-based cheeses can be used. However, the texture and flavor may vary from the traditional tart made with Hokkaido dairy cheese.
The fillings might be too runny, put them in the oven for 5-10 minutes, the surface will be more solid to brush.
To get the gooey texture, cornstarch play an important role here. Cook the filling in a sauce pan until it thickens. This will help make the fillings gooey.
Cracks usually appear when the oven temperature is too high or the filling is overbaked. Bake just until the tops are lightly golden and still a bit jiggly in the center. As they cool, the filling will set perfectly without cracks.
No. Hokkaido cheese tarts have a rich cheese filling with a creamy, slightly gooey center, while egg tarts are filled with silky egg custard. Both have pastry crusts, but their flavor and texture are very different.
Storage
Store your Hokkaido cheese tarts in an airtight container, preferably wrapped individually in plastic or parchment for extra freshness. They’ll stay good in the refrigerator for up to 5 days.
Before serving, reheat them in an oven or air fryer for a few minutes to revive the crispy crust and warm, gooey cheese filling or enjoy them cold for a creamier texture.
More Creamy Cheese Dessert Recipes
- No Bake Mango Cheesecake
- Mini New York Cheesecake
- Burnt Basque Cheesecake
- Pandan Burnt Basque Cheesecake
- Cream Cheese Chiffon Cake
- Strawberry Cream Cheese Butter Cake
Hokkaido Cheese Tart
Ingredients
Crust
- 200 gr cake flour
- 24 gr cornstarch
- 2 gr salt
- 60 gr confectionery sugar
- 116 gr unsalted butter
- 50 gr egg
Cheese Filling
- 176 gr cream cheese
- 60 gr mascarpone
- 40 gr butter
- 76 gr cream
- 50 gr milk
- 50 gr sugar
- 16 gr cornstarch
- 2 egg yolk
- 1 tbsp lemon
- 1/2 tsp vanilla
- 1/2 tsp salt
Eggwash
- 1 egg yolk
- 1 tbsp milk
Instructions
- Sift cake flour, cornstarch, and confectioners’ sugar into a bowl; add a pinch of salt. Add the egg and butter. Knead just until the dough comes together, then wrap and chill for 30 minutes.
- In a bowl, whisk cream cheese, mascarpone, heavy cream, and butter until smooth. Add sugar and vanilla and mix well. Whisk in egg yolk, milk, and lemon juice.
- Whisk cornstarch into the mixture, then cook gently in a saucepan over medium-low heat, stirring until it thickens. Remove from heat.
- Strain the mixture for an ultra-smooth, gooey cheese filling. Transfer to a piping bag and chill for 1 hour. Divide the chilled dough into 20 even pieces.
- Press each portion into greased tart molds to form an even Hokkaido cheese tart crust. Dock the base with a fork. Bake at 180 °C / 356 °F for 15 minutes, until lightly golden. Remove and cool slightly, then pipe the chilled filling into each crust.
- Fill all tarts completely. Brush the tops with egg wash and bake again at 180 °C / 356 °F for 15–18 minutes, until the surface is lightly browned. Remove from the molds, cool on a rack, and enjoy warm for that signature gooey-center!
Video
Notes
- Use a piping bag – Filling the crust is much easier and cleaner this way. Chill the cheese filling for 30 minutes to 1 hour so it’s thicker and less runny when piped.
- Dock the crust – Always poke small holes at the bottom of the tart shells with a fork before baking. This prevents the crust from puffing up and keeps it flat and even.
- Stay with the saucepan – When heating the cheese mixture, never leave it unattended. Stir continuously with a spatula until the filling thickens to a creamy, smooth texture.
- Fix runny filling before eggwash – If the filling feels too soft, skip the eggwash first. Bake the tarts for 5–10 minutes until the surface firms up, then brush with eggwash and continue baking.


It is surprising to know that the famous Hokkaido Cheese Tarts can be made at home so easily! You should really try this one!