
Shio Pan (Japanese Salt Bread) – Crispy Butter-Filled Rolls
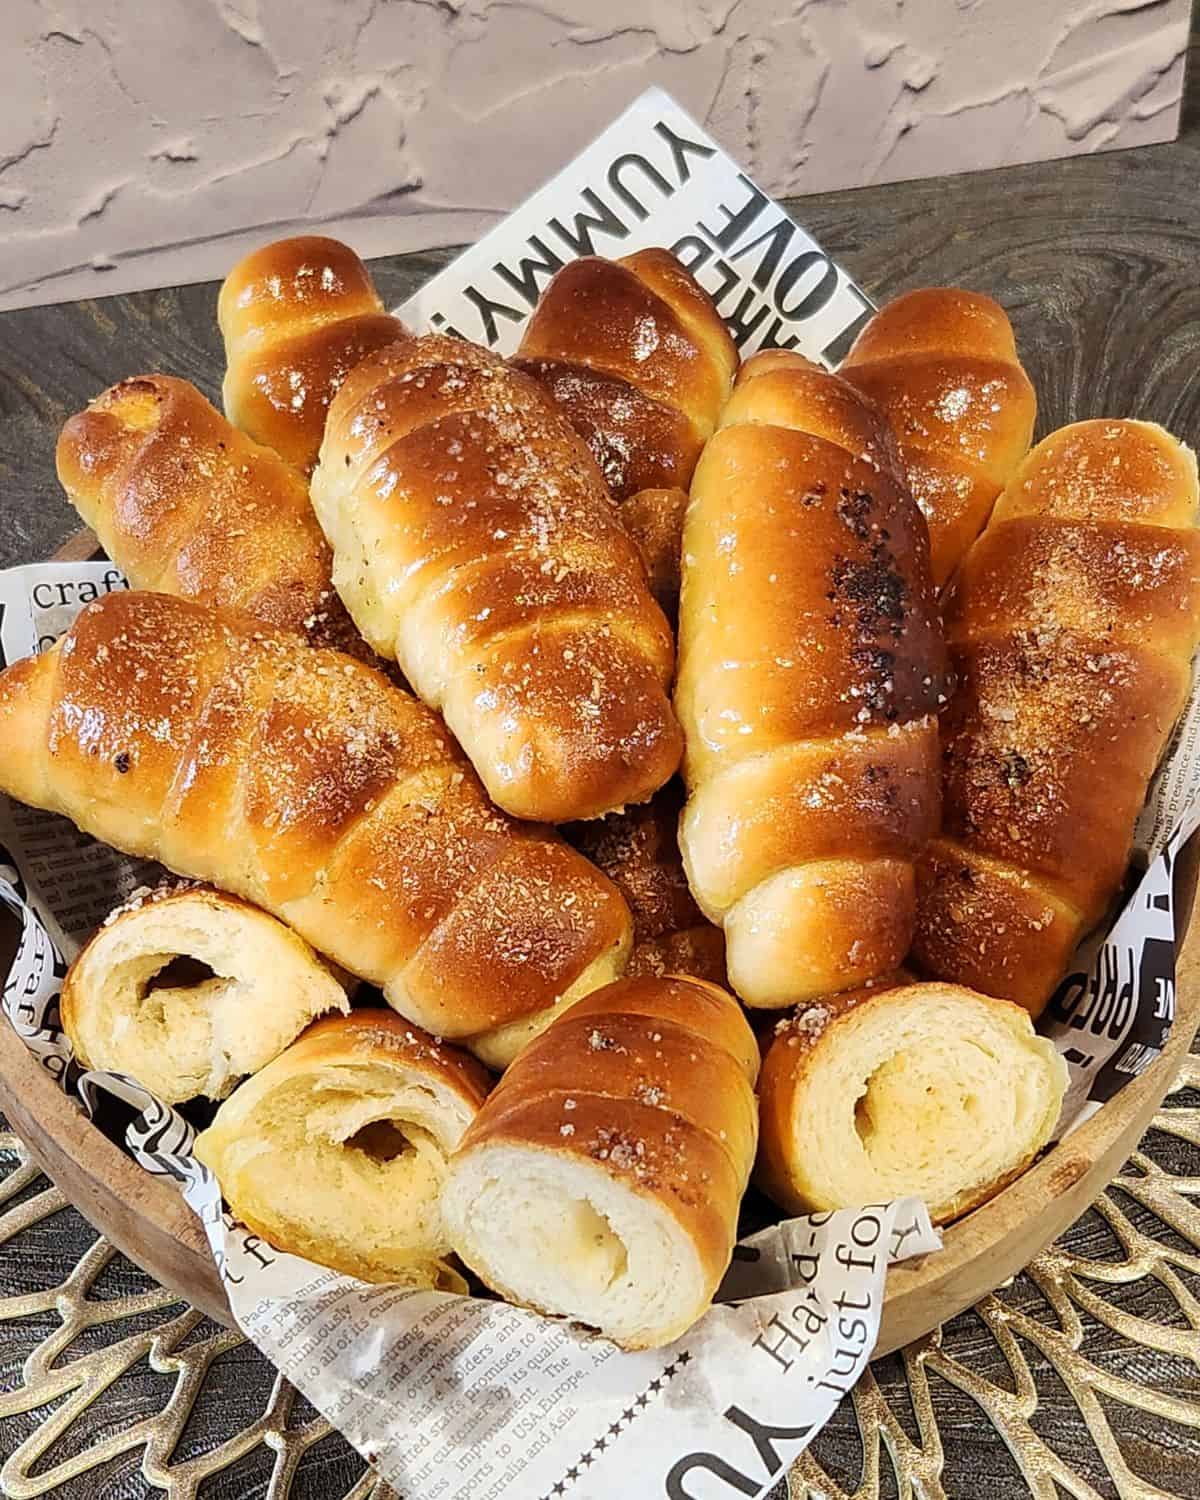
Salt bread or Shio Pan is a soft, buttery bread roll with a lightly crunchy exterior and a delicate sprinkle of salt on top. As it bakes, the butter melts inside the dough, creating a fluffy interior and rich, savory flavor that’s simple but incredibly addictive.
A Quick Look at the Recipe
🏷️ Recipe Name: Salt Bread (Shio Pan) – Japanese & Korean Butter Bread
⏱️ Ready In: ~ 1 hour 50 minutes
🍽️ Serves: 10 pieces
🔥 Calories: 194 kcal (per serving)
🧾 Main Ingredients: Bread flour, cake flour, sugar, instant yeast, salted butter, and salt.
🥗 Dietary Info: Halal
🧠 Difficulty: Easy, very simple steps.
Have a question? Ask AI!
Salt bread, also known as Japanese shio pan, is a simple yet incredibly satisfying bakery favorite with a buttery interior and crisp, golden crust. Like many Japanese baked goods, it relies on balance, technique, and thoughtful details rather than complexity. From anpan and Japanese milk buns to Hokkaido cheese tarts and classics like dorayaki, Japanese snacks have a way of becoming global favorites without much hype. This savory roll is one of my go-to Asian breakfast recipes when I want something comforting, simple, and full of flavor.
What Is Salt Bread?
Salt bread also known as shio pan, is a soft, buttery bread with a lightly crunchy exterior, an airy hollow crumb, and a subtle salty finish. As it bakes, the butter melts inside the dough, creating a rich aroma and a savory flavor that feels simple yet deeply satisfying.
The small yeast bread roll made from a simple dough, wrapped around cold butter, and baked until the butter melts and creates a light, hollow crumb inside. The bread is finished with flaky salt, which enhances the rich buttery flavor without making it heavy.
You may also see it called shio pan in Japan or sogeum-ppang in Korea. Despite the different names, the idea stays the same: minimal ingredients, careful technique, and a perfectly balanced salty-buttery bite.
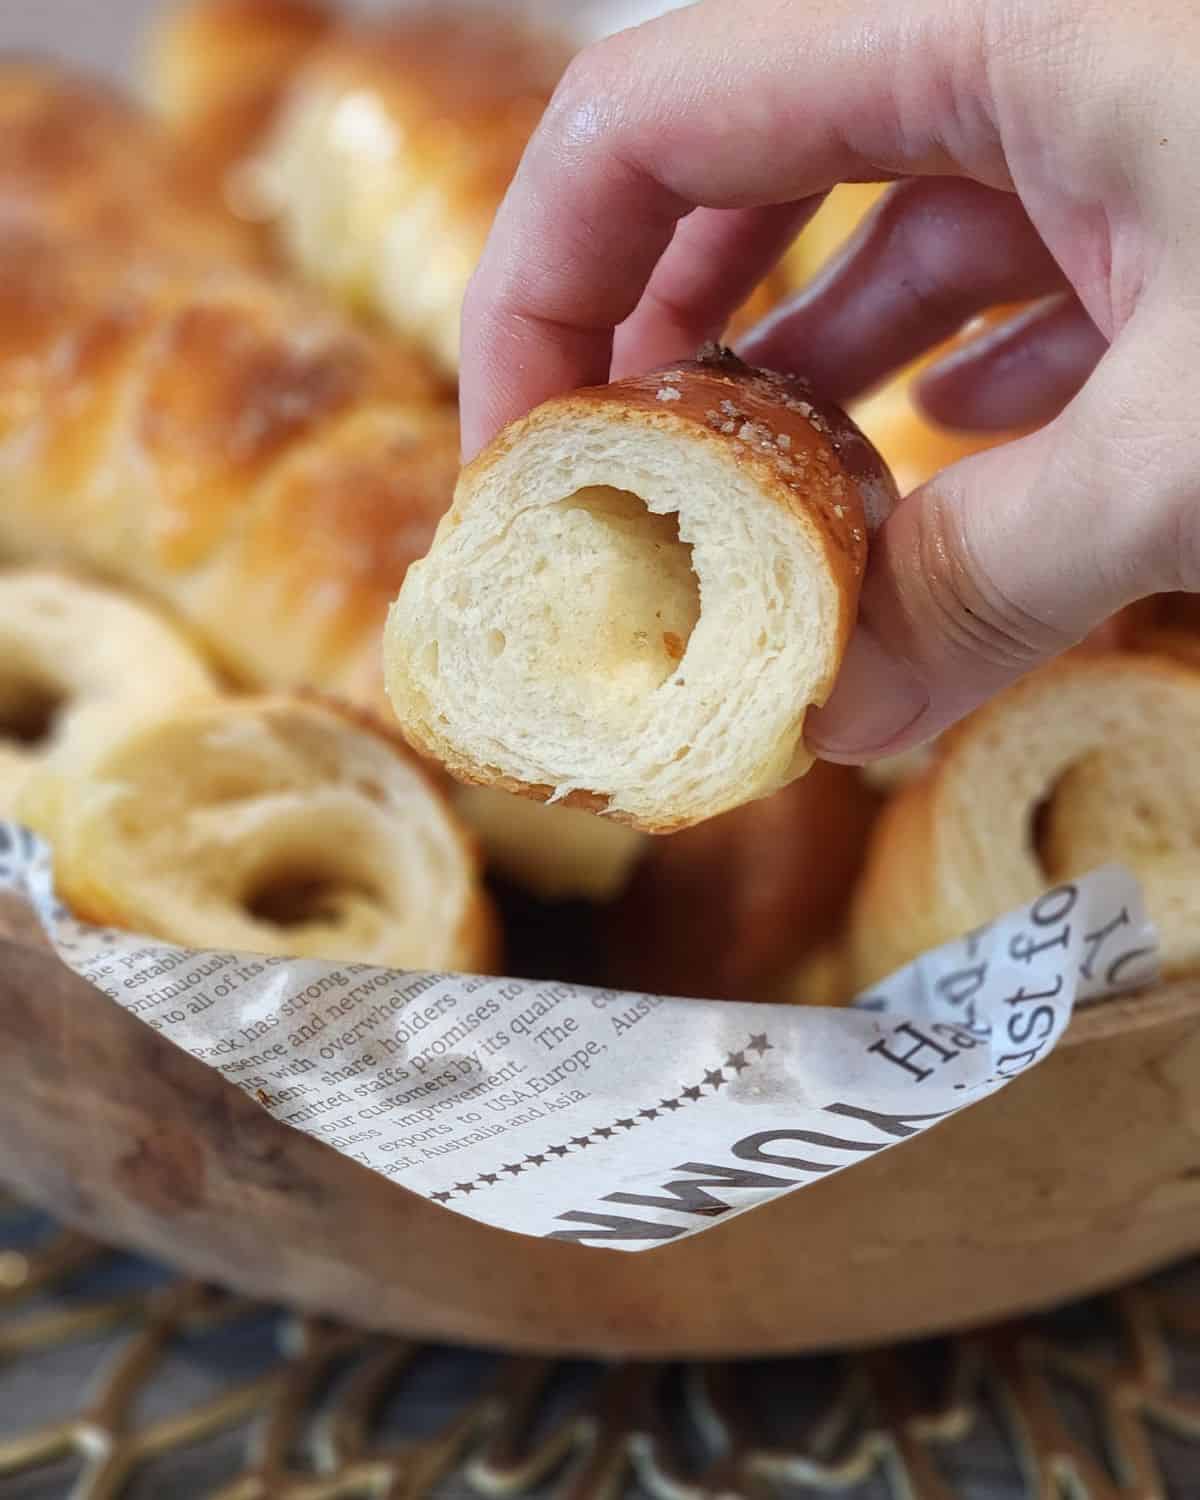
Why Is the Bottom So Crispy?
One of the signature features of shio pan is its beautifully crisp, golden bottom. This happens because a small piece of butter is wrapped inside each roll before baking. As the dough bakes, the butter melts and seeps downward, lightly frying the base of the bread against the hot baking tray.
At the same time, the steam created from the melting butter forms a delicate hollow inside the roll, giving it that airy interior while the bottom turns crisp and slightly caramelized. The sprinkle of salt on top enhances the contrast — crunchy outside, soft and buttery inside.
For the best crispy bottom, bake the rolls on a preheated metal tray and avoid using parchment that’s too thick, as direct heat helps develop that golden crust.
Why You Will Love This Recipe
Recipe Ingredients
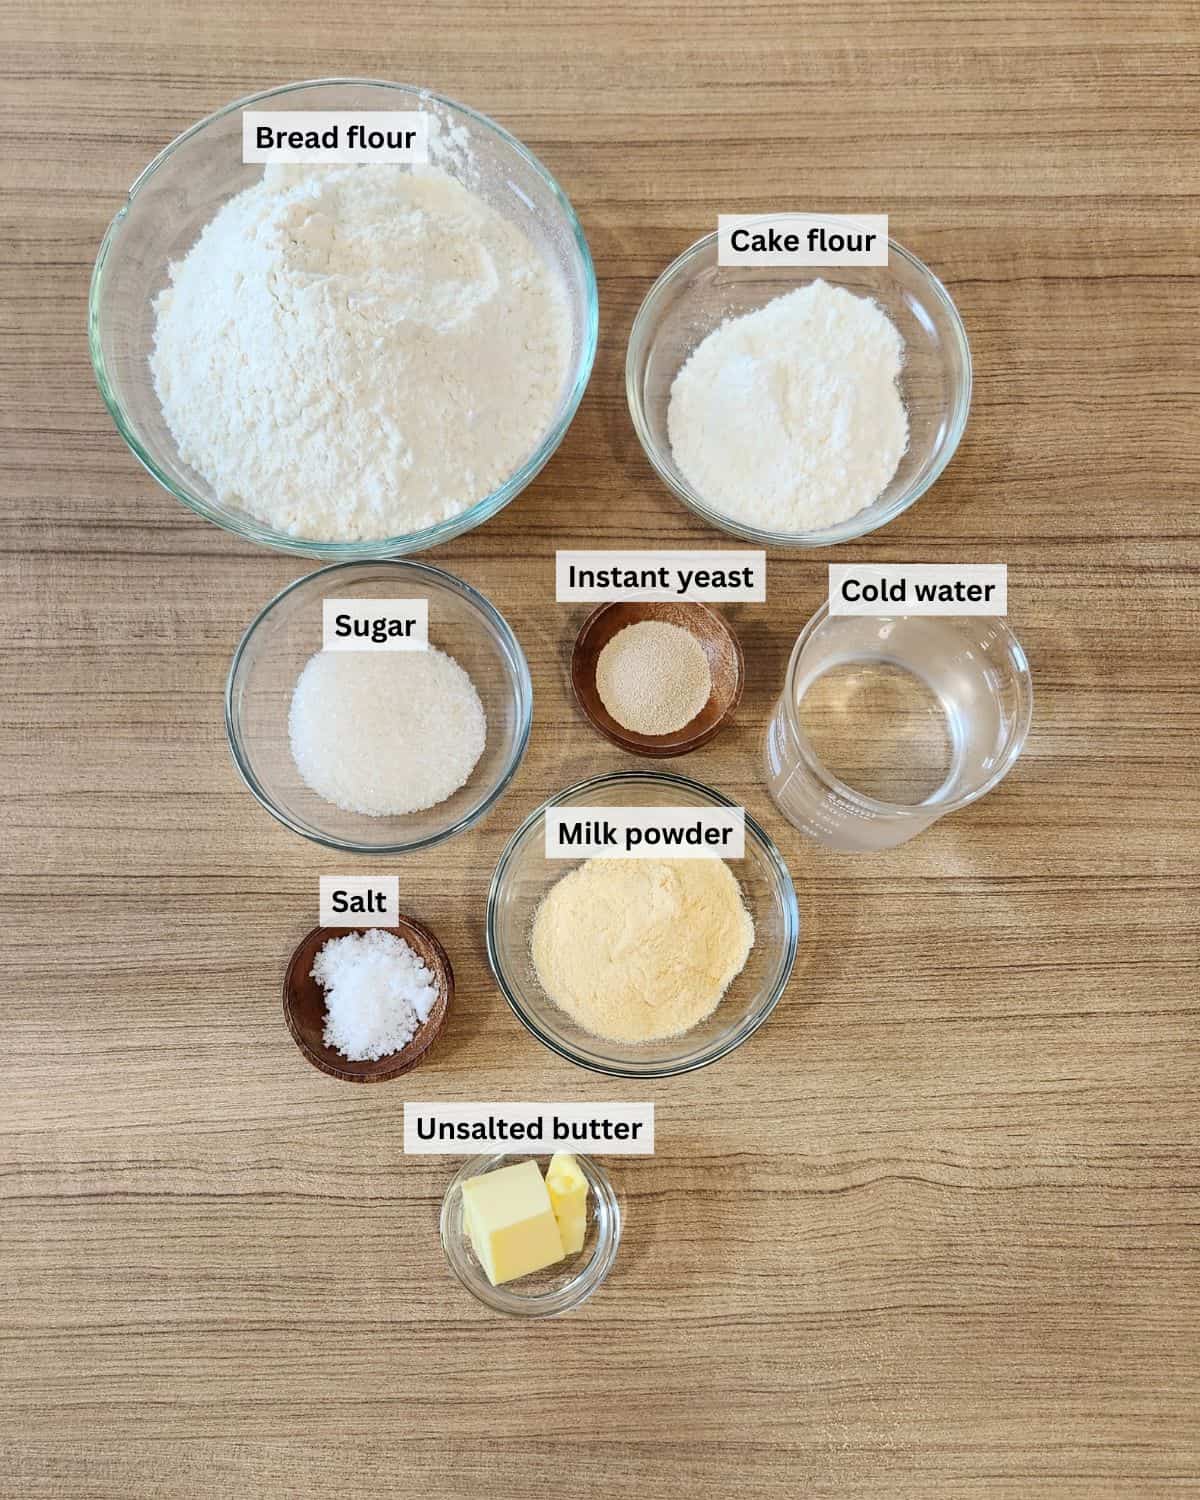
Ingredient Notes
Bread flour & cake flour – This combination gives the dough structure while keeping the crumb soft and light.
Milk powder – Adds richness and helps the bread brown evenly without extra liquid.
Unsalted butter (for the dough) – Unsalted butter allows better control of the overall salt level, especially since the bread is finished with salt on top.
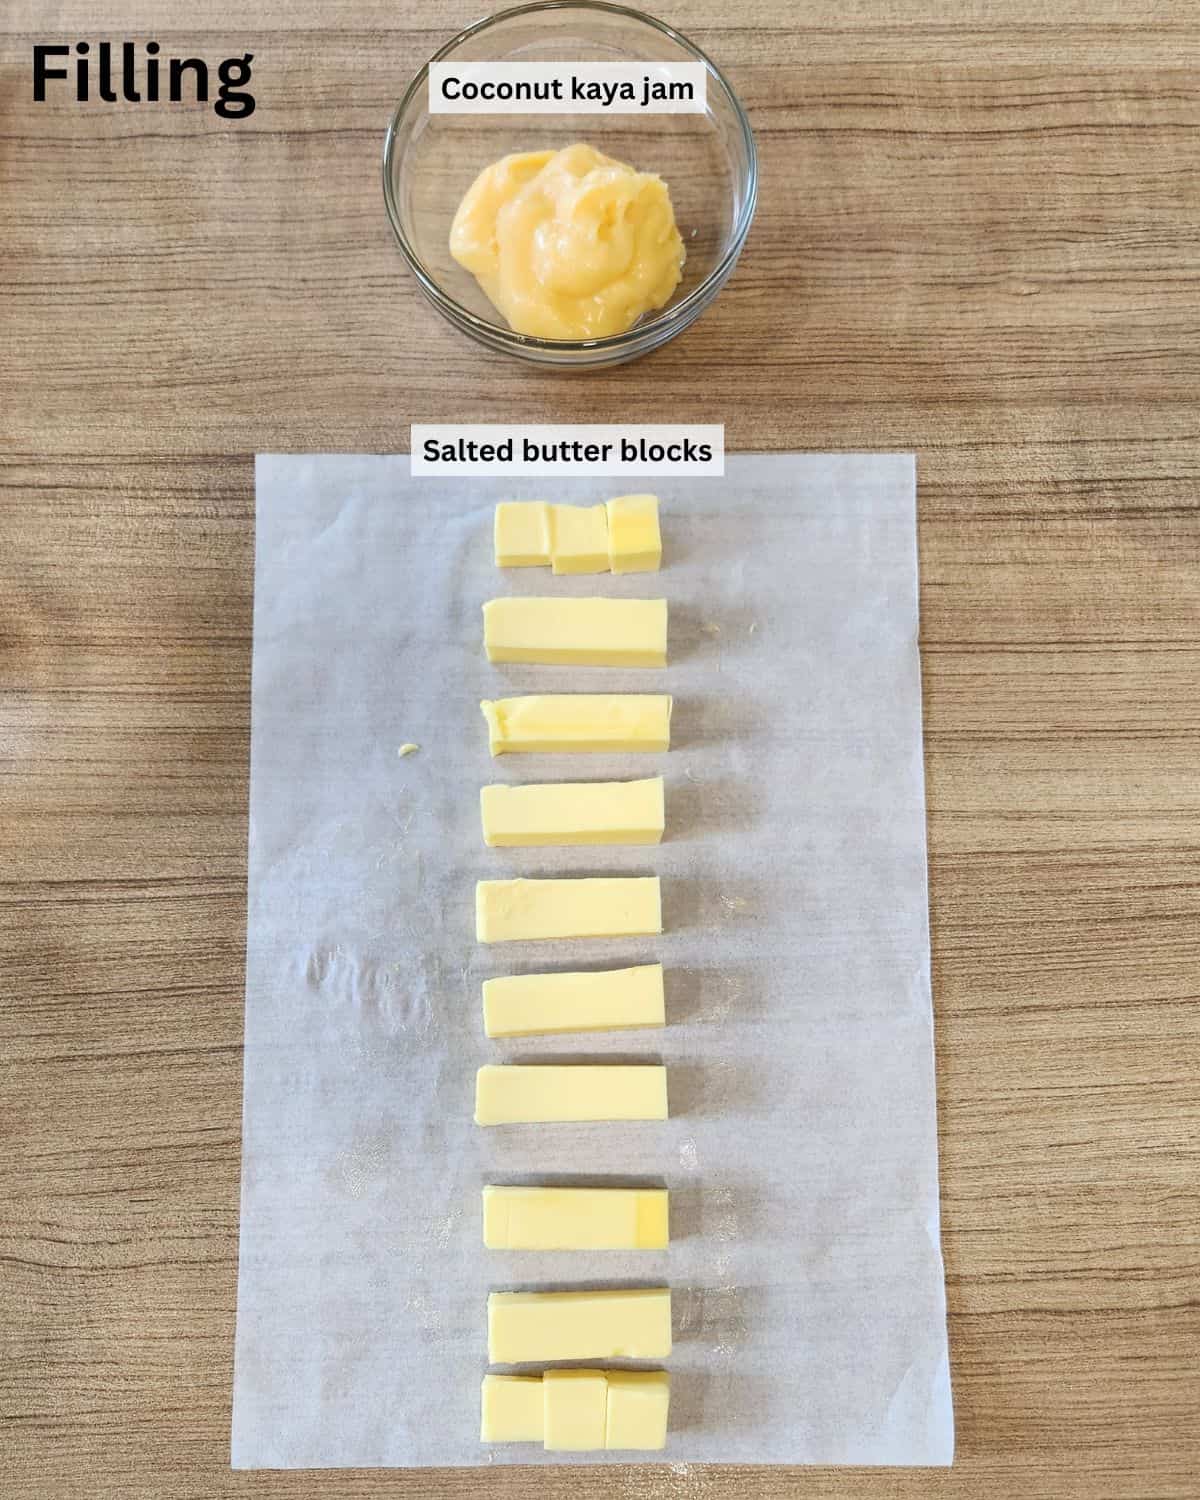
Salted butter blocks (for filling) – Keep the butter cold and refrigerated until use so it melts slowly and creates the hollow crumb.
Flaky salt – A small sprinkle on top enhances the buttery flavor and gives shio pan its signature savory finish.
Coconut kaya jam (optional filling) – Optional filling that adds a lightly sweet contrast to the salty butter.
Be sure to check out the full recipe and ingredient list below
Variations
Salt bread is traditionally enjoyed plain with its signature buttery center, but it’s also easy to customize with different fillings.
For a sweet twist, slice the baked bread in the center and fill it with something creamy like custard filling or coconut kaya jam for a soft, rich contrast.
If you prefer a lighter, fruitier option, try adding strawberry compote. Its sweet-tart flavor pairs beautifully with the salty, buttery bread and adds a refreshing contrast.
You can also experiment with savory options like garlic butter or cheese for a richer flavor.
How to Make Salt Bread
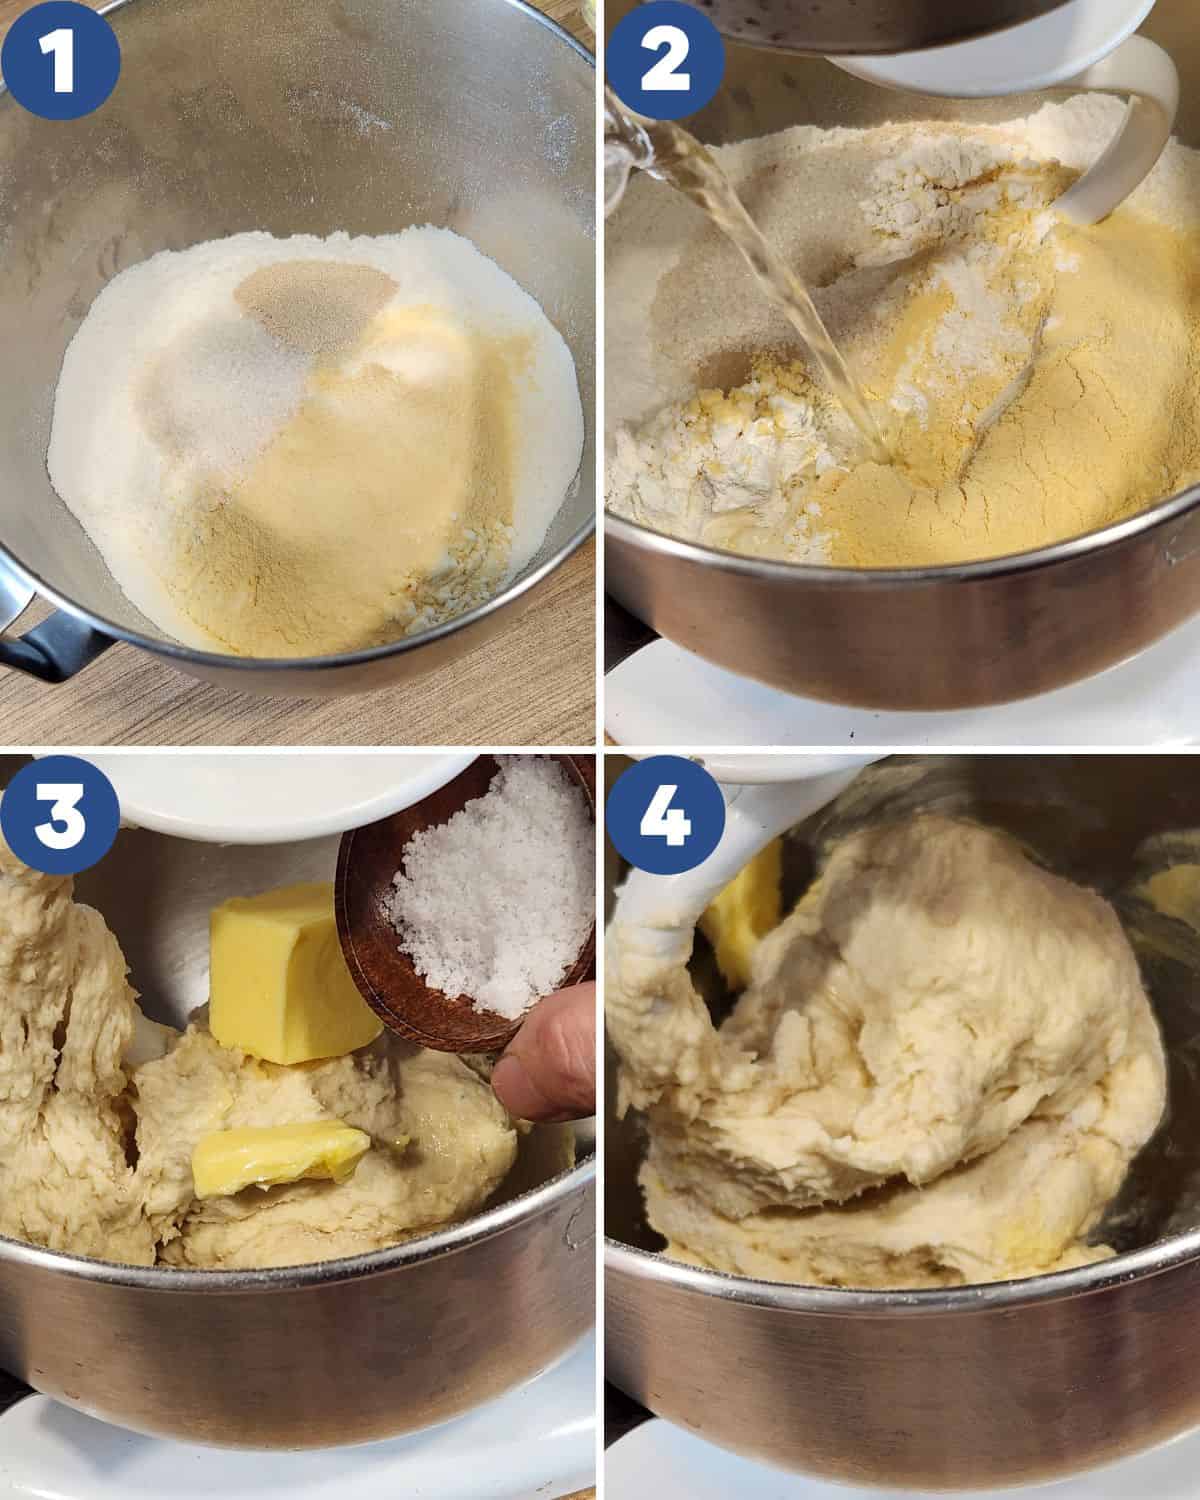
STEP 1. Mix the dough. In a mixing bowl, combine the sifted bread flour, cake flour, milk powder, sugar, and instant yeast (Image 1). Pour in the cold water and start mixing on low speed until the dry ingredients are fully moistened (Image 2).
Add the unsalted butter and salt (Images 3, 4), then continue mixing until the dough comes together and is no longer sticky.
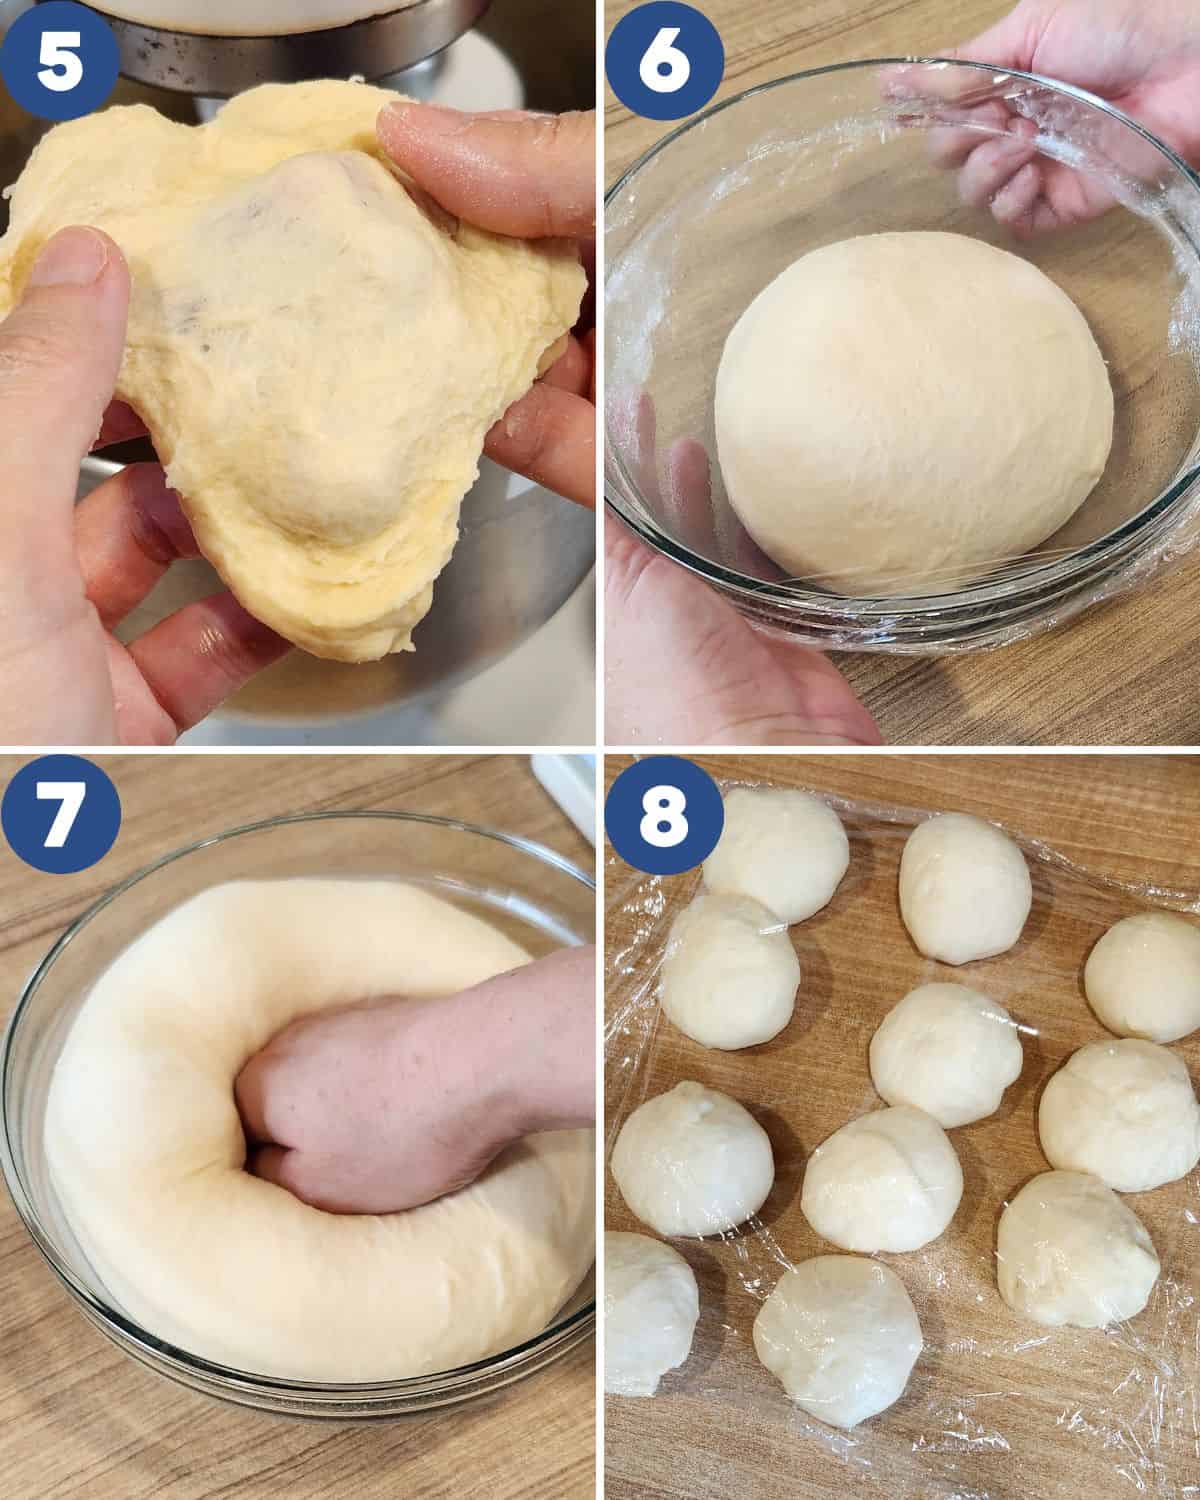
STEP 2. Knead and First Fermentation. Continue mixing until the dough becomes smooth and elastic and can be stretched thin without tearing (windowpane stage) (Image 5).
Transfer the dough to a lightly greased bowl, cover with cling wrap, and let it ferment for 30 minutes or until doubled in size (Image 6). Gently punch out the air (Image 7), then divide the dough into 10 equal portions. Cover and let the dough rest for 10 minutes (Image 8).
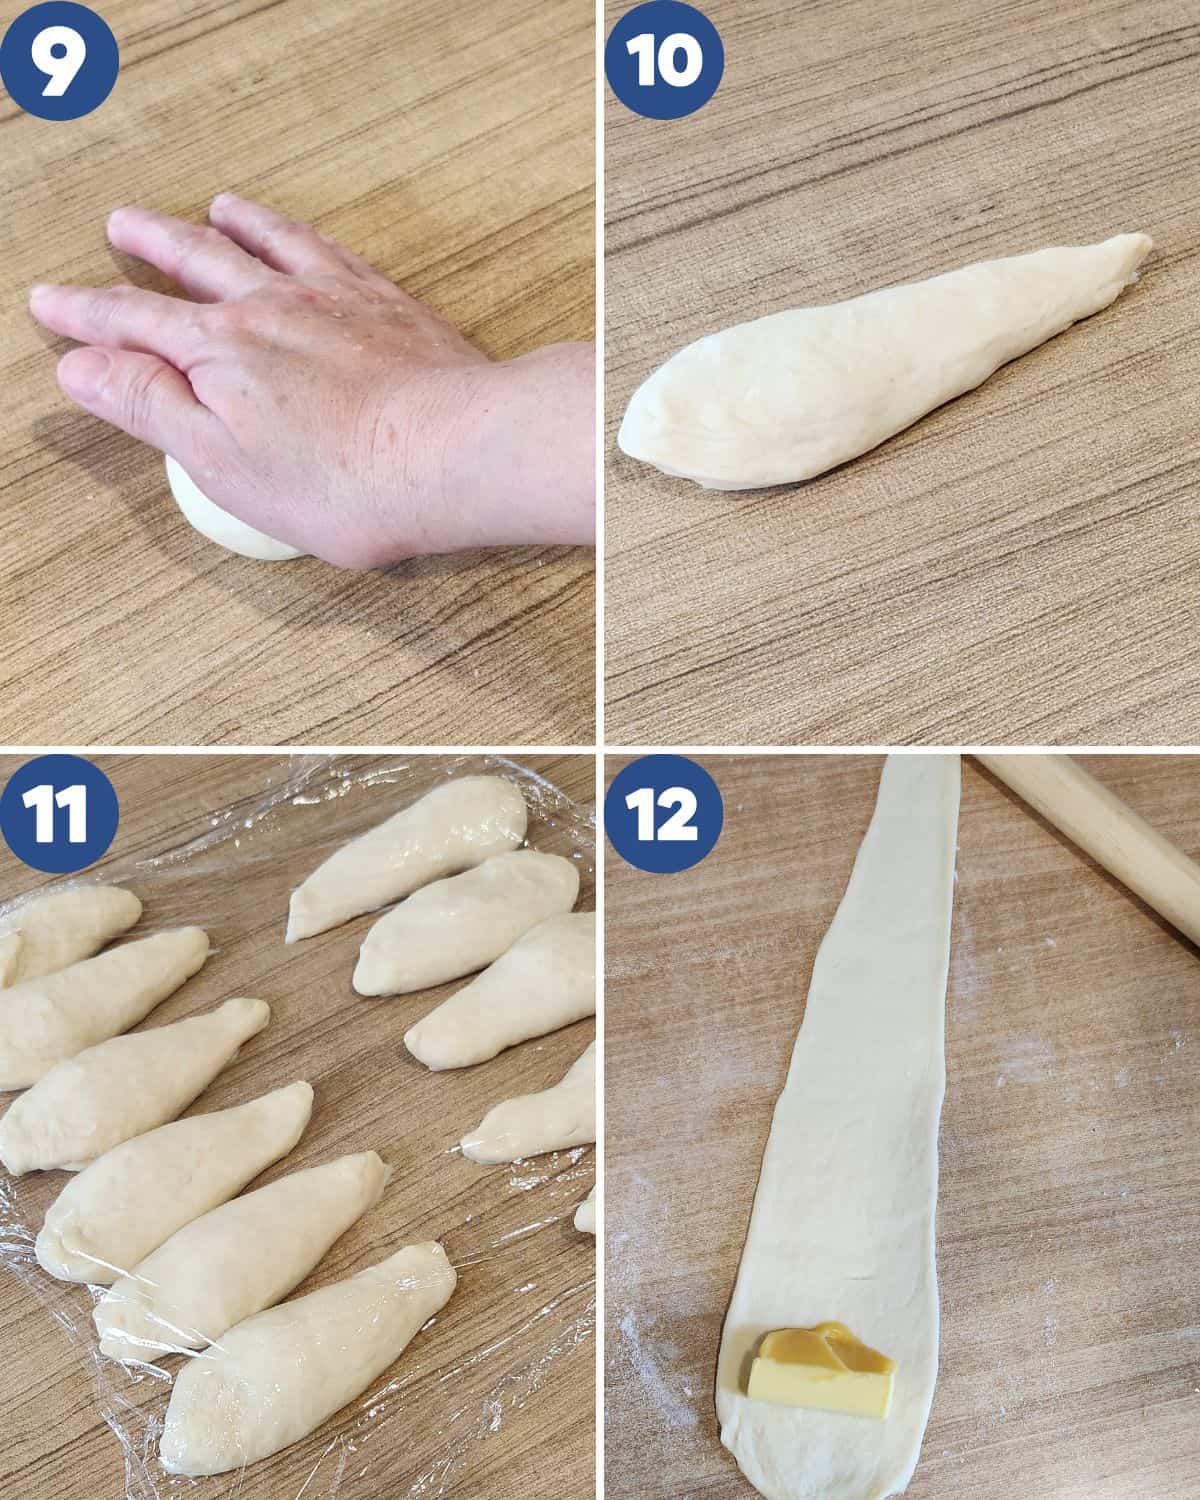
STEP 3. Shape the dough. Take one portion of dough and roll it into a teardrop shape (Images 9, 10). Repeat with the remaining dough and keep them covered to prevent drying (Image 11).
Roll each piece into a long strip, about 5 × 15 cm (adjustable depending on dough elasticity). Place a cold butter block on the wider end of the dough (Image 12).
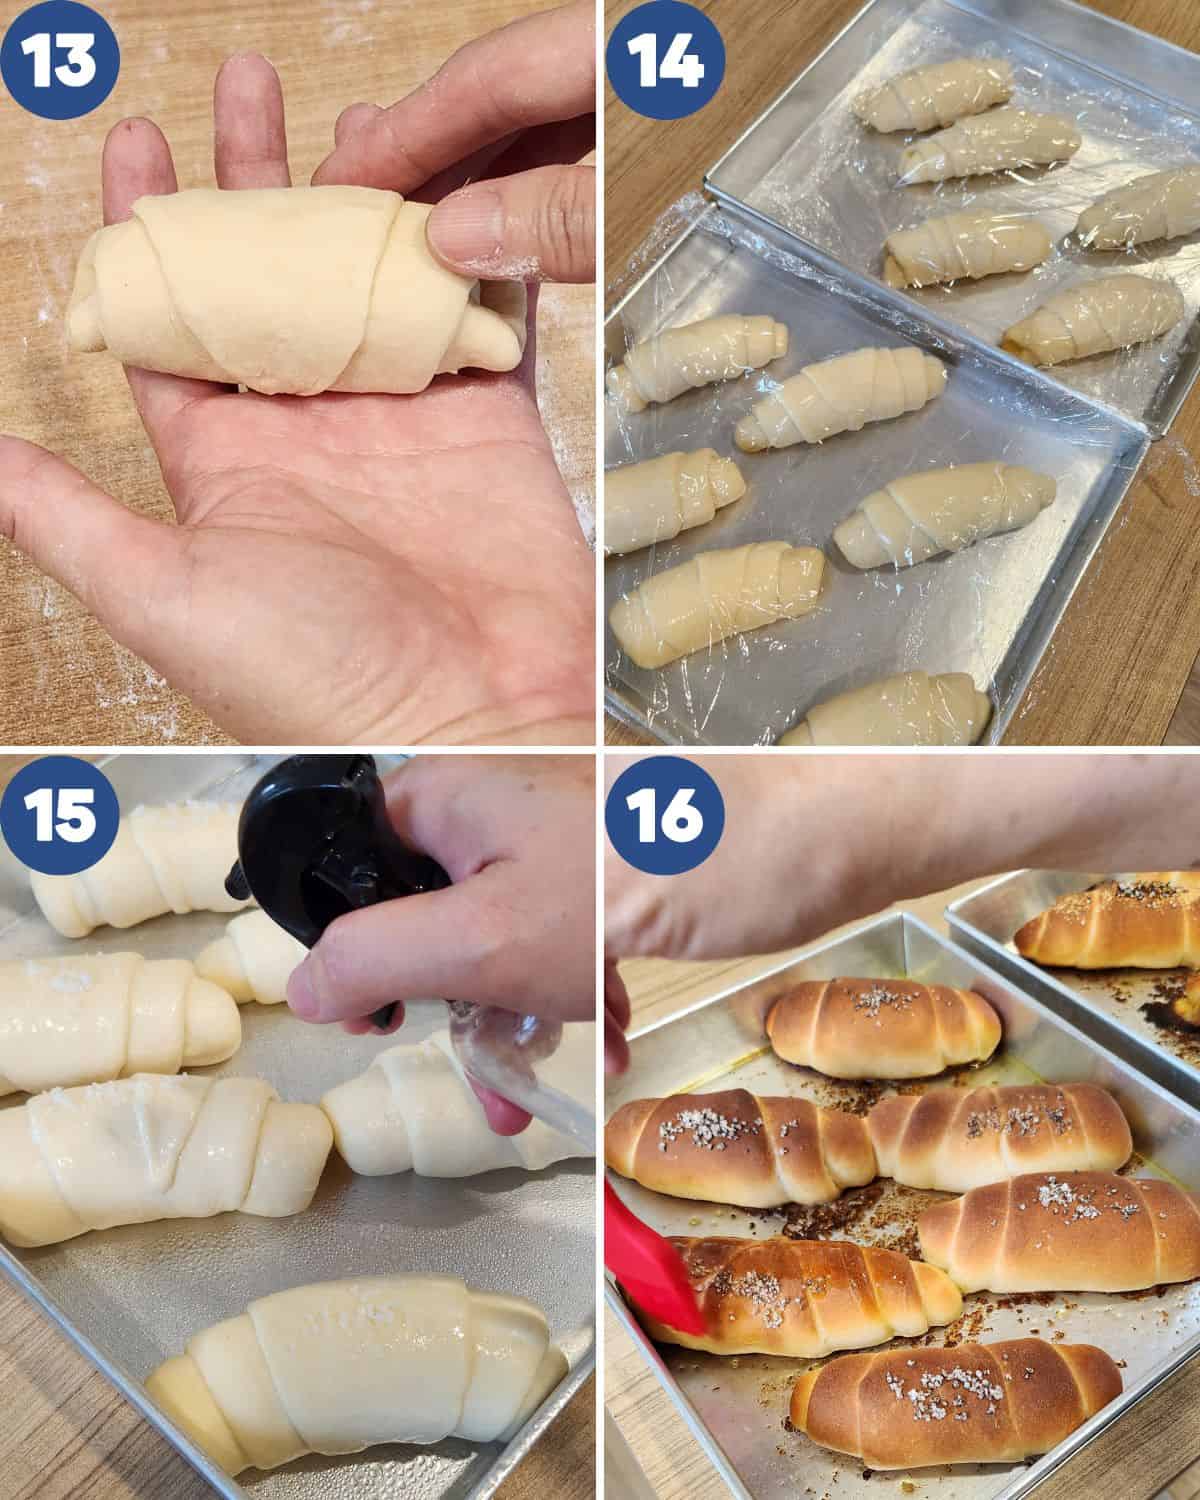
STEP 4: Final Shaping, Proofing, and Baking. Roll the dough tightly from the wide end toward the tip to form a croissant-like shape (Image 13). Place the shaped dough on a baking tray and cover loosely with cling wrap. Let it proof for 30–45 minutes, or until puffy and nearly doubled in size (Image 14).
Lightly spray the dough with water and sprinkle flaky salt on top (Image 15). Bake in a preheated 220°C (430°F) oven for 12–15 minutes, or until brown.
Remove from the oven and immediately brush with melted butter for a glossy finish (Image 16). Enjoy your freshly baked butter rolls while warm.
Pro Tips
- Keep the butter cold – Refrigerate the butter blocks until right before shaping. Cold butter melts slowly in the oven, creating the signature hollow crumb and rich buttery center.
- Add steam during baking – Toss a few ice cubes onto a hot tray or the bottom of the oven right after loading the bread. The steam helps keep the surface moist early on, allowing better oven spring and a lighter texture.
- Don’t overproof the dough – The shaped dough should look puffy but still slightly firm. Overproofing can cause the butter to leak out too quickly during baking.
- Seal the dough snugly around the butter – Roll the dough firmly so the butter is well enclosed. Loose rolling can lead to butter leakage and uneven layers.
- Use flaky salt, not fine salt – Flaky salt gives a pleasant crunch and balanced salinity without making the bread taste overly salty.
- Enjoy while warm – These crispy butter rolls are at their best fresh from the oven, when the crust is lightly crisp and the inside is soft and buttery.
Serving Suggestions
Salt bread is incredibly versatile and pairs beautifully with both sweet and savory flavors. Its lightly crisp crust and rich buttery interior make it easy to enjoy in many different ways.
For a sweet option, serve it warm with coconut kaya jam or slice it open and spread strawberry compote or custard filling inside for a soft, fragrant contrast. The gentle sweetness pairs especially well with the salty, buttery bread. If you enjoy sweet pairings like these, you can also explore this collection of Asian dessert recipes for more ideas to serve alongside.
If you prefer savory, try slicing the bread and filling it with garlic butter or crispy bacon. The salty richness of the bread complements savory fillings perfectly, making it just as satisfying as a light meal or snack.
To complete the experience, pair salt bread with a comforting drink such as Earl Grey milk tea, butterfly pea latte, or oolong milk tea. For something more refreshing, pineapple mint soda adds a bright, cooling contrast that balances the rich, buttery flavor of the bread. For a sweeter pairing, strawberry milk is especially lovely and brings out the buttery notes of the bread.
FAQs about Salt Bread
Salt bread is made from a simple yeast dough using flour, yeast, water, sugar, butter, and salt. A piece of cold butter is wrapped inside the dough before baking, which melts in the oven and creates a soft, airy crumb with a rich buttery flavor.
The hollow center forms when the cold butter inside the dough melts during baking. As the butter releases steam, it creates an airy pocket inside the bread while keeping the crumb light and fluffy.
Salt bread originated in Japan, where it is known as shio pan. It later became extremely popular in Korea as sogeum-ppang, with many bakeries adding creative fillings and variations.
Salt bread became popular because of its contrast in texture and flavor — a lightly crisp exterior, soft interior, and a balanced salty-buttery taste. Its simple appearance paired with a dramatic buttery crumb made it especially popular on social media.
Yes, salt bread works well with both sweet and savory fillings. Popular options include coconut kaya jam, strawberry compote, garlic butter, cheese, or bacon. You can also add the filling later after the bread is baked.
Yes, butter leaking out during baking is completely normal and is part of what makes salt bread so special. As the butter melts, it coats the bottom of the bread and helps create a lightly crunchy, buttery exterior while leaving the inside soft and airy.
Storage and Reheating
Salt bread is best enjoyed fresh, when the crust is lightly crunchy and the inside is soft and buttery. If you need to store leftovers, let the bread cool completely before placing it in an airtight container.
For short-term storage, keep salt bread at room temperature for up to 1 day. Avoid refrigerating unless necessary, as cold temperatures can dry out the bread.
To reheat, warm the bread in a toaster oven or regular oven at 160–170°C (320–340°F) for a few minutes until heated through and the exterior becomes lightly crisp again. An air fryer also works well for reheating.
Love baking soft Asian breads? You might also enjoy this collection of Asian bread recipes you can make at home.
More Asian Bakery Favorites
- Traditional Hong Kong Wife Cake
- Soft Japanese Milk Bun
- Classic Anpan Red Bean Bread
- Savory Korean Sausage Bread

Salt Bread (Shio Pan)
Ingredients
- 350 gr bread flour
- 100 gr cake flour
- 25 gr sugar
- 6 gr instant yeast
- 25 gr milk powder
- 9 gr salt
- 300 gr water cold
Filling
- 10 pcs butter salted butter cut in blocks
Instructions
- In a mixing bowl, combine the sifted bread flour, cake flour, milk powder, sugar, and instant yeast. Pour in the cold water and start mixing on low speed until the dry ingredients are fully moistened.
- Add the unsalted butter and salt, then continue mixing until the dough comes together and is no longer sticky.
- Continue mixing until the dough becomes smooth and elastic and can be stretched thin without tearing (windowpane stage).
- Transfer the dough to a lightly greased bowl, cover with cling wrap, and let it ferment for 30 minutes or until doubled in size. Gently punch out the air, then divide the dough into 10 equal portions. Cover and let the dough rest for 10 minutes.
- Take one portion of dough and roll it into a teardrop shape. Repeat with the remaining dough and keep them covered to prevent drying.
- Roll each piece into a long strip, about 5 × 15 cm (adjustable depending on dough elasticity). Place a cold butter block on the wider end of the dough.
- Roll the dough tightly from the wide end toward the tip to form a croissant-like shape. Place the shaped dough on a baking tray and cover loosely with cling wrap. Let it proof for 30–45 minutes, or until puffy and nearly doubled in size.
- Lightly spray the dough with water and sprinkle flaky salt on top. Bake in a preheated 220°C (430°F) oven for 12–15 minutes, or until golden brown.
- Remove from the oven and immediately brush with melted butter for a glossy finish. Enjoy your freshly baked salt bread while warm.
Notes
-
Keep the butter cold
Refrigerate the butter blocks until right before shaping. Cold butter melts slowly in the oven, creating the signature hollow crumb and rich buttery center. -
Add steam during baking
Toss a few ice cubes onto a hot tray or the bottom of the oven right after loading the bread. The steam helps keep the surface moist early on, allowing better oven spring and a lighter texture. - Don’t overproof the dough – The shaped dough should look puffy but still slightly firm. Overproofing can cause the butter to leak out too quickly during baking.
- Seal the dough snugly around the butter – Roll the dough firmly so the butter is well enclosed. Loose rolling can lead to butter leakage and uneven layers.
- Use flaky salt, not fine salt – Flaky salt gives a pleasant crunch and balanced salinity without making the bread taste overly salty.
- Enjoy while warm – Salt bread is at its best fresh from the oven, when the crust is lightly crisp and the inside is soft and buttery.


This salt bread is one of those bakes that disappears fast in my house — even my husband loves it. Enjoy it warm for the best buttery flavor!